RM37H0E
_58
Vehicle Interior
_095304
INTERIOR PANELS / TRIM
_0492113
REAR SUNSHADE ASSEMBLY(for Package Tray)
A
INTERIOR PANELS / TRIM REAR SUNSHADE ASSEMBLY(for Package Tray) REASSEMBLY
CAUTION / NOTICE / HINT
COMPONENTS (REASSEMBLY)
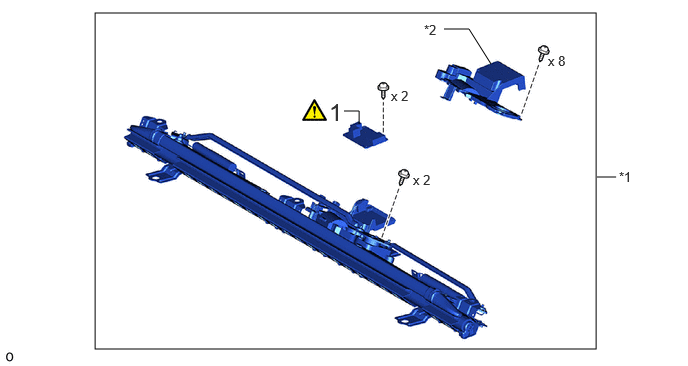
0.99,0.135 6.208,3.635
5.219,3.5
3.583,1.156 3.74,1.156
3.74,1.156 3.74,1.292
false
4.625,0.302 4.885,0.302
4.885,0.302 5.115,0.667
false
6.219,1.844 6.417,1.844
false
3.427,1.021 3.708,1.375
0.281,0.354
18
false
1
4.073,0.917 4.385,1.115
0.313,0.198
10
false
x 2
5.708,0.552 6.021,0.75
0.313,0.198
10
false
x 8
4.302,1.792 4.615,1.99
0.313,0.198
10
false
x 2
4.417,0.229 4.656,0.427
0.24,0.198
10
false
*2
6.448,1.76 6.688,1.958
0.24,0.198
10
false
*1
| Procedure | Part Name Code | 
|

|

|
|
|---|---|---|---|---|---|
| 1 | REAR SUNSHADE RELAY | 85911D | ( ) |
- | - |
| *1 | REAR WINDOW SHADE ASSEMBLY | *2 | COVER |
PROCEDURE

 85911D
1.INSTALL REAR SUNSHADE RELAY
|
|
|
- SST
- 09890-47010 (09891-04010, 09891-04020, 09891-04030, 09891-04040)
a.
5.469,3.542 5.469,3.052
true
1.531,2.156 1.729,2.323
0.198,0.167
10
true
*a
2.042,2.01 2.25,2.177
0.208,0.167
10
true
*b
5.396,3.583 5.594,3.771
0.198,0.188
10
true
*c
2.573,2.313 2.771,2.479
0.198,0.167
10
true
*a
3.052,3.083 3.25,3.25
0.198,0.167
10
true
*a
2.677,3.552 2.875,3.719
0.198,0.167
10
true
*a
1.51,3.542 1.708,3.708
0.198,0.167
10
true
*a
0.542,3.385 0.74,3.552
0.198,0.167
10
true
*a
0.552,2.219 0.75,2.385
0.198,0.167
10
true
*a
2.344,0.135 2.75,0.438
0.406,0.302
18
true
i, ii
0.125,2.083 0.385,2.438
0.26,0.354
18
true
iii
4.167,2.125 4.427,2.479
0.26,0.354
18
true
iv
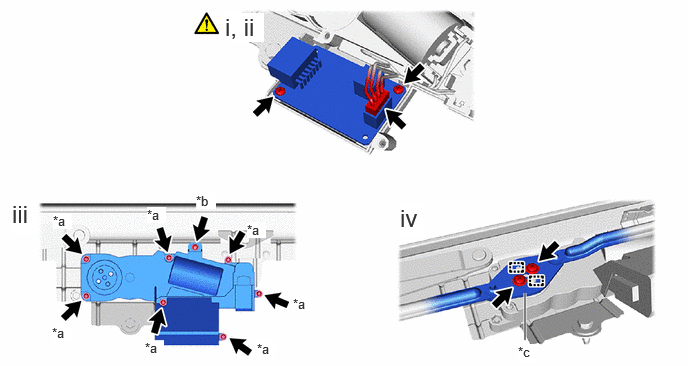
| *a | Screw A | *b | Screw B |
| *c | Link | - | - |
i.
Install the rear sunshade relay with the 2 screws.
ii.
Connect the connector.
iii.
Install the cover with the 7 screws A and screw B.
iv.
Attach the guide and connect the link with the 2 screws .