Home › HYBRID SYSTEM › P112 HYBRID BATTERY CONTROL › HYBRID BATTERY SYSTEM

DTC    P0A9C    Hybrid Battery Temperature Sensor "A"

DTC    P0A9D    Hybrid Battery Temperature Sensor "A" Circuit Low

DTC    P0A9E    Hybrid Battery Temperature Sensor "A" Circuit High

for Preparation Click here


DESCRIPTION

C118369E01
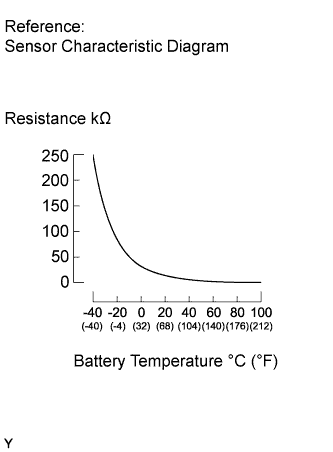
3 battery temperature sensors are located on the bottom of the HV battery assembly. The resistance of the thermistor, which is enclosed in each battery temperature sensor, changes in accordance with the changes in the temperature of the HV battery assembly. The lower the battery temperature, the higher the resistance of the thermistor. Conversely, the higher the temperature, the lower the resistance.
The battery ECU uses the battery temperature sensors to detect the temperature of the HV battery assembly. Based on the results of this detection, the battery ECU controls the battery blower. (Thus, the blower fan starts when the HV battery temperature rises to a predetermined level.)

DTC No.
DTC Detection Condition
Trouble Area
P0A9C
Battery temperature sensor malfunction
  1. HV battery assembly (HV battery temperature sensor)
  2. Battery ECU
P0A9D
Low resistance in battery temperature sensor
  1. HV battery assembly (HV battery temperature sensor)
  2. Battery ECU
P0A9E
High resistance in battery temperature sensor
  1. HV battery assembly (HV battery temperature sensor)
  2. Battery ECU

HINT:
After confirming DTC P0A9C, P0A9D and P0A9E, enter the following menus on the Techstream: Powertrain / HV Battery / Data List. Then, confirm the temperature of the HV battery by checking "Batt Temp 1 to 3".

Temperature Displayed
Malfunction
-45°C (-49°F) or less
Open or +B short circuit
95°C (203°F) or more
GND short circuit


MONITOR DESCRIPTION

If the temperature indicated by the battery temperature sensors is lower than the standard level (open), or is higher than the standard level (short), the battery ECU interprets this as a sensor malfunction. If the battery ECU detects that HV battery temperature is out of a normal range or its value is abnormal, it illuminates the MIL and sets a DTC.

MONITOR STRATEGY


Case 1: Battery temperature sensor malfunction 
Related DTCs
P0A9C
Related Sensor/Components (Main)
Battery temperature sensor
Related Sensor/Components (Related)
None
Frequency of Operation
Continuous
Duration
TOYOTA's intellectual property
MIL Operation
Immediate
Sequence of Operation
None

Case 2: Battery temperature sensor low resistance 
Related DTCs
P0A9D
Related Sensor/Components (Main)
Battery temperature sensor
Related Sensor/Components (Related)
None
Frequency of Operation
Continuous
Duration
TOYOTA's intellectual property
MIL Operation
Immediate
Sequence of Operation
None

Case 3: Battery temperature high resistance 
Related DTCs
P0A9E
Related Sensor/Components (Main)
Battery temperature sensor
Related Sensor/Components (Related)
None
Frequency of Operation
Continuous
Duration
TOYOTA's intellectual property
MIL Operation
Immediate
Sequence of Operation
None

TYPICAL ENABLING CONDITIONS


The monitor will run whenever the following DTCs are not present
TOYOTA's intellectual property
Other conditions belong to TOYOTA's intellectual property
-

TYPICAL MALFUNCTION THRESHOLDS


Case 1: Battery temperature sensor malfunction 
Temperature deviation among batteries
(Maximum temperature - minimum temperature)
Exceeds standard level

Case 2: Battery temperature sensor low resistance 
Resistance of battery temperature sensor
1.108 kΩ or less

Case 3: Battery temperature high resistance 
Resistance of battery temperature sensor
247.7 kΩ or more

COMPONENT OPERATING RANGE


Battery temperature sensor
9 to 11 kΩ (at 25°C (77°F))

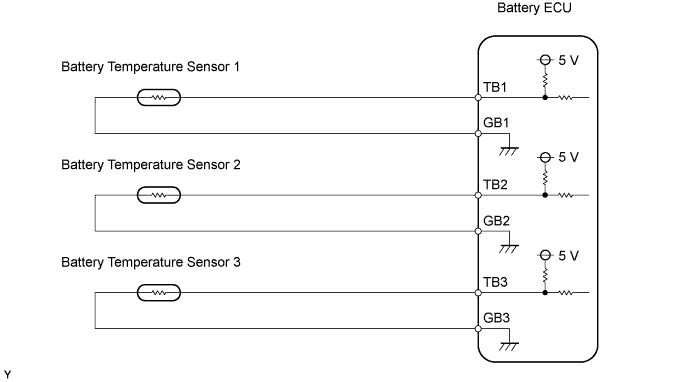
WIRING DIAGRAM


C118376E01


INSPECTION PROCEDURE

CAUTION:
  1. Before inspecting the high-voltage system, take safety precautions to prevent electrical shocks, such as wearing insulated gloves and removing the service plug grip. After removing the service plug grip, put it in your pocket to prevent other technicians from reconnecting it while you are servicing the high-voltage system.
  2. After disconnecting the service plug grip, wait for at least 5 minutes before touching any of the high-voltage connectors or terminals.

HINT:
At least 5 minutes are required to discharge the high-voltage condenser inside the inverter.

1.READ DTC OUTPUT (DTC P0A1F IS OUTPUT)
  1. Connect the Techstream to the DLC3.

  1. Turn the power switch ON (IG) and the tester ON.

  1. Enter the following menus: Powertrain / HV Battery / DTC.

  1. Read DTCs.

    Result:
    DTC P0A1F is output


YES
REPLACE BATTERY ECU
NO


2.CHECK CONNECTION OF BATTERY TEMPERATURE SENSOR CONNECTOR

CAUTION:
Wear insulated gloves before performing the following operation.

  1. Turn the power switch OFF.

  1. Remove the service plug grip (Click here).
    NOTICE:
    Turning the power switch ON (READY) with the service plug grip removed could cause a malfunction. Therefore, never turn the power switch ON (READY) in this state.


    A093174E01
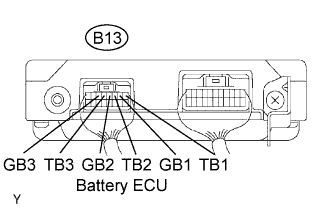
  1. Check the connection condition of the B13 battery ECU connector.

    OK:
    Connector has been connected securely and there is no poor connection.

    HINT:
    Since the battery temperature sensor is not available by itself, if replacement is required, replace the entire HV battery assembly.


NG
CONNECT SECURELY
OK

REPLACE HV SUPPLY BATTERY ASSEMBLY