 |
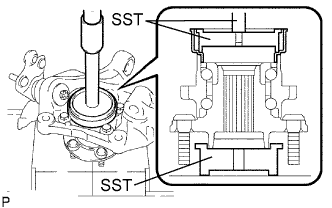
Using SST and a press, press in a new dust deflector.
- SST
- 09950-70010
(09951-07150)
09608-32010
09950-60020 (09951-00720)
- NOTICE:
- Align the dust deflector hole and the steering knuckle hole.
FRONT AXLE HUB > INSTALLATION |
| 1. INSTALL FRONT AXLE HUB SUB-ASSEMBLY LH |
Install the axle hub and dust cover with the 4 bolts.
| 2. INSTALL LOWER BALL JOINT ASSEMBLY |
Install the lower ball joint to the steering knuckle, and install the castle nut.
Install a new clip.
| 3. INSTALL FRONT NO. 1 WHEEL BEARING DUST DEFLECTOR LH |
|
Using SST and a press, press in a new dust deflector.
| 4. INSTALL FRONT AXLE ASSEMBLY LH |
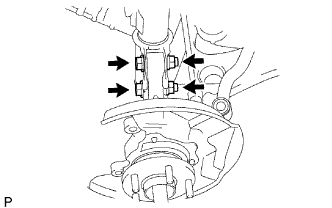 |
Install the front axle to the shock absorber, insert the 2 bolts from the front of the vehicle and tighten the 2 nuts.
Push the front axle outward from the vehicle to engage the spline of the drive shaft and insert it to the front axle.
| 5. CONNECT FRONT NO. 1 SUSPENSION ARM SUB-ASSEMBLY LOWER LH |
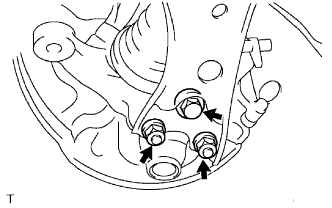 |
Push the No. 1 front suspension lower arm downward, install the front lower ball joint and tighten the bolt and 2 nuts.
| 6. CONNECT TIE ROD END SUB-ASSEMBLY LH |
Connect the tie rod end to the steering knuckle and install it with the castle nut.
Install a new clip.
| 7. INSTALL FRONT DISC |
| 8. INSTALL FRONT DISC BRAKE CALIPER ASSEMBLY LH |
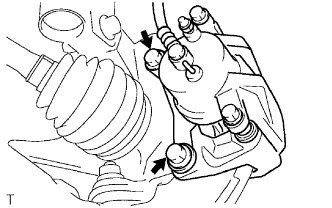 |
Install the disc brake caliper to the steering knuckle with the 2 bolts.
| 9. INSTALL FRONT AXLE SHAFT LH NUT |
Clean the threaded parts on the drive shaft and axle hub nut using a non-residue solvent.
Using a 30 mm socket wrench, install a new hub nut.
| 10. DISCONNECT FRONT DISC BRAKE CALIPER ASSEMBLY LH |
| 11. REMOVE FRONT DISC |
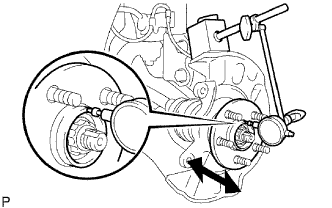
| 12. INSPECT FRONT AXLE HUB BEARING LOOSENESS |
 |
Remove the front wheel.
Remove the front disc brake caliper.
Remove the front disc.
Using a dial indicator, check for looseness at the center of the axle hub.
| 13. INSPECT FRONT AXLE HUB BEARING RUNOUT |
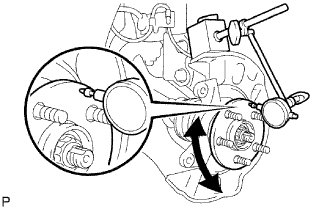 |
Using a dial indicator, check for runout of the axle hub.
Install the front disc.
Install the front disc brake caliper.
Install the front wheel.
| 14. INSTALL FRONT DISC |
Align matchmarks on the disc and the axle hub. Install the front disc.
| 15. INSTALL FRONT DISC BRAKE CALIPER ASSEMBLY LH |
| 16. INSTALL FRONT SPEED SENSOR LH |
Clean the connecting portion of the sensor.
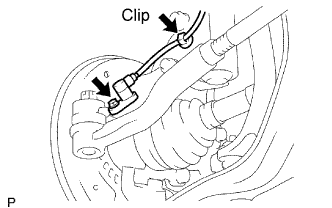 |
Install the sensor with the bolt.
Install the clip to the front shock absorber.
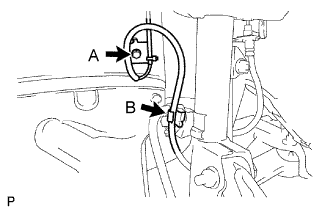 |
Install the sensor clamps to the body and front shock absorber with the bolts A and B.
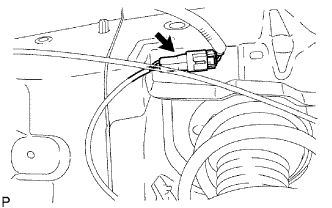 |
Connect the sensor connector.
| 17. INSTALL FRONT AXLE HUB NUT LH |
Using a chisel and hammer, stake the hub nut.
| 18. INSTALL FRONT WHEEL |
| 19. INSPECT AND ADJUST FRONT WHEEL ALIGNMENT |
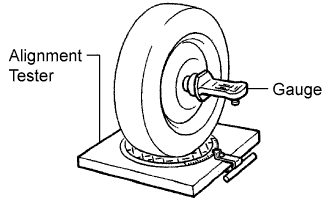 |
Put the front wheel on the center of the alignment tester.
Remove the center ornament.
Install the camber-caster-steering axis inclination gauge at the center of the axle hub or drive shaft.
Inspect the camber, caster and steering axis inclination.
| Item | Specified Condition |
| Camber Right-left error | -0° 35' +-45' (-0.58° +-0.75°) 45' (0.75°) or less |
| Caster Right-left error | 3° 10' +-45' (3.17° +-0.75°) 45' (0.75°) or less |
| Steering axis inclination Right-left error | 12° 35' +-45' (12.58° +-0.75°) 45' (0.75°) or less |
Remove the camber-caster-steering axis inclination gauge and attachment.
Install the center ornament.
If the caster and steering axis inclination are not within the specified values after the camber has been correctly adjusted, recheck the suspension parts for damage and/or wear.
| 20. CHECK ABS SPEED SENSOR SIGNAL |
Check the speed sensor signal (Click here).