HEADLIGHT DIMMER SWITCH > INSTALLATION |
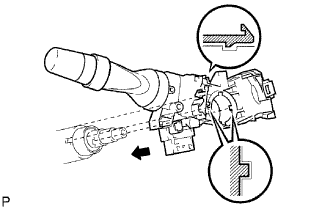
| 1. INSTALL HEADLIGHT DIMMER SWITCH ASSEMBLY |
|
Insert the headlight dimmer switch assembly so that its recessed portion matches that of the steering column shaft.
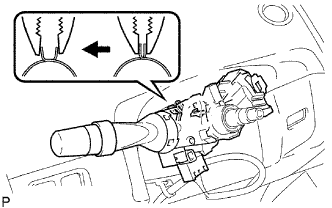 |
Install the headlight dimmer switch with the band clamp and claw.
Connect the connectors.
| 2. INSTALL WIPER AND WASHER SWITCH ASSEMBLY |
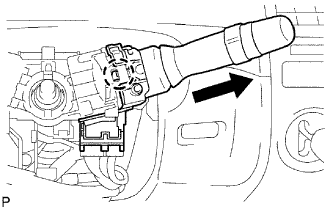 |
Disconnect the connector.
Push and disengage the claw shown in the illustration and remove the windshield wiper switch.
| 3. INSTALL SPIRAL CABLE SUB-ASSEMBLY |
Check that the front wheels are facing straight ahead.
Set the turn signal switch to the neutral position.
Install the spiral cable.
Connect the connector to the spiral cable.
| 4. INSTALL STEERING COLUMN COVER |
Engage the 4 claws to install the steering column upper cover and steering column lower cover.
| 5. ADJUST SPIRAL CABLE SUB-ASSEMBLY |
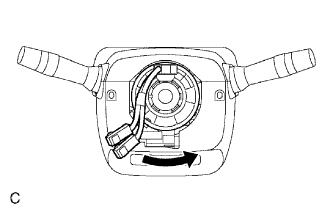 |
Slowly rotate the spiral cable counterclockwise by hand until it feels firm.
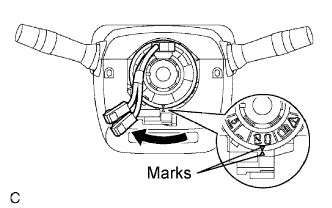 |
Rotate the spiral cable clockwise approximately 2.5 turns to align the marks.
| 6. INSPECT STEERING WHEEL CENTER POINT |
| 7. INSTALL STEERING WHEEL ASSEMBLY |
Align the matchmarks on the steering wheel and steering main shaft.
Install the steering wheel with the set nut.
| 8. INSTALL STEERING PAD ASSEMBLY |
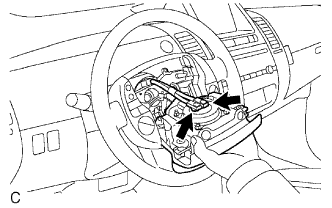 |
Support the steering pad with one hand as shown in the illustration.
Connect the 2 airbag connectors.
Connect the horn connector.
Install the steering pad after confirming that the circumference grooves of the screws are caught on the screw case.
Using a T30 "TORX" socket, install the 2 screws.
| 9. INSTALL NO. 3 STEERING WHEEL COVER LOWER |
| 10. INSTALL NO. 2 STEERING WHEEL COVER LOWER |
| 11. CONNECT CABLE TO NEGATIVE BATTERY TERMINAL |
| 12. INSPECT STEERING PAD ASSEMBLY |
Check for cuts, cracks or discoloration on the steering pad outer surface and in the grooved portion.
Check that the horn sounds.
| 13. CHECK SRS WARNING LIGHT |
Check the SRS warning light (Click here).
| 14. PERFORM INITIALIZATION |
Perform initialization (Click here).