HYBRID / BATTERY CONTROL HYBRID CONTROL SYSTEM P0A3F-243 Drive Motor "A" Position Sensor Circuit P0A40-500 Drive Motor "A" Position Sensor Circuit Range / Performance P0A41-245 Drive Motor "A" Position Sensor Circuit Low
DESCRIPTION
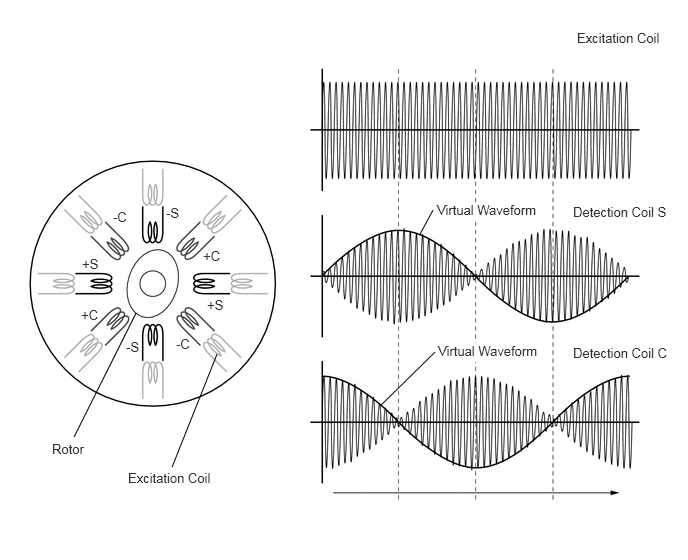
A resolver is a sensor that is used to detect the position of the magnetic poles the rotor of a motor generator. Knowing the position of the poles is indispensable for ensuring precise control of MG2 and MG1.
Each resolver contains a stator that has an excitation coil and 2 detection coils (S, C). The gap between the stator and rotor changes as the rotor turns because the rotor is oval shaped. An alternating current with a predetermined frequency flows through the excitation coil, and detection coils S and C output alternating currents in accordance with the sensor rotor position.
The MG ECU located in the inverter with converter assembly detects the absolute position of the rotor according to the phases of detection coils S and C and the heights of their waveforms. Furthermore, the CPU calculates the amount of change in the position within a predetermined length of time, in order to use the resolver as a speed sensor.
The MG ECU monitors signals output from the motor resolver and detects malfunctions.
- HINT:
-
The term "drive motor A" indicates MG2.
| DTC No. | INF Code | DTC Detection Condition | Trouble Area |
|---|---|---|---|
| P0A3F | 243 | Interphase short in the motor resolver circuit | ·
Inverter with converter assembly ·
Hybrid vehicle transaxle assembly ·
Wire harness or connector |
| P0A40 | 500 | Motor resolver output is out of the normal range | |
| P0A41 | 245 | Open or short in the motor resolver circuit |
WIRING DIAGRAM
Refer to the wiring diagram for DTC P1CAC-200 (See page Engine / Hybrid System>HYBRID / BATTERY CONTROL>HYBRID CONTROL SYSTEM>P1CAC-200).
CAUTION / NOTICE / HINT
- CAUTION:
- ·
Before inspecting the high-voltage system or disconnecting the low voltage connector of the inverter with converter assembly, take safety precautions such as wearing insulated gloves and removing the service plug grip to prevent electrical shocks. After removing the service plug grip, put it in your pocket to prevent other technicians from accidentally reconnecting it while you are working on the high-voltage system.
·After removing the service plug grip, wait for at least 10 minutes before touching any of the high-voltage connectors or terminals. After waiting for 10 minutes, check the voltage at the terminals in the inspection point in the inverter with converter assembly. The voltage should be 0 V before beginning work (See page Engine / Hybrid System>HYBRID / BATTERY CONTROL>HYBRID CONTROL SYSTEM>PRECAUTION).
- HINT:
-
Waiting for at least 10 minutes is required to discharge the high-voltage capacitor inside the inverter with converter assembly.
- NOTICE:
-
After turning the power switch off, waiting time may be required before disconnecting the cable from the negative (-) auxiliary battery terminal. Therefore, make sure to read the disconnecting the cable from the negative (-) auxiliary battery terminal notices before proceeding with work (See page General>INTRODUCTION>REPAIR INSTRUCTION>PRECAUTION).
- HINT:
- ·
If the problem symptom cannot be reproduced, performing a road test on a road on which the vehicle tends to vibrate will make it easier to reproduce the symptom.
·If the resolver is malfunctioning, the vehicle may not drive smoothly.
·After the repair, clear the DTCs and perform the following procedure to check that DTCs are not output.
(a)Turn the power switch on (IG) and wait for 5 seconds or more.
(b)Turn the power switch on (READY) with the shift lever in P and wait for 5 seconds or more.
(c)Depress the accelerator pedal of the vehicle with the engine stopped and the shift lever in P to start the engine.
(d)Keep the engine running for 5 seconds or more.
(e)Drive the vehicle forward with the shift lever in D for 5 m or more.
(f)Drive the vehicle backward with the shift lever in R for 5 m or more.
PROCEDURE
OK
NG
OK
NG
OK
NG
OK
NG
OK
NG
OK
NG
OK
NG
OK
NG
Connect the intelligent tester to the DLC3.
Turn the power switch on (IG) and wait for 5 seconds or more.
Turn the power switch on (READY) with the shift lever in P and wait for 5 seconds or more.
Depress the accelerator pedal of the vehicle with the engine stopped and the shift lever in P to start the engine.
Keep the engine running for 5 seconds or more.
Drive the vehicle forward with the shift lever in D for 5 m or more.
Drive the vehicle backward with the shift lever in R for 5 m or more.
Enter the following menus: Powertrain / Hybrid Control / DTC.
Check if DTCs are output.
- Result:
Result Proceed to P0A3F-243, P0A40-500 or P0A41-245 is output. A P0A3F-243, P0A40-500 and P0A41-245 is not output. B
- HINT:
-
If the connector engagement check and cleaning caused the condition to return to normal, DTCs will not be output.
Turn the power switch off.
A
B
OK
NG
OK
NG
OK
NG
OK
NG