HYBRID / BATTERY CONTROL HYBRID CONTROL SYSTEM P0705-757 Transmission Range Sensor Circuit
DESCRIPTION
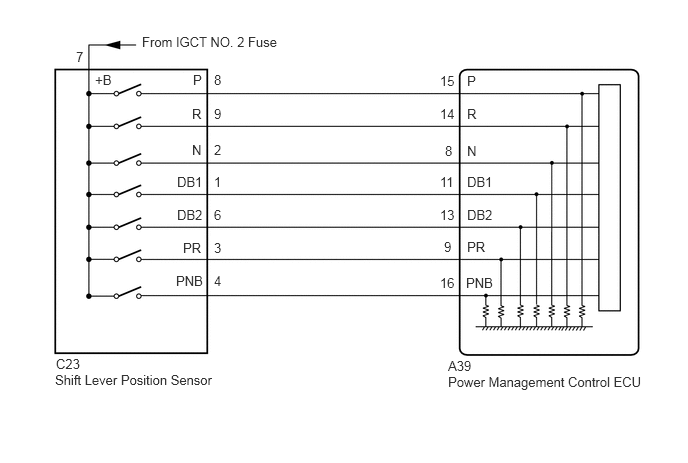
The shift lever position sensor can send 7 different switch signals to the power management control ECU. The power management control ECU uses the signals to detect the shift lever position (P, R, N, D, or B). The power management control ECU also uses this information to determine intended direction of travel (forward or reverse).
| DTC No. | INF Code | DTC Detection Condition | Trouble Area |
|---|---|---|---|
| P0705 | 757 | Logical inconsistency in shift sensor output values | ·
Wire harness or connector ·
Shift lever position sensor ·
Power management control ECU |
WIRING DIAGRAM
CAUTION / NOTICE / HINT
- HINT:
-
After the repair, clear the DTCs and perform the following procedure to check that DTCs are not output.
- 1.
Turn the power switch on (IG).
2.Slowly move the shift lever from P to B then back to P.
PROCEDURE
Connect the intelligent tester to the DLC3.
Turn the power switch on (IG).
Enter the following menus: Powertrain / Hybrid Control / Data List / Shift Sensor SW - P, Shift Sensor SW - R, Shift Sensor SW - N, Shift Sensor SW - DB1, Shift Sensor SW - DB2, Shift Sensor SW - PR, Shift Sensor SW - PNB.
While slowly moving the shift lever from P to B, then back to P, read the Data List (shift position) displayed on the intelligent tester.
- HINT:
-
Be sure to move the shift lever slowly.
- Result:
ECU Data List Shift Position P R N D B Shift Sensor SW-P ON OFF OFF OFF OFF Shift Sensor SW-R OFF ON OFF OFF OFF Shift Sensor SW-PR ON ON OFF OFF OFF Shift Sensor SW-N OFF OFF ON OFF OFF Shift Sensor SW-DB1 OFF OFF OFF ON ON Shift Sensor SW-DB2 OFF OFF OFF ON ON Shift Sensor SW-PNB ON OFF ON OFF ON
Enter the following menus: Powertrain / Hybrid Control / DTC.
Check if DTCs are output.
- OK:
DTC P0705-757 is not output.
Turn the power switch off.
OK
NG
OK
NG
Turn the power switch on (IG).
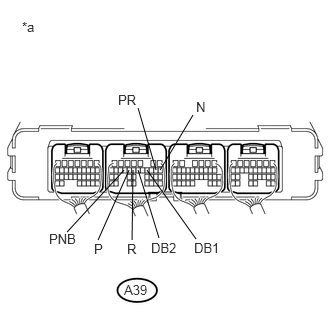
Measure the voltage according to the value(s) in the table below.
- Standard Voltage:
Tester Connection Condition Specified Condition A39-15 (P) - Body ground Power switch on (IG)
Shift lever in P7.5 to 14 V A39-15 (P) - Body ground Power switch on (IG)
Any position except shift lever in P0 to 1.5 V A39-14 (R) - Body ground Power switch on (IG)
Shift lever in R7.5 to 14 V A39-14 (R) - Body ground Power switch on (IG)
Any position except shift lever in R0 to 1.5 V A39-9 (PR) - Body ground Power switch on (IG)
Shift lever in P or R7.5 to 14 V A39-9 (PR) - Body ground Power switch on (IG)
Any position except shift lever in P and R0 to 1.5 V A39-8 (N) - Body ground Power switch on (IG)
Shift lever in N7.5 to 14 V A39-8 (N) - Body ground Power switch on (IG)
Any position except shift lever in N0 to 1.5 V A39-11 (DB1) - Body ground Power switch on (IG)
Shift lever in D or B7.5 to 14 V A39-11 (DB1) - Body ground Power switch on (IG)
Any position except shift lever in D and B0 to 1.5 V A39-13 (DB2) - Body ground Power switch on (IG)
Shift lever in D or B7.5 to 14 V A39-13 (DB2) - Body ground Power switch on (IG)
Any position except shift lever in D and B0 to 1.5 V A39-16 (PNB) - Body ground Power switch on (IG)
Shift lever in P, N or B7.5 to 14 V A39-16 (PNB) - Body ground Power switch on (IG)
Any position except shift lever in P, N and B0 to 1.5 V
| *a | Component with harness connected
(Power Management Control ECU) |
Turn the power switch off.
OK
NG
Disconnect the shift lever position sensor connector.
Turn the power switch on (IG).
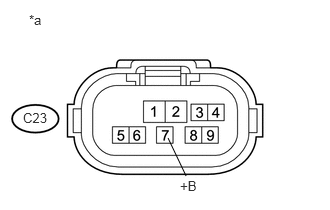
Measure the voltage according to the value(s) in the table below.
- Standard Voltage:
Tester Connection Switch Condition Specified Condition C23-7 (+B) - Body ground Power switch on (IG) 7.5 to 14 V
| *a | Front view of wire harness connector
(to Shift Lever Position Sensor) |
- NOTICE:
-
Turning the power switch on (IG) with the shift lever position sensor connector disconnected causes other DTCs to be stored. Clear the DTCs after performing this inspection.
Turn the power switch off.
Connect the shift lever position sensor connector.
OK
NG
Disconnect the shift lever position sensor connector.
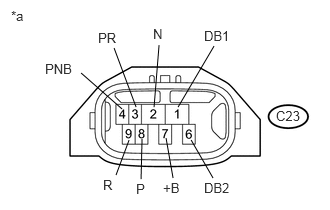
Measure the resistance according to the value(s) in the table below.
- Standard Resistance:
Tester Connection Condition Specified Condition C23-7 (+B) - C23-3 (PR) Shift lever in P Below 1 Ω C23-7 (+B) - C23-4 (PNB) Below 1 Ω C23-7 (+B) - C23-8 (P) Below 1 Ω C23-7 (+B) - C23-1 (DB1), C23-2 (N), C23-6 (DB2) and C23-9 (R) 10 kΩ or higher C23-7 (+B) - C23-3 (PR) Shift lever in R Below 1 Ω C23-7 (+B) - C23-9 (R) Below 1 Ω C23-7 (+B) - C23-1 (DB1), C23-2 (N), C23-4 (PNB), C23-6 (DB2) and C23-8 (P) 10 kΩ or higher C23-7 (+B) - C23-2 (N) Shift lever in N Below 1 Ω C23-7 (+B) - C23-4 (PNB) Below 1 Ω C23-7 (+B) - C23-1 (DB1), C23-3 (PR), C23-6 (DB2), C23-8 (P) and C23-9 (R) 10 kΩ or higher C23-7 (+B) - C23-1 (DB1) Shift lever in D Below 1 Ω C23-7 (+B) - C23-6 (DB2) Below 1 Ω C23-7 (+B) - C23-2 (N), C23-3 (PR), C23-4 (PNB), C23-8 (P) and C23-9 (R) 10 kΩ or higher C23-7 (+B) - C23-1 (DB1) Shift lever in B Below 1 Ω C23-7 (+B) - C23-4 (PNB) Below 1 Ω C23-7 (+B) - C23-6 (DB2) Below 1 Ω C23-7 (+B) - C23-2 (N), C23-3 (PR), C23-8 (P) and C23-9 (R) 10 kΩ or higher
| *a | Component without harness connected
(Shift Lever Position Sensor) |
- HINT:
-
Terminal No. 5 on the component side connector is empty.
Connect the shift lever position sensor connector.
OK
NG