HYBRID / BATTERY CONTROL HYBRID BATTERY SYSTEM U029A-123 Lost Communication with Hybrid Battery Pack Sensor Module
DESCRIPTION
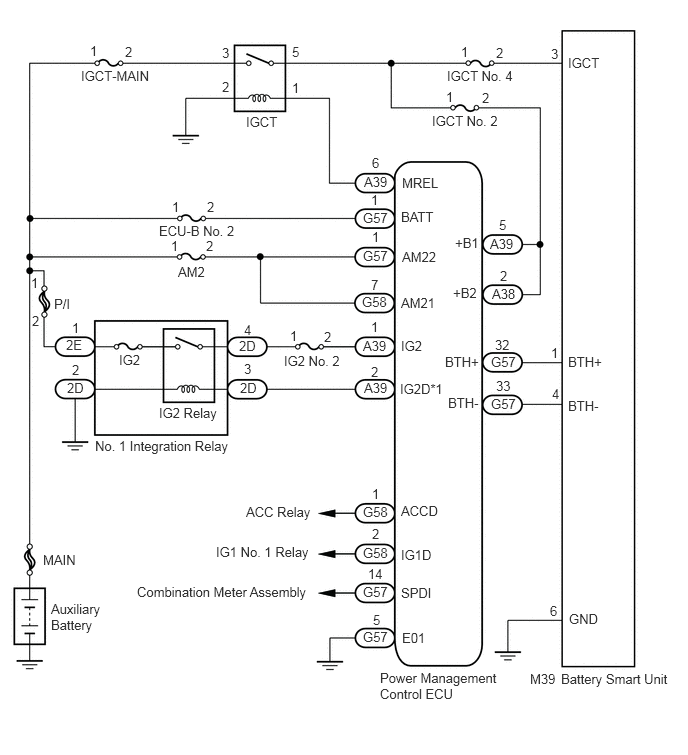
The battery smart unit detects the HV battery conditions (voltage, current, and temperature) and battery cooling fan voltage, and sends the detected signals to the power management control ECU via serial communication.
| DTC No. | INF Code | DTC Detection Condition | Trouble Area |
|---|---|---|---|
| U029A | 123 | Problem in serial communication between the battery smart unit and power management control ECU (1 trip detection) | ·
Wire harness or connector ·
Power management control ECU ·
Battery smart unit |
WIRING DIAGRAM
CAUTION / NOTICE / HINT
- CAUTION:
- ·
Before inspecting the high-voltage system, take safety precautions to prevent electrical shocks, such as wearing insulated gloves and removing the service plug grip. After removing the service plug grip, put it in your pocket to prevent other technicians from accidentally reconnecting it while you are working on the high-voltage system.
·After removing the service plug grip, wait for at least 10 minutes before touching any of the high-voltage connectors or terminals. After waiting for 10 minutes, check the voltage at the terminals in the inspection point in the inverter with converter assembly. The voltage should be 0 V before beginning work (See page Engine / Hybrid System>HYBRID / BATTERY CONTROL>HYBRID BATTERY SYSTEM>PRECAUTION).
- HINT:
-
At least 10 minutes is required to discharge the high-voltage capacitor inside the inverter with converter assembly.
- NOTICE:
-
After turning the power switch off, waiting time may be required before disconnecting the cable from the negative (-) auxiliary battery terminal. Therefore, make sure to read the disconnecting the cable from the negative (-) auxiliary battery terminal notices before proceeding with work (See page General>INTRODUCTION>REPAIR INSTRUCTION>PRECAUTION).
PROCEDURE
Connect the intelligent tester to the DLC3.
Turn the power switch on (IG).
Enter the following menus: Powertrain / Hybrid Control / DTC.
Check for DTCs (See page Engine / Hybrid System>HYBRID / BATTERY CONTROL>HYBRID BATTERY SYSTEM>DTC CHECK / CLEAR).
- Result:
Result Proceed to Only U029A-123 is output. A DTCs other than U029A-123 are also output. B
Turn the power switch off.
Disconnect the intelligent tester from the DLC3.
A
B
(See pageEngine / Hybrid System>HYBRID / BATTERY CONTROL>HYBRID BATTERY SYSTEM>DIAGNOSTIC TROUBLE CODE CHART)
- CAUTION:
-
Be sure to wear insulated gloves.
Check that the service plug grip is not installed.
- NOTICE:
-
After removing the service plug grip, do not turn the power switch on (READY), unless instructed by the repair manual because this may cause a malfunction.
Remove the No. 1 hybrid battery exhaust duct (See page Engine / Hybrid System>HYBRID / BATTERY CONTROL>BATTERY SMART UNIT>REMOVAL).
Connect the cable to the negative (-) auxiliary battery terminal.
Turn the power switch on (IG).
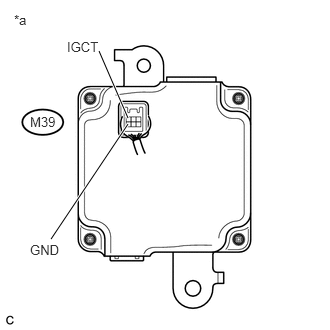
Measure the voltage according to the value(s) in the table below.
- Standard Voltage:
Tester Connection Switch Condition Specified Condition M39-3 (IGCT) - M39-6 (GND) Power switch on (IG) 11 to 14 V
| *a | Component with harness connected
(Battery Smart Unit) |
- NOTICE:
-
Turning the power switch on (IG) with the service plug grip removed causes other DTCs to be stored. Clear the DTCs after performing this inspection.
- HINT:
-
As there might be an intermittent malfunction in the battery smart unit power source circuit, inspect the following even if the measured voltage is as specified:
Installation condition of fuse(s) (before removing fuse(s)) (IGCT circuit)
Fuse condition (before and after removing fuse(s)) (IGCT circuit)
Connection condition of connectors (IGCT circuit)
Wire harness condition (IGCT circuit)
Wire harness condition (GND circuit)
Turn the power switch off.
Disconnect the cable from the negative (-) auxiliary battery terminal.
Install the No. 1 hybrid battery exhaust duct.
OK
NG
- CAUTION:
-
Be sure to wear insulated gloves.
Check that the service plug grip is not installed.
- NOTICE:
-
After removing the service plug grip, do not turn the power switch on (READY), unless instructed by the repair manual because this may cause a malfunction.
Disconnect connector G57 from the power management control ECU (See page Power Source / Network>POWER DISTRIBUTION>POWER MANAGEMENT CONTROL ECU>REMOVAL).
Remove the No. 1 hybrid battery exhaust duct (See page Engine / Hybrid System>HYBRID / BATTERY CONTROL>BATTERY SMART UNIT>REMOVAL).
Disconnect connector M39 from the battery smart unit.
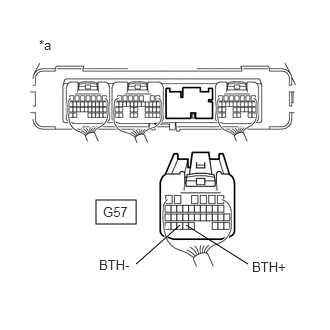
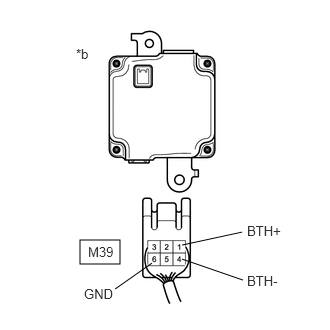
Measure the resistance according to the value(s) in the table below.
- Standard Resistance:
Tester Connection Switch Condition Specified Condition G57-32 (BTH+) - M39-1 (BTH+) Power switch off Below 1 Ω G57-33 (BTH-) - M39-4 (BTH-) Power switch off Below 1 Ω M39-1 (BTH+) - M39-6 (GND) and Body ground Power switch off 10 kΩ or higher M39-4 (BTH-) - M39-6 (GND) and Body ground Power switch off 10 kΩ or higher
| *a | Rear view of wire harness connector
(to Power Management Control ECU) |
| *b | Rear view of wire harness connector
(to Battery Smart Unit) |
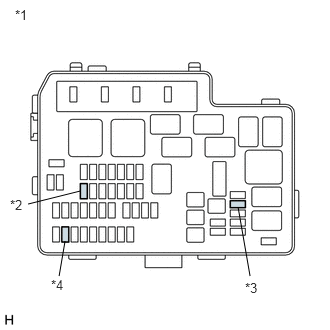
Remove the IG2 No. 2 fuse, IGCT No. 2 fuse, AM2 fuse from the No. 2 engine room relay block and No. 2 junction block assembly.
| *1 | No. 2 Engine Room Relay Block and No. 2 Junction Block Assembly |
| *2 | IG2 No. 2 fuse |
| *3 | IGCT No. 2 fuse |
| *4 | AM2 fuse |
Disconnect all connectors from the power management control ECU.
Measure the resistance according to the value(s) in the table below.
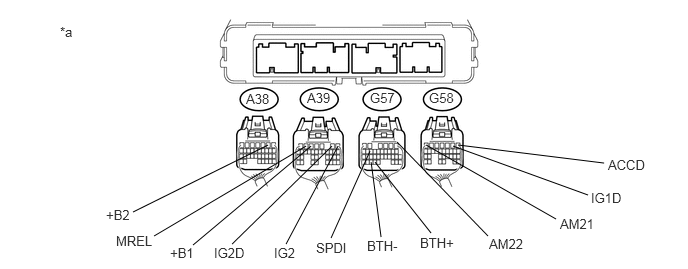
- Standard Resistance:
Tester Connection Switch Condition Specified Condition G57-32 (BTH+) - G58-7 (AM21) Power switch off 10 kΩ or higher G57-32 (BTH+) - G57-1 (AM22) Power switch off 10 kΩ or higher G57-32 (BTH+) - A38-2 (+B2) Power switch off 10 kΩ or higher G57-32 (BTH+) - A39-5 (+B1) Power switch off 10 kΩ or higher G57-32 (BTH+) - A39-6 (MREL) Power switch off 10 kΩ or higher G57-32 (BTH+) - A39-1 (IG2) Power switch off 10 kΩ or higher G57-32 (BTH+) - G58-1 (ACCD) Power switch off 10 kΩ or higher G57-32 (BTH+) G58-2 (IG1D) Power switch off 10 kΩ or higher G57-32 (BTH+) - A39-2 (IG2D) Power switch off 10 kΩ or higher G57-32 (BTH+) - G57-14 (SPDI) Power switch off 10 kΩ or higher G57-33 (BTH-) - G58-7 (AM21) Power switch off 10 kΩ or higher G57-33 (BTH-) - G57-1 (AM22) Power switch off 10 kΩ or higher G57-33 (BTH-) - A38-2 (+B2) Power switch off 10 kΩ or higher G57-33 (BTH-) - A39-5 (+B1) Power switch off 10 kΩ or higher G57-33 (BTH-) - A39-6 (MREL) Power switch off 10 kΩ or higher G57-33 (BTH-) - A39-1 (IG2) Power switch off 10 kΩ or higher G57-33 (BTH-) - G58-1 (ACCD) Power switch off 10 kΩ or higher G57-33 (BTH-) - G58-2 (IG1D) Power switch off 10 kΩ or higher G57-33 (BTH-) - A39-2 (IG2D) Power switch off 10 kΩ or higher G57-33 (BTH-) - G57-14 (SPDI) Power switch off 10 kΩ or higher
| *a | Rear view of wire harness connector
(to Power Management Control ECU) |
- | - |
- NOTICE:
-
When taking a measurement with a tester, do not apply excessive force to the tester probe to avoid damaging the holder.
Connect the battery smart unit connector.
Install the No. 1 hybrid battery exhaust duct.
Connect the power management control ECU connectors.
OK
NG
- CAUTION:
-
Be sure to wear insulated gloves.
Check that the service plug grip is not installed.
- NOTICE:
-
After removing the service plug grip, do not turn the power switch on (READY), unless instructed by the repair manual because this may cause a malfunction.
Remove the No. 1 hybrid battery exhaust duct (See page Engine / Hybrid System>HYBRID / BATTERY CONTROL>BATTERY SMART UNIT>REMOVAL).
Disconnect connector M39 from the battery smart unit.
Connect the cable to the negative (-) auxiliary battery terminal.
Turn the power switch on (IG).
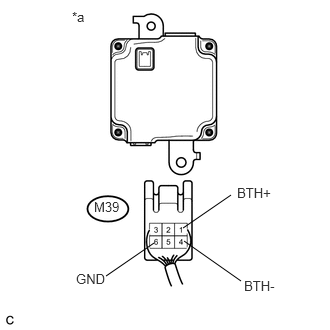
Measure the voltage according to the value(s) in the table below.
- Standard Voltage:
Tester Connection Switch Condition Specified Condition M39-1 (BTH+) - M39-6 (GND) Power switch on (IG) 2.3 to 2.7 V M39-4 (BTH-) - M39-6 (GND) Power switch on (IG) 2.3 to 2.7 V
| *a | Rear view of wire harness connector
(to Battery Smart Unit) |
- NOTICE:
-
Turning the power switch on (IG) with the battery smart unit connector and power management control ECU connector disconnected causes other DTCs to be stored. Clear the DTCs after performing this inspection.
Turn the power switch off.
Disconnect the cable from the negative (-) auxiliary battery terminal.
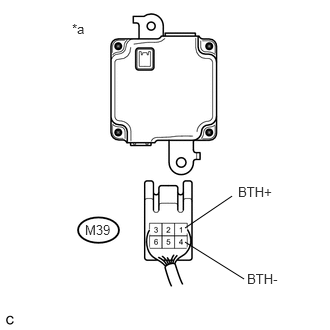
Measure the resistance according to the value(s) in the table below.
- Standard Resistance:
Tester Connection Switch Condition Specified Condition M39-1 (BTH+) - M39-4 (BTH-) Power switch off 4.4 to 5.4 kΩ
| *a | Rear view of wire harness connector
(to Battery Smart Unit) |
- HINT:
-
Resistance becomes 2.0 kΩ or less when there is a short circuit in the power management control ECU.
Connect the battery smart unit connector.
Install the No. 1 hybrid battery exhaust duct.
OK
NG