1NZ-FXE ENGINE MECHANICAL CYLINDER BLOCK REASSEMBLY
PROCEDURE

 13516B
1.INSTALL OIL JET
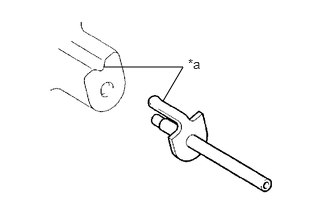
Align the concave part of the cylinder block with the bracket of a new oil jet, then tap in the oil jet (the service part).
| *a | Align |
- NOTICE:
-
Do not tap the tip of the oil jet.
16261B
2.INSTALL WATER BY-PASS HOSE UNION
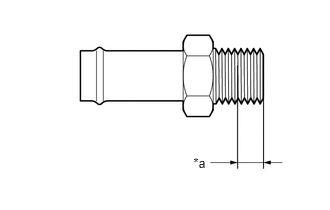
Apply adhesive as shown in the illustration.
| *a | 6.0 mm (0.236 in.) |
- Adhesive:
Toyota genuine adhesive 1324, three bond 1324 or equivalent
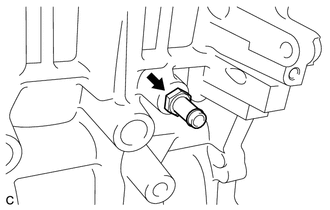
Using a 17 mm deep socket wrench, install the water by-pass hose union to the cylinder block.
- Torque:
- 30 N*m (306 kgf*cm, 22 ft.*lbf)
- NOTICE:
- ·
Install the water by-pass hose union within 3 minutes of applying adhesive.
·Do not add coolant for at least 1 hour after installation.
11711
3.INSTALL CRANKSHAFT BEARING
Clean the main journal and both surfaces of the crankshaft bearing.
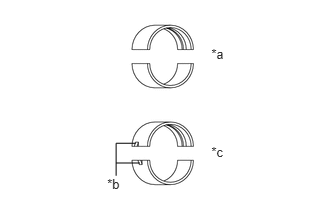
Mass production parts do not have claws. If reusing mass production parts, measure the clearance of both sides with the crankshaft bearings in the center of the crankshaft bearing caps.
| *a | Mass Production Part |
| *b | Claw |
| *c | Service Part |
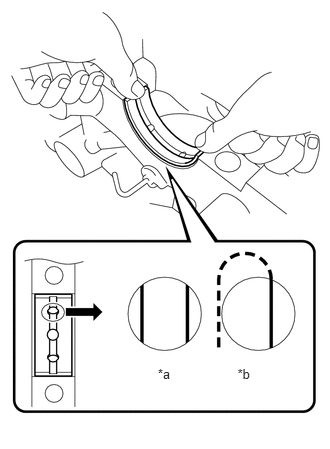
Install the 5 upper crankshaft bearings to the cylinder block as shown in the illustration.
| *a | Correct |
| *b | Incorrect |
- NOTICE:
- ·
Both sides of the oil groove in the cylinder block should be visible through the oil feed holes in the upper crankshaft bearing. The amount visible on each side of the holes should be equal.
·Do not apply engine oil to the bearings or their contact surfaces.
Install the 5 lower crankshaft bearings onto the crankshaft bearing cap.
- NOTICE:
-
Do not apply engine oil to the bearings and the contact surfaces.
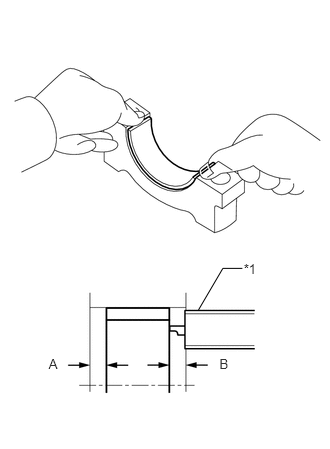
Using a vernier caliper, measure the distance between the crankshaft bearing caps edge and the lower crankshaft bearings edge.
| *1 | Vernier Caliper |
- Standard Dimension A - B or B - A:
0 to 0.7 mm (0 to 0.0276 in.)
11791
4.INSTALL UPPER CRANKSHAFT THRUST WASHER
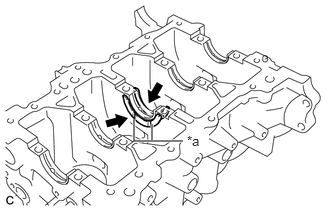
Install the 2 upper crankshaft thrust washers onto the No. 3 journal position of the cylinder block with the oil grooves facing outward.
| *a | Oil Groove |
13411
5.INSTALL CRANKSHAFT
- HINT:
-
The crankshaft bearing cap bolts are tightened in 2 progressive steps.
Apply engine oil to the upper crankshaft bearings and install the crankshaft onto the cylinder block.
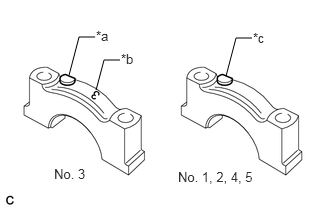
Check the front marks and numbers and install the crankshaft bearing caps onto the cylinder block.
| *a | Front Mark |
| *b | Number |
| *c | Front Mark and Number |
Apply a light coat of engine oil to the lower crankshaft bearings and threads of the crankshaft bearing cap bolts.
Step 1:
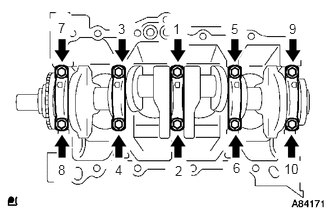
Using a 12 mm socket wrench, install and uniformly tighten the 10 crankshaft bearing cap bolts in several steps in the sequence shown in the illustration.
- Torque:
- 22 N*m (224 kgf*cm, 16 ft.*lbf)
Step 2:
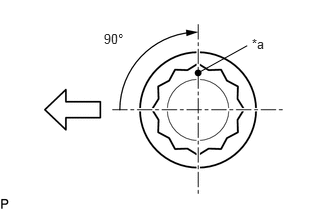
Mark each crankshaft bearing cap bolt head with a paint mark as shown in the illustration.
| *a | Paint Mark |

|
Engine Front |
Tighten the crankshaft bearing cap bolts 90° in the sequence shown in step 1.
Check that the paint marks are now at a 90° angle to the front.
Check that the crankshaft turns smoothly.
13101
6.INSTALL PISTON SUB-ASSEMBLY WITH PISTON PIN
- HINT:
-
Perform "Inspection After Repairs" after replacing the piston sub-assembly (See page Engine / Hybrid System>1NZ-FXE (ENGINE CONTROL)>SFI SYSTEM (w/o Canister Pump Module)>INITIALIZATION).
Gradually heat the connecting rod up to 80 to 90°C (176 to 194°F).
Apply engine oil to the piston pin and the inside surface of the connecting rod sub-assembly.
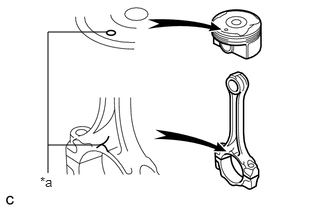
Align the front marks of the piston sub-assembly and connecting rod sub-assembly.
| *a | Front Mark |
Using SST, push in the piston pin.
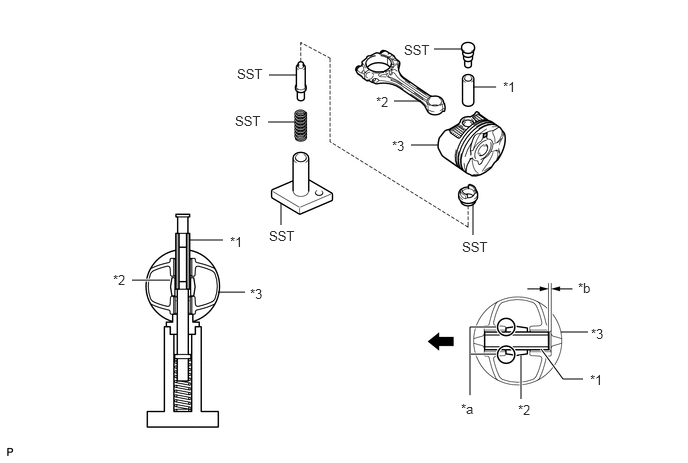
| *1 | Piston Pin |
| *2 | Connecting Rod Sub-assembly |
| *3 | Piston Sub-assembly |
| *a | Press |
| *b | 1.25 to 2.25 mm (0.0492 to 0.0886 in.) |
- SST
- 09221-25026 (09221-00021, 09221-00030, 09221-00061, 09221-00090, 09221-00100)
- NOTICE:
- ·
The piston sub-assembly and piston pin are a matched set.
·With the connecting rod fully inserted into the piston end, press in the piston pin until it is flush with the piston surface.
Check the fitting condition between the piston sub-assembly and piston pin by trying to move the piston back and forth on the piston pin.
13041
7.INSTALL CONNECTING ROD BEARING
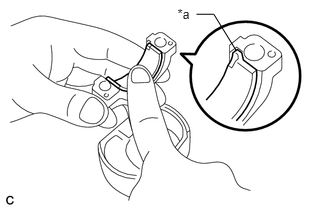
Align the connecting rod bearing claw with the grooves of the connecting rod and connecting rod cap.
| *a | Claw |
- NOTICE:
-
Do not apply engine oil to the contact surface of the connecting rod and connecting rod cap or the backside of the connecting rod bearing.
13011
8.INSTALL PISTON RING SET
- HINT:
-
Perform "Inspection After Repairs" after replacing the piston ring (See page Engine / Hybrid System>1NZ-FXE (ENGINE CONTROL)>SFI SYSTEM (w/o Canister Pump Module)>INITIALIZATION).
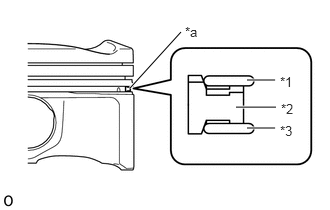
| *1 | Upper Side Rail |
| *2 | Expander Spacer |
| *3 | Lower Side Rail |
| *a | Expander Spacer and Side Rail Groove |
Install the expander spacer, upper side rail and lower side rail by hand.
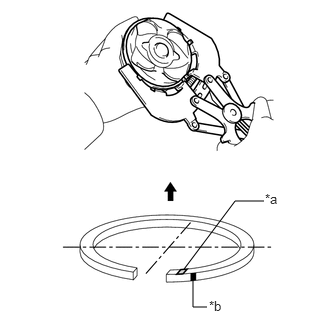
Using a piston ring expander, install the No. 2 compression ring as shown in the illustration.
| *a | Code Mark |
| *b | Paint Mark |

|
Up |
| Part | Paint Mark | Code Mark |
|---|---|---|
| No. 2 compression ring | Blue | 2R |
- NOTICE:
-
Install the No. 2 compression ring with the code mark facing upward.
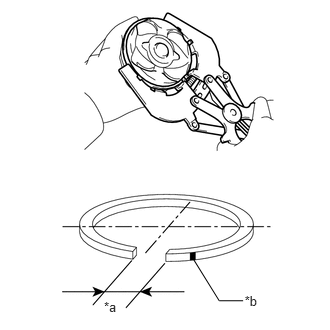
Using a piston ring expander, install the No. 1 compression ring as shown in the illustration.
| *a | Compression Ring Ends |
| *b | Paint Mark |
| Part | Paint Mark | Code Mark |
|---|---|---|
| No. 1 compression ring | Red | - |
- NOTICE:
-
Place a paint mark on the right side of the opening.
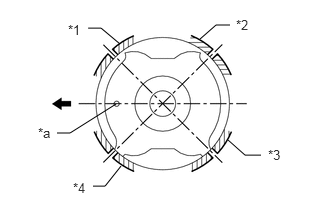
| *1 | No. 1 Compression Ring and Expander Spacer (Oil Ring) |
| *2 | Lower Side Rail (Oil Ring) |
| *3 | No. 2 Compression Ring |
| *4 | Upper Side Rail (Oil Ring) |
| *a | Front Mark |
|
|
Engine Front |
Position the piston rings so that the ring ends are as shown in the illustration.
13201
9.INSTALL PISTON SUB-ASSEMBLY WITH CONNECTING ROD
- HINT:
-
The connecting rod cap bolts are tightened in 2 progressive steps.
Apply engine oil to the cylinder walls, pistons, and surfaces of the connecting rod bearings.
- NOTICE:
-
Do not apply engine oil to the contact surface of the connecting rod and connecting rod cap or the backside of the connecting rod bearing.
Check the position of the piston ring ends.
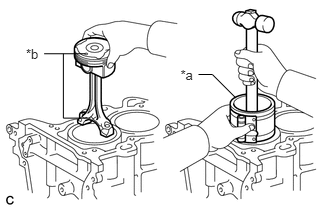
Using a piston ring compressor, push the correct piston sub-assembly and connecting rod subassembly into each cylinder with the front marks facing forward.
| *a | Piston Ring Compressor |
| *b | Front Mark |
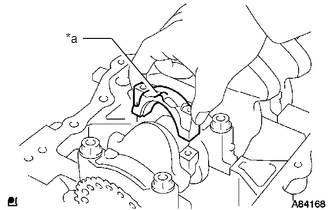
Check that the front mark of the connecting rod cap is facing forward and install the connecting rod cap.
| *a | Front Mark |
Apply a light coat of engine oil to the threads of the connecting rod cap bolts.
Step 1:
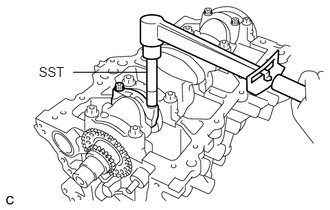
Using SST, install and alternately tighten the connecting rod cap bolts of the connecting rod cap in several steps.
- Torque:
- 15 N*m (153 kgf*cm, 11 ft.*lbf)
- SST
- 09205-16010
Step 2:
Mark each connecting rod cap bolt head with a paint mark as shown in the illustration.
| *a | Paint Mark |
|
|
Engine Front |
Tighten the connecting rod cap bolts 90° in the sequence shown in step 1.
Check that the paint marks are now at a 90° angle to the front.
Check that the crankshaft turns smoothly.