STEERING COLUMN STEERING COLUMN ASSEMBLY REASSEMBLY
PROCEDURE

 1.INSTALL POWER STEERING MOTOR ASSEMBLY (for LHD)
- NOTICE:
- ·
Do not drop the power steering motor assembly, strike it with tools or subject it to impacts.
·If the power steering motor assembly is subjected to an impact, replace it with a new one.
·Do not pull the wire harness and tilt steering support bond cable of the power steering motor assembly.
·Do not allow any moisture to come into contact with the power steering motor assembly.
·Do not loosen any bolts not mentioned in the procedure.
·Do not allow any foreign objects to contaminate the power steering motor assembly.
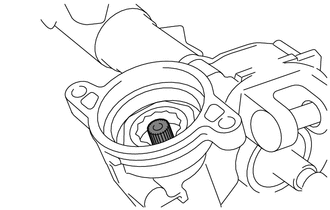
Apply grease to the serrated part of the electric power steering column sub-assembly.

|
Grease |
- NOTICE:
-
First wipe off the existing grease from the serrated part, and then apply the dedicated grease supplied with a new power steering motor assembly or electric power steering column sub-assembly.
Temporarily install the power steering motor assembly to the electric power steering column sub-assembly with the 2 bolts.
- NOTICE:
-
When temporarily installing the 2 bolts to the power steering motor assembly, do not tighten them all the way down.
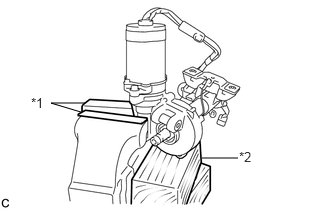
Secure the steering column assembly in a vise using aluminum plates.
| *1 | Aluminum Plate |
| *2 | Wooden Block |
- NOTICE:
- ·
Do not overtighten the vise, as the steering column assembly may become deformed.
·Secure the power steering motor assembly so that it is directly upright.
·Support the steering column assembly with a wooden block or similar item to ensure that it does not fall.
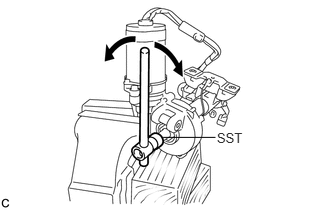
Using SST, turn the steering main shaft once 180 degrees to the left and then 180 degrees to the right at a speed of 60 rpm, and repeat 2 to 3 times to adjust the axis centering of the power steering motor assembly.
- SST
- 09616-00011
Tighten the 2 bolts.
- Torque:
- 19 N*m (189 kgf*cm, 14 ft.*lbf)
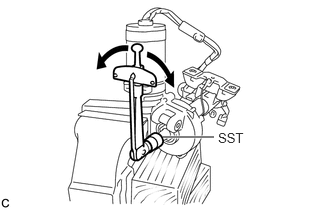
Using SST, measure the turning torque of the steering main shaft.
- SST
- 09616-00011
- Torque:
- Turning torque : 1.4 N*m (14 kgf*cm, 12 in.*lbf)
or less
- NOTICE:
-
Ensure that there is no abnormal resistance during rotation.
If the torque is not as specified, readjust the axis centering of the power steering motor assembly.
Install a new clamp and tape to the wire harness as shown in the illustration.
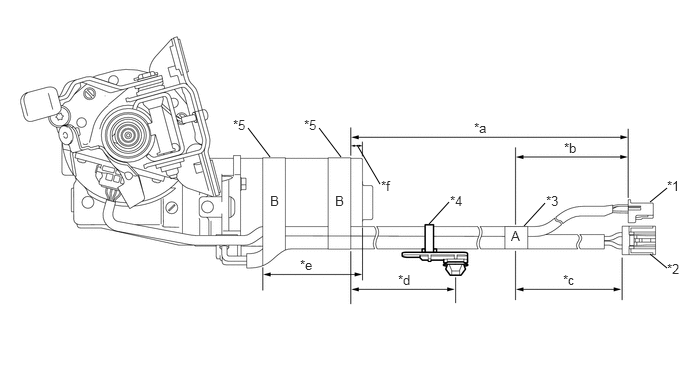
| *1 | Torque Sensor Wire Harness | *2 | Power Steering Motor Wire Harness |
| *3 | Tape A | *4 | Clamp |
| *5 | Tape B | - | - |
| *a | 383 to 403 mm (1.26 to 1.32 ft.) | *b | 100 mm (3.94 in.) |
| *c | 80 to 100 mm (3.15 to 3.93 in.) | *d | 155 to 175 mm (6.11 to 6.89 in.) |
| *e | 74 to 94 mm (2.92 to 3.70 in.) | *f | 10 mm (0.394 in.) |
- NOTICE:
- ·
Wrap the tape around the area marked as "A" in the illustration more than 1.5 times.
·Wrap the tape around the area marked as "B" in the illustration more than 2 times.
·As heat from the power steering motor assembly may generate smoke, use heat resistant tape (resistant to 100°C (212°F) or more).
Cut off the excess length of the clamp.
2.INSTALL POWER STEERING MOTOR ASSEMBLY (for RHD)
- NOTICE:
- ·
Do not drop the power steering motor assembly, strike it with tools or subject it to impacts.
·If the power steering motor assembly is subjected to an impact, replace it with a new one.
·Do not pull the wire harness and tilt steering support bond cable of the power steering motor assembly.
·Do not allow any moisture to come into contact with the power steering motor assembly.
·Do not loosen any bolts not mentioned in the procedure.
·Do not allow any foreign objects to contaminate the power steering motor assembly.
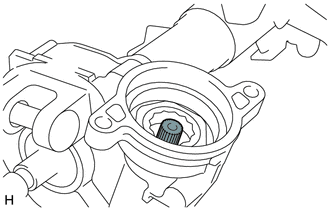
Apply grease to the serrated part of the electric power steering column sub-assembly.
|
|
Grease |
- NOTICE:
-
First wipe off the existing grease from the serrated part, and then apply the dedicated grease supplied with a new power steering motor assembly or electric power steering column sub-assembly.
Temporarily install the power steering motor assembly to the electric power steering column sub-assembly with the 2 bolts.
- NOTICE:
-
When temporarily installing the 2 bolts to the power steering motor assembly, do not tighten them all the way down.
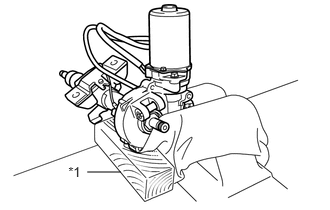
Secure the steering column assembly in a vise using aluminum plates.
| *1 | Wooden Block |
- NOTICE:
- ·
Do not overtighten the vise, as the steering column assembly may become deformed.
·Secure the power steering motor assembly so that it is directly upright.
·Support the steering column assembly with a wooden block or similar item to ensure that it does not fall.
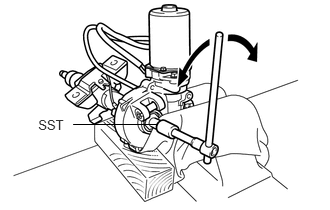
Using SST, turn the steering main shaft once 180 degrees to the left and then 180 degrees to the right at a speed of 60 rpm, and repeat 2 to 3 times to adjust the axis centering of the power steering motor assembly.
- SST
- 09616-00011
Tighten the 2 bolts.
- Torque:
- 19 N*m (189 kgf*cm, 14 ft.*lbf)
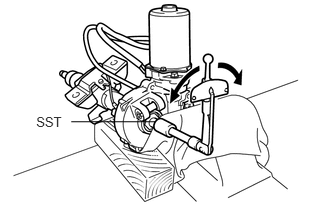
Using SST, measure the turning torque of the steering main shaft.
- SST
- 09616-00011
- Torque:
- Turning torque : 1.4 N*m (14 kgf*cm, 12 in.*lbf)
or less
- NOTICE:
-
Ensure that there is no abnormal resistance during rotation.
If the torque is not as specified, readjust the axis centering of the power steering motor assembly.
Install a new No. 2 clamp, new No. 3 clamp and tape to the wire harness as shown in the illustration.
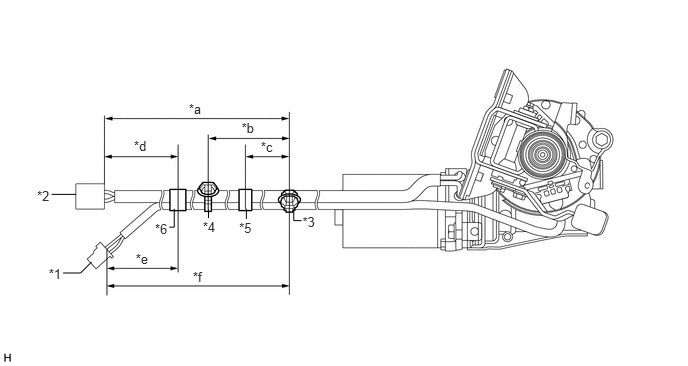
| *1 | Torque Sensor Wire Harness | *2 | Power Steering Motor Wire Harness |
| *3 | No. 2 Clamp | *4 | No. 3 Clamp |
| *5 | Tape A | *6 | Tape B |
| *a | 358 to 378 mm (1.18 to 1.24 ft.) | *b | 152 to 168 mm (5.99 to 6.62 in.) |
| *c | 60 to 100 mm (2.37 to 3.93 in.) | *d | 80 to 100 mm (3.15 to 3.39 in.) |
| *e | 105 mm (4.14 in.) | *f | 373 to 393 mm (1.23 to 1.28 ft.) |
- NOTICE:
-
Wrap the tape at least 1.5 turns.
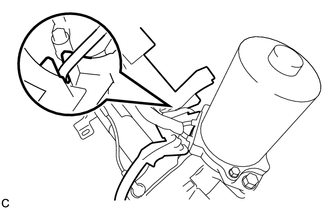
Pass the torque sensor wire harness through the cutout of a new No. 1 steering column protector.
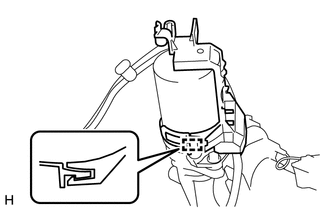
Engage the clamp and install the No. 1 steering column protector to the electric power steering column sub-assembly.
- NOTICE:
-
Make sure the torque sensor wire harness and power steering motor wire harness is not pinched between the No. 1 steering column protector and the steering column assembly.
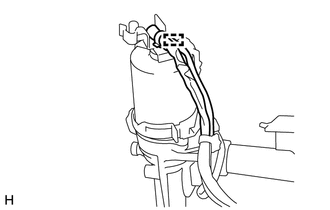
Engage the No. 2 clamp to the No. 1 steering column protector.
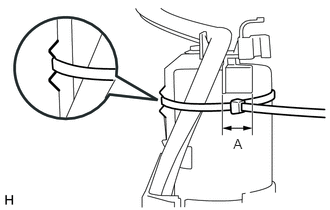
Pass a new No. 1 clamp through the groove in the No. 1 steering column protector, and tighten it within area A shown in the illustration to secure the No. 1 steering column protector and torque sensor wire harness and power steering motor wire harness to the power steering motor assembly.
- NOTICE:
-
Make sure there is no rattling or looseness in the No. 1 steering column protector.
Cut off the excess length of the No. 1 clamp, No. 2 clamp and No. 3 clamp.
45020A
3.INSTALL STEERING LOCK ACTUATOR ASSEMBLY
- HINT:
-
When replacing the steering lock actuator assembly, refer to Service Bulletin.
Set the steering column assembly in a vise between aluminum plates.
- NOTICE:
-
Do not overtighten the vise.
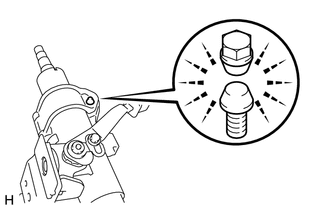
Install the steering lock actuator assembly with a new steering lock set bolt, and then tighten the bolt until its head comes off.