LIGHTING (EXT) HEADLIGHT ASSEMBLY(for Halogen Headlight) REASSEMBLY
PROCEDURE

 81132B
1.INSTALL HEADLIGHT LENS GASKET
Completely remove the old headlight lens gasket.
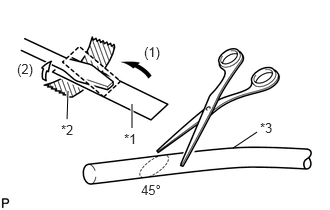
Partially remove the release paper, and cut off a piece of it.
| *1 | Release Paper |
| *2 | Tape |
| *3 | Headlight Lens Gasket |
Fold the release paper over the tip of a screwdriver and fix it in place with tape.
- HINT:
-
Use the release paper that is supplied with the headlight lens gasket.
Using scissors, cut the end of the headlight lens gasket at an angle (45°).
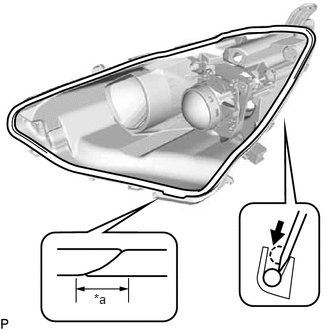
Set the headlight lens gasket into the groove so that the ends of the gasket are aligned with the bottom of the housing, as shown in the illustration.
| *a | 10 mm (0.394 in.) or more |
Using the screwdriver, completely press the headlight lens gasket into the housing to install it.
After pressing the headlight lens gasket completely, check that the ends overlap for 10 mm (0.394 in.) or more.
- HINT:
-
Place the headlight lens gasket along the outside surface and press it in with the screwdriver to roll it into place. Then, set the headlight lens gasket at the center of the groove.
81171B
2.INSTALL HEADLIGHT LENS
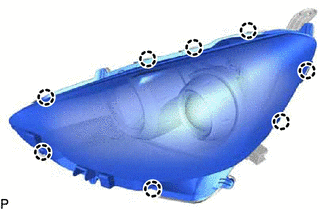
Engage the 8 claws and install the headlight lens to the housing.
- NOTICE:
- ·
Check that all the claws are engaged.
·Wear rubber gloves when handling the headlight lens.
·Do not touch the lens or the aluminum surfaces with bare hands.
·If there are fingerprints on the aluminum surfaces, wipe them off with a soft cloth.
·If there are fingerprints on the back of the headlight lens, replace the headlight lens.
·Do not allow dirt or foreign matter to get on the headlight lens.
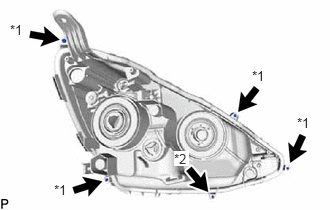
Using a T20H "TORX" driver, install the "TORX" screw.
| *1 | Screw |
| *2 | "TORX" Screw |
Install the 4 screws.
85669
3.INSTALL HEADLIGHT LEVELING MOTOR BASE PACKING
Install a new headlight leveling motor base packing.
85662
4.INSTALL HEADLIGHT LEVELING MOTOR
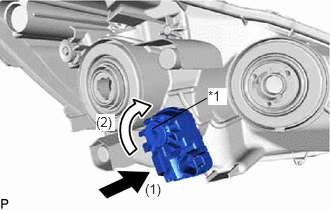
Insert the headlight leveling motor in the direction indicated by the arrow (1) shown in the illustration.
Turn the aiming screw of the headlight leveling motor in the direction indicated by the arrow (2) shown in the illustration to engage the shaft.
| *1 | Aiming Screw |
- HINT:
-
Turn the aiming screw the same number of times as it was turned during removal.
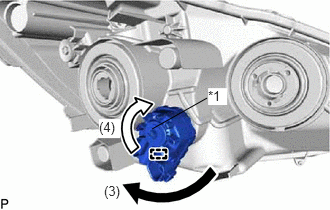
Turn the headlight leveling motor in the direction indicated by the arrow (3) shown in the illustration and engage the pin to install the headlight leveling motor to the headlight unit.
- HINT:
-
When installing the headlight leveling motor of the headlight assembly RH, turn the headlight leveling motor in the opposite direction indicated by the arrow (3) shown in the illustration.
Turn the aiming screw of the headlight leveling motor in the direction indicated by the arrow (4) shown in the illustration to install it.
| *1 | Aiming Screw |
- HINT:
-
Turn the aiming screw the same number of times as it was turned during removal.
81610F
5.INSTALL CLEARANCE LIGHT BULB
Install the clearance light bulb to the clearance light socket.
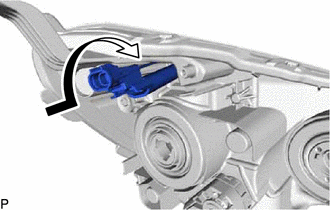
Turn the clearance light socket with the clearance light bulb in the direction indicated by the arrow shown in the illustration and install them as a unit.
81110D
6.INSTALL NO. 2 HEADLIGHT BULB
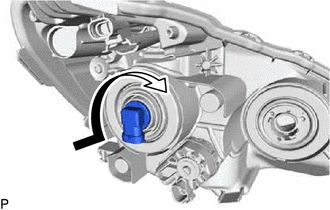
Turn the No. 2 headlight bulb in the direction indicated by the arrow shown in the illustration to install it.
- NOTICE:
-
Do not touch the bulb glass.
81110B
7.INSTALL NO. 1 HEADLIGHT BULB
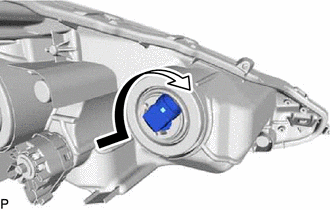
Turn the No. 1 headlight bulb in the direction indicated by the arrow shown in the illustration to install it.
- NOTICE:
-
Do not touch the bulb glass.