P410 HYBRID TRANSMISSION / TRANSAXLE HYBRID VEHICLE TRANSAXLE UNIT DISASSEMBLY
CAUTION / NOTICE / HINT
- NOTICE:
- ·
Do not use gloves, cloths or papers that produce lint or dust.
·Cover the removed parts with plastic bags to prevent entry of foreign matter.
·Do not remove the generator cable terminal, motor cable terminal, transaxle housing cover, rear transaxle case cover sub-assembly or resolver adjuster bolts.
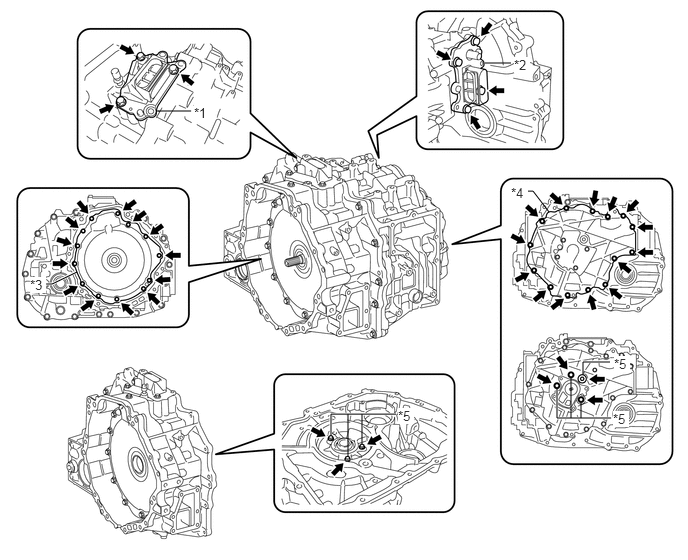 1.625,1.156 1.99,1.156 false 5.052,0.656 5.323,0.656 false 0.479,2.958 0.542,2.958 0.542,2.958 0.802,2.833 false 5.5,1.99 5.552,1.99 5.552,1.99 5.719,2.208 false 3.625,4.76 3.625,4.313 false 3.771,4.625 3.771,4.313 false 3.448,4.542 3.448,4.313 3.448,4.313 4.125,4.313 false 5.802,4.052 5.802,4.354 5.802,4.354 6.365,4.354 false 5.948,3.938 5.948,4.354 false 6.052,4.198 6.052,4.354 false 6.073,3.906 6.073,3.771 6.073,3.771 6.354,3.771 false 2.021,1.094 2.188,1.26 0.167,0.167 10 true *1 5.354,0.594 5.521,0.76 0.167,0.167 10 true *2 0.313,2.885 0.479,3.052 0.167,0.167 10 true *3 5.323,1.927 5.49,2.094 0.167,0.167 10 false *4 4.146,4.25 4.313,4.417 0.167,0.167 10 true *5 6.385,4.281 6.552,4.448 0.167,0.167 10 true *5 6.396,3.708 6.563,3.875 0.167,0.167 10 true *5
Text in Illustration *1 Generator Cable Terminal *2 Motor Cable Terminal *3 Transaxle Housing Cover *4 Rear Transaxle Case Cover Sub-assembly *5 Resolver Adjuster Bolt - -
PROCEDURE

 1.INSPECT INPUT SHAFT END PLAY
G2148
2.REMOVE GENERATOR CABLE
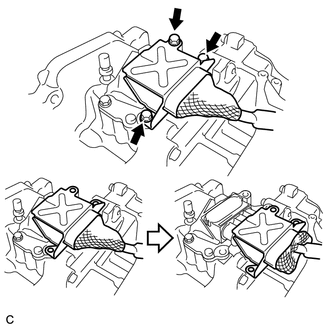
Remove the 3 bolts and slide the generator cable connector shell back.
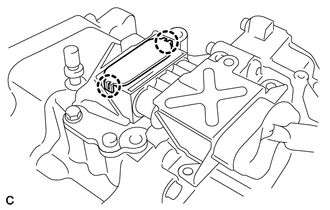
Disengage the 2 claws to remove the terminal cap from the hybrid vehicle transaxle assembly.
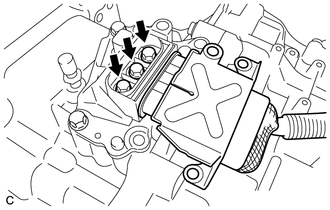
Remove the 3 bolts and generator cable from the hybrid vehicle transaxle assembly.
- NOTICE:
-
Keep foreign matter, water, etc. away from the terminal cable and its installation section.
G1148
3.REMOVE MOTOR CABLE
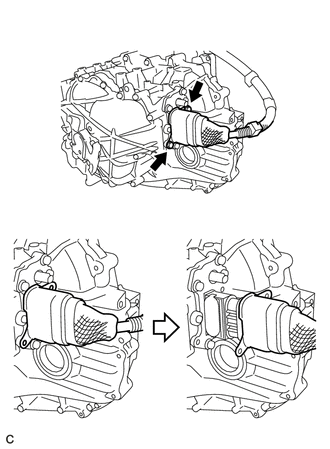
Remove the 3 bolts and slide the motor cable connector shell back.
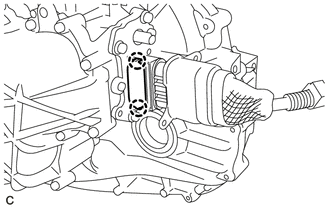
Disengage the 2 claws to remove the terminal cap from the hybrid vehicle transaxle assembly.
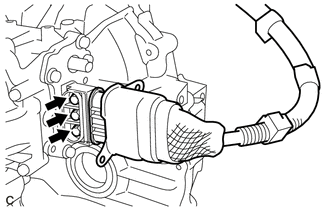
Remove the 3 bolts and motor cable from the hybrid vehicle transaxle assembly.
- NOTICE:
-
Keep foreign matter, water, etc. away from the terminal cable and its installation section.
35580
4.REMOVE SHIFT CONTROL ACTUATOR ASSEMBLY
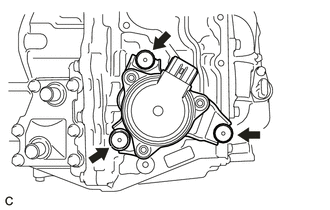
Remove the 3 shift control actuator bolts and shift control actuator assembly from the hybrid vehicle transaxle assembly.
- HINT:
- ·
Please refer to Service Bulletin for details on the removal procedure of the shift control actuator bolt.
·This actuator is a precision instrument. Do not strike it with a plastic hammer or the like during installation.
·This actuator detects its own position when a battery is reinstalled. Thus it does not require initialization.
30900N
5.REMOVE TRANSAXLE BREATHER PLUG
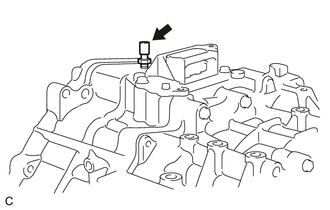
Remove the transaxle breather plug from the hybrid vehicle transaxle assembly.
- NOTICE:
-
Be careful not to damage the transaxle breather plug.
6.REMOVE WITH HEAD STRAIGHT SCREW PLUG
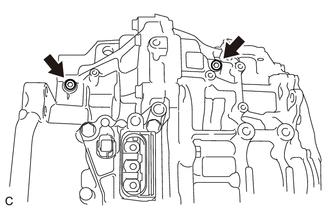
Using a 6 mm hexagon socket wrench, remove the 2 with head straight screw plugs from the hybrid vehicle transaxle assembly.
35308D
7.REMOVE TRANSMISSION OIL PUMP COVER SUB-ASSEMBLY
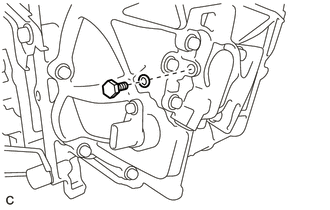
Remove the fluid pump cover plug and O-ring from the transmission oil pump cover sub-assembly.
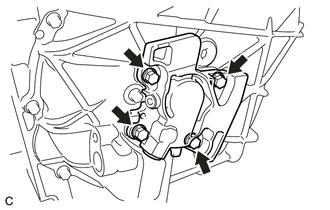
Remove the 4 bolts and transmission oil pump cover sub-assembly from the hybrid vehicle transaxle assembly.
- NOTICE:
-
Do not drop the transaxle oil pump drive rotor or transmission oil pump driven rotor.
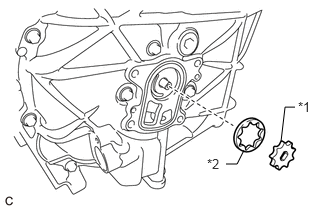
Remove the transaxle oil pump drive rotor and transmission oil pump driven rotor from the hybrid vehicle transaxle assembly.
| *1 | Transaxle Oil Pump Drive Rotor |
| *2 | Transmission Oil Pump Driven Rotor |
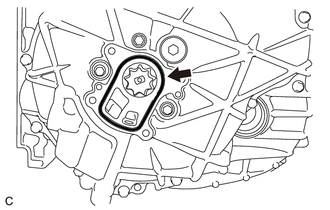
Remove the O-ring from the hybrid vehicle transaxle assembly.
35371
8.REMOVE OIL PUMP DRIVE SHAFT
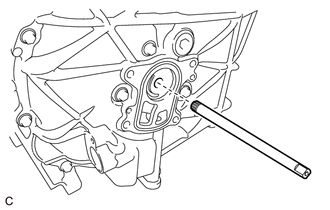
Remove the oil pump drive shaft from the hybrid vehicle transaxle assembly.
30900
9.SECURE HYBRID VEHICLE TRANSAXLE ASSEMBLY
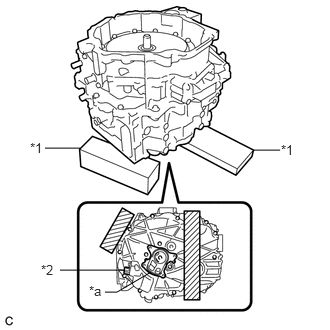
Place wooden blocks under the hybrid vehicle transaxle assembly.
| *1 | Wooden Block |
| *2 | Resolver Sensor Connector |
| *a | Installation area of the Transmission Oil Pump Cover Sub-assembly |

|
Wooden Block Placement Position |
- NOTICE:
-
Do not place the wooden blocks under the installation area of the transmission oil pump cover sub-assembly or resolver sensor connector.
10.REMOVE FILLER PLUG
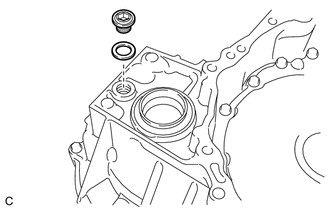
Using a 10 mm hexagon socket wrench, remove the filler plug and gasket from the hybrid vehicle transaxle assembly.
11.REMOVE DRAIN PLUG
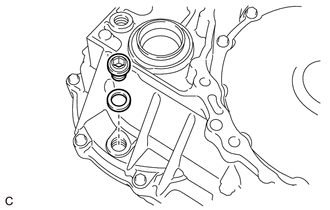
Using a 10 mm hexagon socket wrench, remove the drain plug and gasket from the hybrid vehicle transaxle assembly.
G1020
12.REMOVE NO. 1 MOTOR WATER JACKET COVER ASSEMBLY
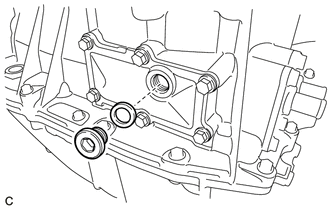
Using a 10 mm hexagon socket wrench, remove the drain plug and gasket from the No. 1 motor water jacket cover assembly.
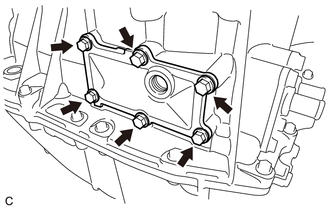
Remove the 6 bolts from the No. 1 motor water jacket cover assembly.
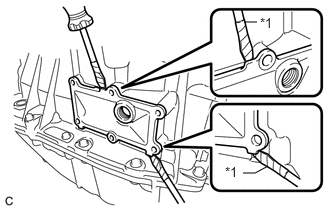
Using a screwdriver, remove the No. 1 motor water jacket cover assembly from the hybrid vehicle transaxle assembly.
| *1 | Protective Tape |
- NOTICE:
-
Be careful not to damage the hybrid vehicle transaxle assembly.
- HINT:
-
Tape the screwdriver tip before use.
G1020A
13.REMOVE NO. 2 MOTOR WATER JACKET COVER ASSEMBLY
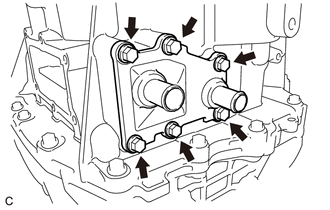
Remove the 6 bolts from the No. 2 motor water jacket cover assembly.
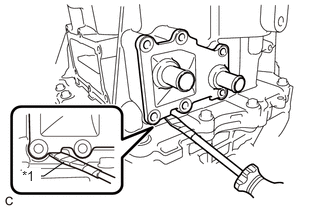
Using a screwdriver, remove the No. 2 motor water jacket cover assembly from the hybrid vehicle transaxle assembly.
| *1 | Protective Tape |
- NOTICE:
-
Be careful not to damage the hybrid vehicle transaxle assembly.
- HINT:
-
Tape the screwdriver tip before use.
14.REMOVE MOTOR WATER JACKET COVER ASSEMBLY
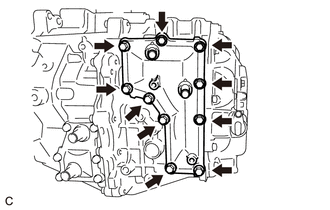
Remove the 10 bolts from the motor water jacket cover assembly.
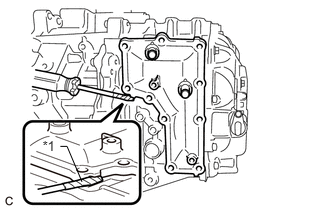
Using a screwdriver, remove the motor water jacket cover assembly from the hybrid vehicle transaxle assembly.
| *1 | Protective Tape |
- NOTICE:
-
Be careful not to damage the hybrid vehicle transaxle assembly.
- HINT:
-
Tape the screwdriver tip before use.
15.REMOVE HYBRID VEHICLE GENERATOR ASSEMBLY
Install the No. 1 engine hanger and No. 2 engine hanger with the 2 bolts and washer as shown in the illustration.
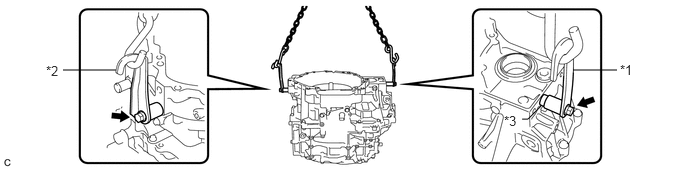
| *1 | No. 1 Engine Hanger | *2 | No. 2 Engine Hanger |
| *3 | Washer | - | - |
- Torque:
- 43 N*m (438 kgf*cm, 32 ft.*lbf)
| Part Name | Part No. |
|---|---|
| No. 1 Engine Hanger | 12281-37050 |
| No. 2 Engine Hanger | 12282-37040 |
| Bolt | 91552-81050 |
- HINT:
-
When installing the No. 1 engine hanger, use a washer with an appropriate thickness so that the No. 1 engine hanger will not interfere with the installation surface of the transaxle housing.
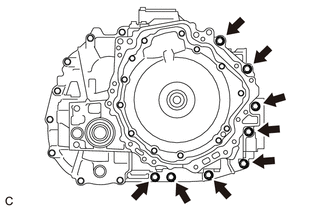
Remove the 8 bolts from the hybrid vehicle generator assembly.
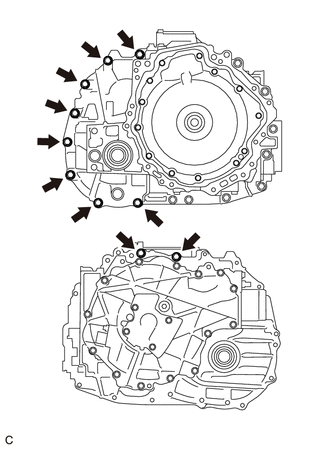
Remove the 8 bolts from the hybrid vehicle generator assembly.
Remove the 2 bolts from the hybrid vehicle motor assembly.
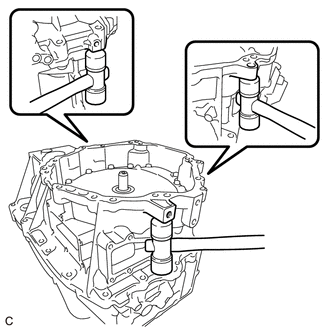
While lifting the hybrid vehicle generator assembly with a chain, tap the areas shown in the illustration with a plastic hammer and separate the hybrid vehicle generator assembly from the hybrid vehicle motor assembly.
While lifting the hybrid vehicle generator assembly with a chain, remove it from the hybrid vehicle motor assembly.
- NOTICE:
- ·
Lift the hybrid vehicle generator assembly straight up.
·If the hybrid vehicle generator assembly is tilted, return it to the original position before removing.
Remove the 2 bolts, washer, No. 1 engine hanger and No. 2 engine hanger from the hybrid vehicle generator assembly.
16.REMOVE TRANSAXLE HOUSING OIL SEPARATOR
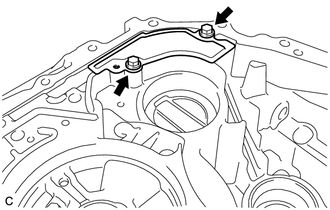
Remove the 2 bolts and transaxle housing oil separator from the hybrid vehicle generator assembly.
30900B
17.REMOVE HYBRID VEHICLE TRANSAXLE ASSEMBLY TYPE T OIL SEAL (RH SIDE)
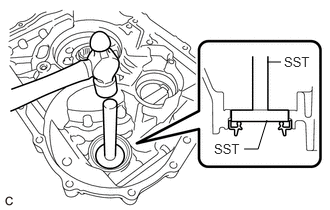
Using SST and a hammer, remove the hybrid vehicle transaxle assembly type T oil seal (RH side) from the hybrid vehicle generator assembly.
- SST
- 09950-60010 (09951-00590)
09950-70010 (09951-07200)
18.REMOVE TAPERED ROLLER BEARING (RH SIDE OUTER RACE)
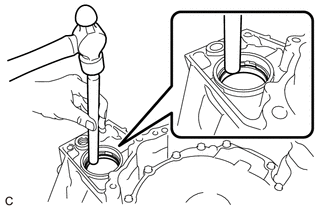
Using brass bar and a hammer, remove the tapered roller bearing (RH side outer race) and differential case RH shim from the hybrid vehicle generator assembly.
- NOTICE:
-
Be careful not to damage the hybrid vehicle generator assembly.
35710A
19.REMOVE INPUT SHAFT TYPE T OIL SEAL
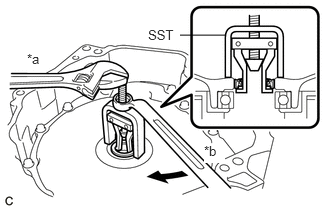
Using SST, remove the input shaft type T oil seal from the hybrid vehicle generator assembly.
| *a | Hold |
| *b | Turn |
- SST
- 09310-36021
- NOTICE:
- ·
Be careful not to damage the hybrid vehicle generator assembly.
·When removing the hybrid vehicle generator assembly, be sure to replace the input shaft type T oil seal.
35783J
20.REMOVE COUNTER DRIVEN GEAR SHIM
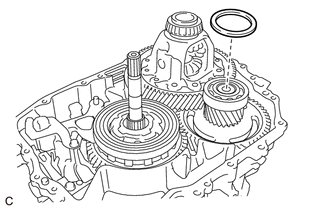
Remove the counter driven gear shim from the counter driven gear sub-assembly.
35557B
21.REMOVE PARKING LOCK PAWL
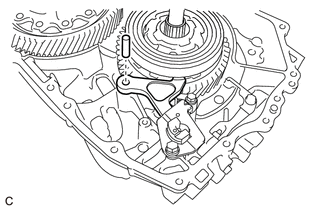
Remove the parking lock pawl and parking lock pawl shaft from the hybrid vehicle motor assembly.
35596B
22.REMOVE PAWL STOPPER PLATE
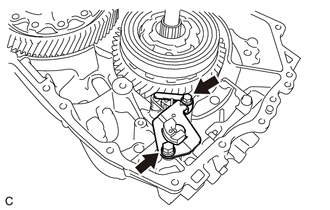
Remove the 2 bolts and pawl stopper plate from the hybrid vehicle motor assembly.
35556M
23.REMOVE TORSION SPRING
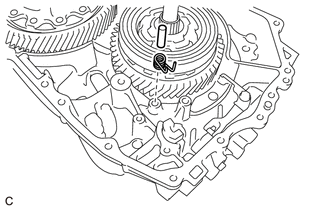
Remove the parking lock pawl shaft and torsion spring from the hybrid vehicle motor assembly.
35598A
24.REMOVE PARKING LOCK SLEEVE
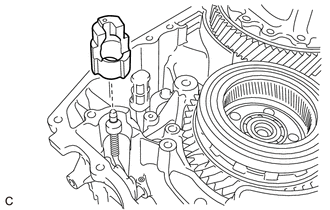
Remove the parking lock sleeve from the hybrid vehicle motor assembly.
35409C
25.REMOVE MANUAL DETENT SPRING SUB-ASSEMBLY
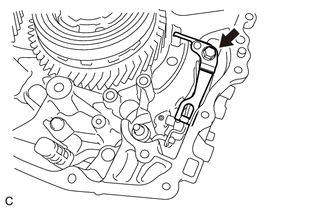
Remove the bolt and manual detent spring sub-assembly from the hybrid vehicle motor assembly.
35556K
26.REMOVE RETAINER SPRING
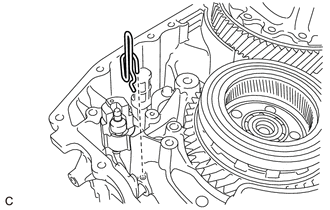
Remove the retainer spring from the hybrid vehicle motor assembly and No. 1 parking lock shaft.
27.REMOVE NO. 1 PARKING LOCK SHAFT
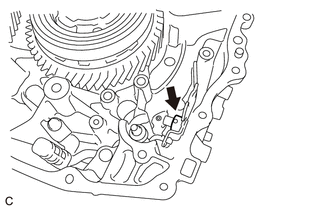
Using a hammer and a screwdriver, cut off the spacer and remove it from the No. 1 parking lock shaft.
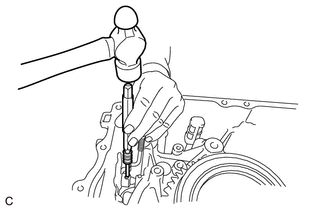
Using a 5 mm pin punch and a hammer, drive out the slotted spring pin from the No. 1 parking lock shaft.
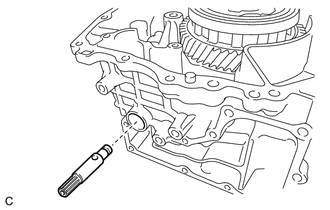
Remove the No. 1 parking lock shaft from the hybrid vehicle motor assembly.
28.REMOVE PARKING LOCK ROD SUB-ASSEMBLY
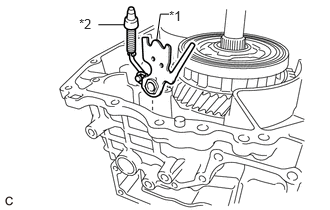
Remove the No. 1 parking lock lever sub-assembly and parking lock rod sub-assembly from the hybrid vehicle motor assembly.
| *1 | No. 1 Parking Lock Lever Sub-assembly |
| *2 | Parking Lock Rod Sub-assembly |
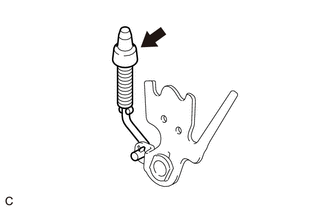
Remove the parking lock rod sub-assembly from the No. 1 parking lock lever sub-assembly.
33449F
29.REMOVE NO. 1 TRANSMISSION MAGNET
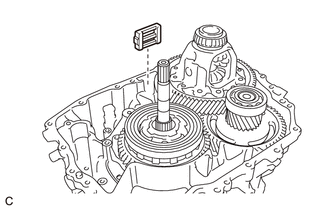
Remove the No. 1 transmission magnet from the hybrid vehicle motor assembly.
35710
30.REMOVE INPUT SHAFT ASSEMBLY
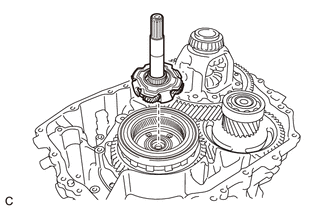
Remove the input shaft assembly from the counter drive gear sub-assembly.
35719C
31.REMOVE PLANETARY SUN GEAR
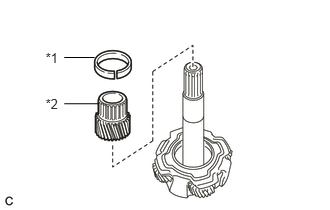
Remove the planetary sun gear snap ring and planetary sun gear from the input shaft assembly.
| *1 | Planetary Sun Gear Snap Ring |
| *2 | Planetary Sun Gear |
32.REMOVE THRUST NEEDLE ROLLER BEARING
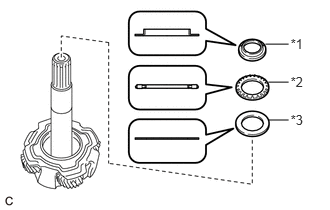
Remove the thrust bearing race, thrust needle roller bearing and No. 1 thrust bearing race from the input shaft assembly.
| *1 | Thrust Bearing Race |
| *2 | Thrust Needle Roller Bearing |
| *3 | No. 1 Thrust Bearing Race |
- HINT:
-
The No. 1 thrust bearing race may be attached to the input shaft assembly.
33.REMOVE DIFFERENTIAL CASE SUB-ASSEMBLY
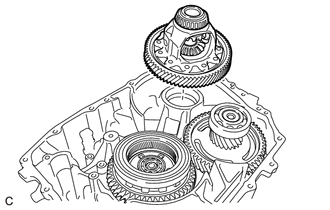
Remove the differential case sub-assembly from the hybrid vehicle motor assembly.
34.REMOVE COUNTER DRIVEN GEAR SUB-ASSEMBLY
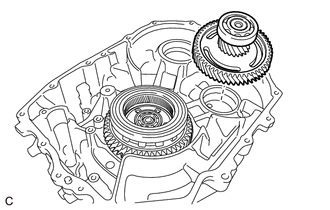
Remove the counter driven gear sub-assembly from the hybrid vehicle motor assembly.
35.REMOVE COUNTER DRIVE GEAR SUB-ASSEMBLY
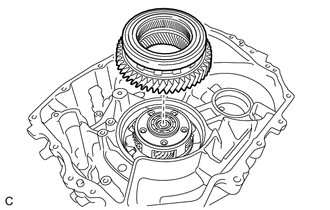
Remove the counter drive gear sub-assembly from the No. 1 rear planetary gear assembly.
35760A
36.REMOVE NO. 1 REAR PLANETARY GEAR ASSEMBLY
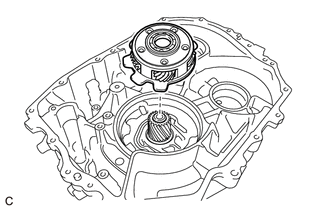
Remove the No. 1 rear planetary gear assembly from the rear planetary sun gear.
35760A
37.INSPECT NO. 1 REAR PLANETARY GEAR ASSEMBLY
38.REMOVE REAR PLANETARY SUN GEAR
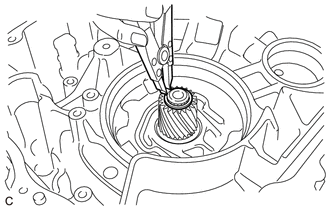
Using a snap ring expander, remove the rear planetary sun gear shaft snap ring from the hybrid vehicle motor assembly.
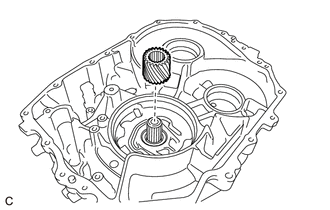
Remove the rear planetary sun gear from the hybrid vehicle motor assembly.
35395D
39.REMOVE TRANSMISSION OIL STRAINER
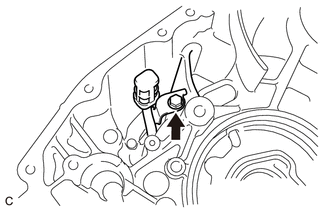
Remove the bolt and transmission oil strainer from the hybrid vehicle motor assembly.
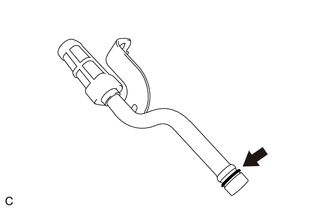
Remove the O-ring from the transmission oil strainer
30900B
40.REMOVE HYBRID VEHICLE TRANSAXLE ASSEMBLY TYPE T OIL SEAL (LH SIDE)
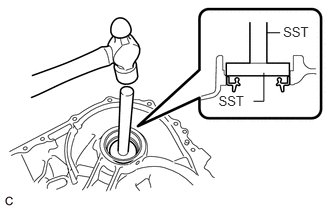
Using SST and a hammer, remove the hybrid vehicle transaxle assembly type T oil seal (LH side) from the hybrid vehicle motor assembly.
- SST
- 09950-60010 (09951-00620)
09950-70010 (09951-07200)
41.REMOVE TAPERED ROLLER BEARING (LH SIDE OUTER RACE)
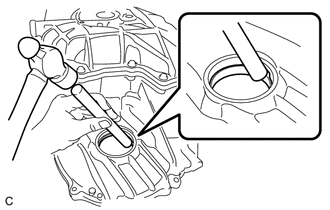
Using brass bar and a hammer, remove the tapered roller bearing (LH side outer race) from the hybrid vehicle motor assembly.
- NOTICE:
-
Be careful not to damage the hybrid vehicle motor assembly.
35563
42.REMOVE SHIFT CONTROL ACTUATOR SEAL
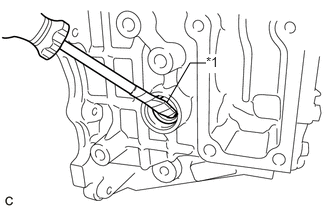
Using a screwdriver, remove the shift control actuator seal from the hybrid vehicle motor assembly.
| *1 | Protective Tape |
- NOTICE:
-
Be careful not to damage the hybrid vehicle motor assembly.
- HINT:
-
Tape the screwdriver tip before use.
43.REMOVE TAPERED ROLLER BEARING (RH SIDE INNER RACE)
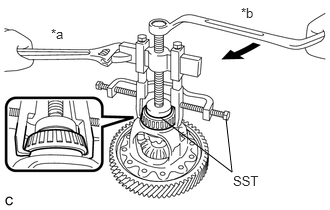
Using SST, remove the tapered roller bearing (RH side inner race) from the differential case sub-assembly.
| *a | Hold |
| *b | Turn |
- SST
- 09950-40011 (09951-04010, 09952-04010, 09953-04030, 09954-04010, 09955-04061, 09957-04010, 09958-04011)
09950-60010 (09951-00460)
44.REMOVE TAPERED ROLLER BEARING (LH SIDE INNER RACE)
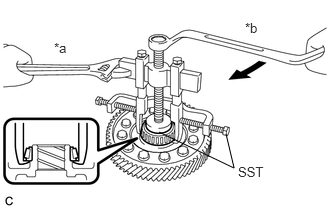
Using SST, remove the tapered roller bearing (LH side inner race) from the differential case sub-assembly.
| *a | Hold |
| *b | Turn |
- SST
- 09950-40011 (09951-04010, 09952-04010, 09953-04030, 09954-04010, 09955-04061, 09957-04010, 09958-04011)
09950-60010 (09951-00460)
45.REMOVE RADIAL BALL BEARING (LH SIDE)
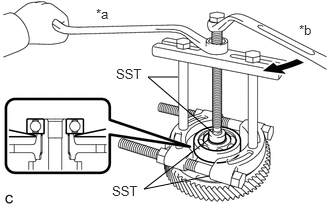
Using SST, remove the radial ball bearing (LH side) from the counter driven gear sub-assembly.
| *a | Hold |
| *b | Turn |
- SST
- 09950-00020
09950-00030
09950-40011 (09957-04010)
09950-60010 (09951-00280)
46.REMOVE RADIAL BALL BEARING (RH SIDE)
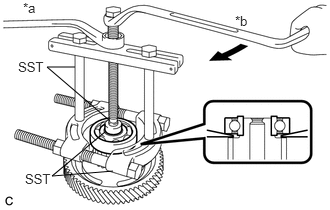
Using SST, remove the radial ball bearing (RH side) from the counter driven gear sub-assembly.
| *a | Hold |
| *b | Turn |
- SST
- 09950-00020
09950-00030
09950-40011 (09957-04010)
09950-60010 (09951-00280)
47.REMOVE STRAIGHT PIN
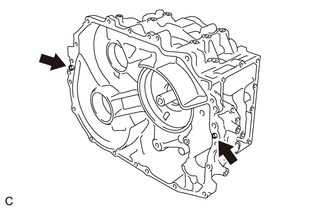
Remove the 2 straight pins from the hybrid vehicle motor assembly.