AUDIO / VIDEO AUDIO AND VISUAL SYSTEM B15C3 Speaker Output Short
DESCRIPTION
This DTC is stored when a malfunction occurs in the speakers.
| DTC No. | DTC Detection Condition | Trouble Area |
|---|---|---|
| B15C3 | A short is detected in the speaker output circuit | ·
Harness or connector ·
Speaker ·
Radio and display receiver assembly |
WIRING DIAGRAM
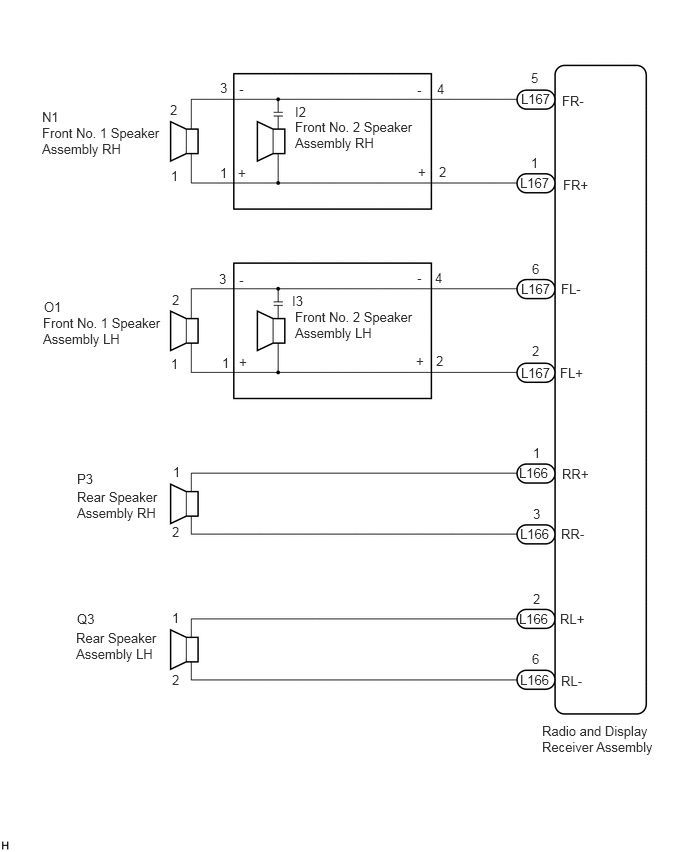
PROCEDURE
Disconnect the L167 and L166 radio and display receiver assembly connectors.
Disconnect the I2 and I3 front No. 2 speaker assembly connectors.
Disconnect the P3 and Q3 rear speaker assembly connectors.
Measure the resistance between the radio and display receiver assembly and body ground to check for a short circuit in the wire harness.
- Standard Resistance:
Tester Connection Condition Specified Condition L167-1 (FR+) - Body ground Always 10 kΩ or higher L167-5 (FR-) - Body ground Always 10 kΩ or higher L167-2 (FL+) - Body ground Always 10 kΩ or higher L167-6 (FL-) - Body ground Always 10 kΩ or higher L166-1 (RR+) - Body ground Always 10 kΩ or higher L166-3 (RR-) - Body ground Always 10 kΩ or higher L166-2 (RL+) - Body ground Always 10 kΩ or higher L166-6 (RL-) - Body ground Always 10 kΩ or higher
OK
NG
Disconnect the N1 and O1 front No. 1 speaker assembly connectors.
Disconnect the I2 and I3 front No. 2 speaker assembly connectors.
Measure the resistance between each of the front No. 2 speaker assemblies and body ground to check for a short circuit in the wire harness.
- Standard Resistance:
Tester Connection Condition Specified Condition I2-1 (+) - Body ground Always 10 kΩ or higher I2-3 (-) - Body ground Always 10 kΩ or higher I3-1 (+) - Body ground Always 10 kΩ or higher I3-3 (-) - Body ground Always 10 kΩ or higher
OK
NG
Remove the front No. 1 speaker assembly (See page Audio / Visual / Telematics>AUDIO / VIDEO>FRONT DOOR SPEAKER>REMOVAL).
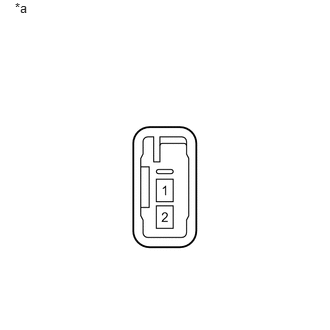
Measure the resistance according to the value(s) in the table below.
- Standard Resistance:
Tester Connection Condition Specified Condition 1 - 2 Always 3.2 to 4.8 Ω
| *a | Component without harness connected
(Front No. 1 Speaker Assembly) |
OK
NG
Remove the front No. 2 speaker assembly (See page Audio / Visual / Telematics>AUDIO / VIDEO>INSTRUMENT PANEL SPEAKER>REMOVAL).
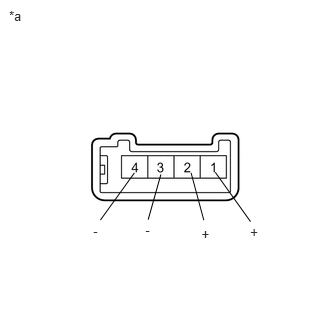
Measure the resistance according to the value(s) in the table below.
- Standard Resistance:
Tester Connection Condition Specified Condition 2 (+) - 4 (-) Always 10 kΩ or higher 3 (-) - 4 (-) Always Below 1 Ω 1 (+) - 2 (+) Always Below 1 Ω
| *a | Component without harness connected
(Front No. 2 Speaker Assembly) |
OK
NG
Replace the front No. 2 speaker assembly with a new or known good one (See page Audio / Visual / Telematics>AUDIO / VIDEO>INSTRUMENT PANEL SPEAKER>REMOVAL).
Clear the DTCs (See page Audio / Visual / Telematics>AUDIO / VIDEO>AUDIO AND VISUAL SYSTEM>DTC CHECK / CLEAR).
Recheck for DTCs and check that no DTCs are output.
- OK:
No DTCs are output.
- HINT:
- ·
Connect all the connectors to the front No. 2 speaker assemblies that were disconnected.
·When there is a possibility that either the right or left front No. 2 speaker assembly is defective, inspect by interchanging the right one with the left one.
·Perform the above inspection on both the LH and RH side.
OK
NG
Remove the rear speaker assembly (See page Audio / Visual / Telematics>AUDIO / VIDEO>REAR DOOR SPEAKER>REMOVAL).
Measure the resistance according to the value(s) in the table below.
- Standard Resistance:
Tester Connection Condition Specified Condition 1 - 2 Always 3.2 to 4.8 Ω
| *a | Component without harness connected
(Rear Speaker Assembly) |
OK
NG