THEFT DETERRENT / KEYLESS ENTRY ENTRY AND START SYSTEM(for Start Function) B2282 Vehicle Speed Signal Malfunction
DESCRIPTION
This DTC is stored when a mismatch between the vehicle speed signal from the direct line sent by the combination meter sub-assembly and the vehicle speed signal sent via CAN communication is detected.
- HINT:
- ·
When the power management control ECU is replaced with a new one and the cable is connected to the negative (-) auxiliary battery terminal, the power source mode changes to on (IG).
·When the auxiliary battery cable is disconnected and reconnected, the power source returns to the mode it was in before the auxiliary battery cable was disconnected.
| DTC Code | DTC Detection Condition | Trouble Area | DTC Output Confirmation Operation |
|---|---|---|---|
| B2282 | Mismatch between the vehicle speed signal from the direct line sent by the combination meter sub-assembly and the vehicle speed signal sent via CAN communication (1-trip detection logic*). | ·
CAN communication system ·
Combination meter sub-assembly ·
Power management control ECU ·
Junction Connector ·
Wire harness or connector |
Drive the vehicle for 20 seconds at a vehicle speed of 25 km/h (16 mph) or more, and then drive the vehicle at a vehicle speed that is less than 5 km/h (3 mph) for 20 seconds. |
*: Only output while a malfunction is present and the power switch is on (IG)
| DTC Code | Vehicle Condition when Malfunction Detected | Fail-safe Function when Malfunction Detected |
|---|---|---|
| B2282 | ·
When the signal from the direct line or CAN communication is malfunctioning and indicates no vehicle speed, there is no effect on vehicle behavior. ·
When the signal from the direct line or CAN communication is malfunctioning and indicates that the vehicle is moving, the power source mode cannot be turned from on (IG) to off. |
- |
WIRING DIAGRAM
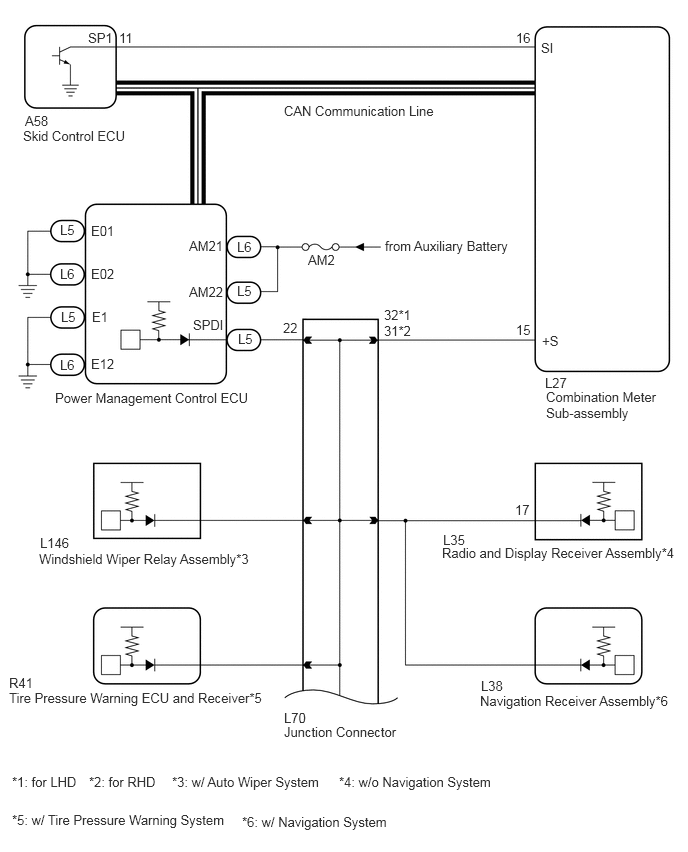
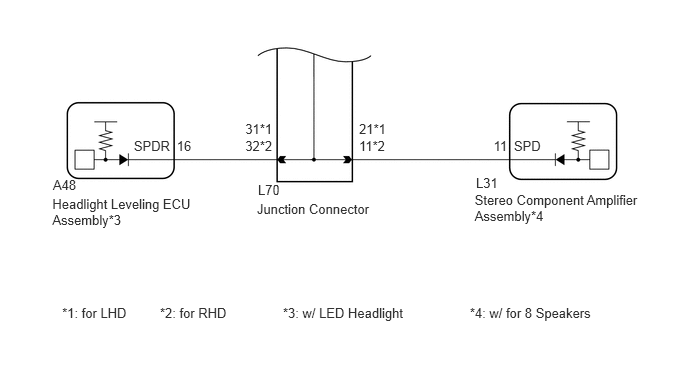
- HINT:
- ·
A voltage of 12 V or 5 V is output from each ECU and then input to the combination meter sub-assembly. The signal is changed to a pulse signal at the transistor in the combination meter sub-assembly. Each ECU controls the respective system based on the pulse signal.
·If a short occurs in an ECU, all systems in the diagram above will not operate normally.
CAUTION / NOTICE / HINT
- NOTICE:
- ·
When using the GTS with the power switch off, perform either of the following: 1) Turn a courtesy light switch on and off at intervals of 1.5 seconds or less until communication between the GTS and vehicle begins, or 2) connect the GTS to the vehicle, select the vehicle type under manual mode, and then enter the following menus:
for Power Source Control: Body Electrical / Power Source Control / Trouble Codes.
for Entry&Start: Body Electrical / Entry&Start / Trouble Codes.
·The entry and start system uses multiplex communication. First perform the inspections in "How to Proceed with Troubleshooting" to confirm that there are no communication malfunctions before proceeding with troubleshooting (See page Vehicle Interior>THEFT DETERRENT / KEYLESS ENTRY>ENTRY AND START SYSTEM (for Start Function)>HOW TO PROCEED WITH TROUBLESHOOTING).
·Inspect the fuses for circuits related to this system before performing the following inspection procedure.
·After performing repairs, perform the operation that fulfills the DTC output confirmation operation, and then confirm that no DTCs are output again.
- HINT:
Related Data List and Active Test Items DTC Data List Item Active Test Item B2282 Power Source Control·Vehicle Speed Signal
·Power Supply Condition
Combination MeterVehicle Speed Meter
-
PROCEDURE
Check if CAN communication DTCs are output.
- HINT:
-
If any DTCs for the CAN communication system are output, inspect those DTCs first.
- OK:
CAN communication DTC is not output.
OK
NG
Connect the GTS to the DLC3.
Turn the power switch on (IG).
Turn the GTS on.
Enter the following menus: Body Electrical / Combination Meter / Data List.
Check the Data List for proper functioning of the vehicle speed signal.
| Tester Display | Measurement Item/Range | Normal Condition | Diagnostic Note |
|---|---|---|---|
| Vehicle Speed Meter | Vehicle speed / Min.: 0 km/h (0 mph), Max.: 255 km/h (158 mph) | Almost the same as actual vehicle speed | - |
- OK:
Vehicle speed displayed on the GTS is almost the same as the actual vehicle speed measured using a speedometer tester (calibrated chassis dynamometer).
OK
NG
Enter the following menus: Body Electrical / Power Source Control / Data List.
Read the Data List according to the display on the GTS.
| Tester Display | Measurement Item/Range | Normal Condition | Diagnostic Note |
|---|---|---|---|
| Vehicle speed signal | Vehicle moving or stationary/Stop or Run | Stop: Vehicle stopped
Run: Vehicle moving at 5 km/h (3 mph) or more |
- |
- OK:
Stop (vehicle is stopped) and Run (vehicle is running) appear on the screen.
OK
NG
OK
NG
OK
NG
Disconnect the L27 connector from the combination meter sub-assembly.
Measure the resistance according to the value(s) in the table below.
- Standard Resistance:
Tester Connection Condition Specified Condition L5-14 (SPDI) - L27-15 (+S) Always Below 1 Ω L5-14 (SPDI) - Body ground Always 10 kΩ or higher
OK
NG
Remove the combination meter sub-assembly (See page Vehicle Interior>METER / GAUGE / DISPLAY>COMBINATION METER>REMOVAL).
Reconnect the L27 connector to the combination meter sub-assembly.
Reconnect the L5 connector to the power management control ECU.
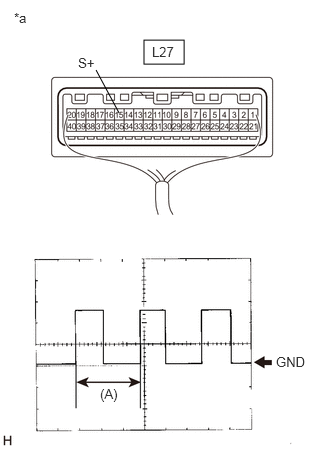
Connect an oscilloscope to terminal L27-15 (+S) and body ground.
Turn the power switch on (IG).
Turn a wheel slowly.
Check the signal waveform according to the condition(s) in the table below.
| Item | Condition |
|---|---|
| Tool setting | 5 V/DIV., 20 ms./DIV. |
| Vehicle condition | Driving at approx. 20 km/h (12 mph) |
- OK:
The waveform is similar to that shown in the illustration.
| *a | Component with harness connected
(Combination Meter Sub-assembly) |
- HINT:
-
When the system is functioning normally, one wheel revolution generates 4 pulses. As the vehicle speed increases, the width indicated by (A) in the illustration narrows.
OK
NG
Disconnect the L70 connector.
Measure the resistance according to the value(s) in the table below.
- Standard Resistance:
Tester Connection Condition Specified Condition L27-15 (+S) - L70-32*1
L27-15 (+S) - L70-31*2Always Below 1 Ω L27-15 (+S) - Body ground Always 10 kΩ or higher
*1: for LHD
*2: for RHD
OK
NG
Measure the resistance according to the value(s) in the table below.
- Standard Resistance:
Tester Connection Condition Specified Condition L5-14 (SPDI) - L70-22 Always Below 1 Ω L5-14 (SPDI) - Body ground Always 10 kΩ or higher
OK
NG