Home › Vehicle Interior › LIGHTING (INT) › LIGHTING SYSTEM › from 2016.05
RM2070E _58 Vehicle Interior _061939 LIGHTING (INT) _0301790 LIGHTING SYSTEM J

LIGHTING (INT)  LIGHTING SYSTEM  Interior Light Auto Cut Circuit  


DESCRIPTION

When battery saving control operates while the interior lights are on, the main body ECU (multiplex network body ECU) opens the light cut relay to turn off the lights.

WIRING DIAGRAM
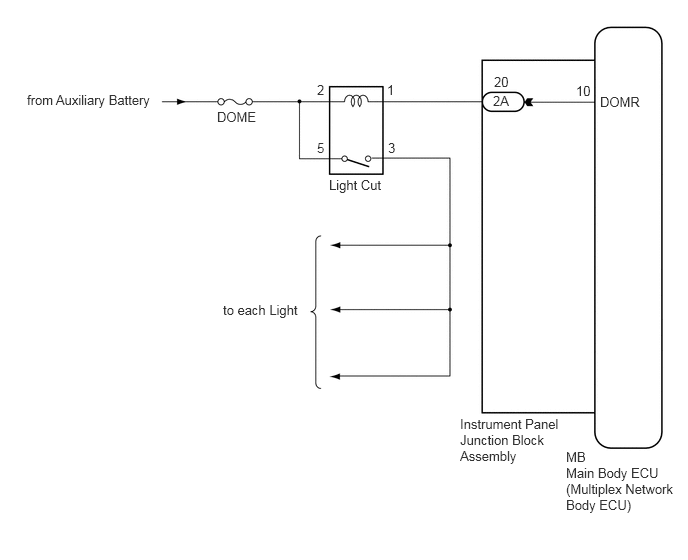
E311248E04
0.281,0.958 2,1.479 1.719,0.521 10 false from Auxiliary Battery 2.26,1.135 2.833,1.51 0.573,0.375 10 false DOME 3.302,0.854 3.875,1.229 0.573,0.375 10 false 2 4.031,0.854 4.604,1.229 0.573,0.375 10 false 1 4.042,1.458 4.615,1.833 0.573,0.375 10 false 3 3.302,1.458 3.875,1.833 0.573,0.375 10 false 5 3.427,1.844 4.219,2.26 0.792,0.417 10 false Light Cut 2.323,3.146 3.99,3.646 1.667,0.5 10 false to each Light 4.792,4.333 5.875,5.01 1.083,0.677 10 false Instrument Panel Junction Block Assembly 5.896,4.677 6.469,5.052 0.573,0.375 10 false MB 5.896,4.844 7.083,5.5 1.188,0.656 10 false Main Body ECU (Multiplex Network Body ECU) 5.135,0.969 5.708,1.344 0.573,0.375 10 false 2A 5.146,0.771 5.719,1.146 0.573,0.375 10 false 20 6,0.865 6.573,1.24 0.573,0.375 10 false 10 6.25,0.979 6.823,1.354 0.573,0.375 10 false DOMR

CAUTION / NOTICE / HINT

NOTICE:

Inspect the fuses for circuits related to this system before performing the following inspection procedure.


PROCEDURE

1.PERFORM ACTIVE TEST USING GTS
a.

Connect the GTS to the DLC3.


b.

Turn the power switch on (IG).


c.

Turn the GTS on.


d.

Enter the following menus: Body Electrical / Main Body / Active Test.


e.

Check that the relay operates.

Main Body
Tester Display Test Part Control Range Diagnostic Note
Relay for Interior Light Auto Cut Function Light Cut Relay ON/OFF -

OK:

Light cut relay operates.


OK

PROCEED TO NEXT SUSPECTED AREA SHOWN IN PROBLEM SYMPTOMS TABLE

NG

2.INSPECT LIGHT CUT RELAY
a.

Remove the light cut relay.


b.

Inspect the light cut relay (See page Vehicle Interior>LIGHTING (INT)>RELAY>ON-VEHICLE INSPECTION)


OK

3.CHECK HARNESS AND CONNECTOR (AUXILIARY BATTERY - LIGHT CUT RELAY)

NG

REPLACE LIGHT CUT RELAY

3.CHECK HARNESS AND CONNECTOR (AUXILIARY BATTERY - LIGHT CUT RELAY)
a.

Measure the voltage according to the value(s) in the table below.

Standard Voltage:
Tester Connection Condition Specified Condition
Relay terminal 2 - Body ground Power switch off 11 to 14 V


OK

4.CHECK HARNESS AND CONNECTOR (LIGHT CUT RELAY - INSTRUMENT PANEL JUNCTION BLOCK ASSEMBLY)

NG

REPAIR OR REPLACE HARNESS OR CONNECTOR

4.CHECK HARNESS AND CONNECTOR (LIGHT CUT RELAY - INSTRUMENT PANEL JUNCTION BLOCK ASSEMBLY)
a.

Disconnect the 2A instrument panel junction block assembly connector.


b.

Measure the resistance according to the value(s) in the table below.

Standard Resistance:
Tester Connection Condition Specified Condition
Relay terminal 1 - 2A-20 Always Below 1 Ω
Relay terminal 1 - Body ground Always 10 kΩ or higher


OK

5.INSPECT INSTRUMENT PANEL JUNCTION BLOCK ASSEMBLY

NG

REPAIR OR REPLACE HARNESS OR CONNECTOR

5.INSPECT INSTRUMENT PANEL JUNCTION BLOCK ASSEMBLY
a.

Remove the instrument panel junction block assembly (See page Power Source / Network>POWER DISTRIBUTION>MAIN BODY ECU>REMOVAL)


b.

Remove the main body ECU (multiplex network body ECU) from the instrument panel junction block assembly.
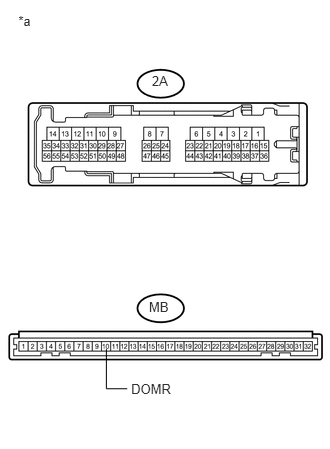

c.
U155075E01
0.191,0.138 0.385,0.284 0.194,0.145 10 *a 1.582,0.757 1.769,0.938 0.187,0.181 10 2A 1.551,3.111 1.808,3.293 0.257,0.181 10 MB 1.366,3.965 1.841,4.116 0.475,0.151 10 DOMR 1.108,3.636 1.108,4.049 1.108,4.049 1.325,4.049 false

Measure the resistance according to the value(s) in the table below.

Text in Illustration
*a Component without harness connected
(Instrument Panel Junction Block Assembly)

Standard Resistance:
Tester Connection Condition Specified Condition
2A-20 - MB-10 (DOMR) Always Below 1 Ω


OK

PROCEED TO NEXT SUSPECTED AREA SHOWN IN PROBLEM SYMPTOMS TABLE

NG

REPLACE INSTRUMENT PANEL JUNCTION BLOCK ASSEMBLY