Home › Vehicle Interior › HEATING / AIR CONDITIONING › AIR CONDITIONING SYSTEM › 2012.03–2020.08
RM2070E _58 Vehicle Interior _061946 HEATING / AIR CONDITIONING _0301837 AIR CONDITIONING SYSTEM J

HEATING / AIR CONDITIONING  AIR CONDITIONING SYSTEM  PTC Heater Circuit  


DESCRIPTION

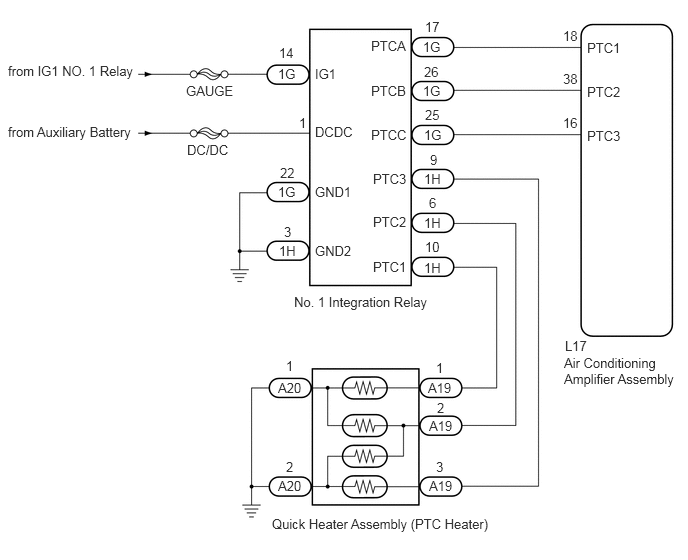
The air conditioning amplifier assembly sends operation signals to the No. 1 integration relay when quick heater assembly (PTC heater) operation conditions are met. Based on the signals from the air conditioning amplifier assembly, the relays in the No. 1 integration relay turn on, and power is supplied to the quick heater assembly (PTC heater) installed in the air conditioning radiator assembly.

Quick Heater Assembly (PTC Heater) Operation Condition
Control ECU Condition
Air Conditioning Amplifier Assembly Blower motor on
Temperature set to MAX HOT
ECO switch off
IDH terminal signal less than 1 V
(Inverter with converter assembly overload not detected)
Coolant temperature 55°C or lower
Ambient temperature 10°C or lower

WIRING DIAGRAM

E254463E02
0.083,0.656 1.469,0.865 1.385,0.208 10 false from IG1 NO. 1 Relay 0.083,1.292 1.469,1.5 1.385,0.208 10 false from Auxiliary Battery 1.938,0.865 2.521,1.073 0.583,0.208 10 false GAUGE 2.896,0.688 3.115,0.844 0.219,0.156 10 false 1G 3.281,0.688 3.74,0.844 0.458,0.156 10 false IG1 3.281,1.292 3.74,1.448 0.458,0.156 10 false DCDC 3.281,1.917 3.708,2.073 0.427,0.156 10 false GND1 3.281,2.531 3.719,2.688 0.438,0.156 10 false GND2 2.906,0.469 3.125,0.625 0.219,0.156 10 false 14 2.906,2.531 3.125,2.688 0.219,0.156 10 false 1H 2.958,2.333 3.073,2.49 0.115,0.156 10 false 3 2.896,3.958 3.177,4.115 0.281,0.156 10 false A20 2.979,3.729 3.094,3.885 0.115,0.156 10 false 1 4.458,3.958 4.74,4.115 0.281,0.156 10 false A19 4.542,3.75 4.656,3.906 0.115,0.156 10 false 1 4.469,4.354 4.75,4.51 0.281,0.156 10 false A19 4.552,4.167 4.667,4.323 0.115,0.156 10 false 2 4.469,4.979 4.75,5.135 0.281,0.156 10 false A19 2.833,5.375 5.208,5.719 2.375,0.344 10 false Quick Heater Assembly (PTC Heater) 3.063,3.063 4.542,3.219 1.479,0.156 10 false No. 1 Integration Relay 4.542,4.781 4.656,4.938 0.115,0.156 10 false 3 2.896,4.979 3.177,5.135 0.281,0.156 10 false A20 2.979,4.781 3.094,4.938 0.115,0.156 10 false 2 2.917,1.719 3.104,1.875 0.188,0.156 10 false 22 3.115,1.198 3.333,1.354 0.219,0.156 10 false 1 2.896,1.917 3.115,2.073 0.219,0.156 10 false 1G 4.406,0.406 4.625,0.563 0.219,0.156 10 false 1G 6.115,0.417 6.604,0.573 0.49,0.156 10 false PTC1 6.115,0.875 6.604,1.031 0.49,0.156 10 false PTC2 6.115,1.333 6.604,1.49 0.49,0.156 10 false PTC3 3.865,0.396 4.281,0.552 0.417,0.156 10 false PTCA 3.865,0.865 4.281,1.021 0.417,0.156 10 false PTCB 3.865,1.323 4.281,1.479 0.417,0.156 10 false PTCC 3.885,1.781 4.302,1.938 0.417,0.156 10 false PTC3 3.885,2.229 4.302,2.385 0.417,0.156 10 false PTC2 3.885,2.698 4.302,2.854 0.417,0.156 10 false PTC1 4.427,0.198 4.615,0.354 0.188,0.156 10 false 17 5.865,0.292 6.073,0.448 0.208,0.156 10 false 18 5.865,0.74 6.073,0.896 0.208,0.156 10 false 38 5.865,1.198 6.073,1.354 0.208,0.156 10 false 16 4.479,1.583 4.625,1.74 0.146,0.156 10 false 9 4.469,2.031 4.615,2.188 0.146,0.156 10 false 6 4.406,0.865 4.625,1.021 0.219,0.156 10 false 1G 4.417,0.667 4.635,0.823 0.219,0.156 10 false 26 4.427,1.115 4.646,1.271 0.219,0.156 10 false 25 4.417,1.323 4.635,1.479 0.219,0.156 10 false 1G 4.417,1.781 4.635,1.938 0.219,0.156 10 false 1H 4.417,2.24 4.635,2.396 0.219,0.156 10 false 1H 4.417,2.708 4.635,2.865 0.219,0.156 10 false 1H 5.885,3.521 6.188,3.677 0.302,0.156 10 false L17 5.875,3.698 7.115,4.083 1.24,0.385 10 false Air Conditioning Amplifier Assembly 4.427,2.49 4.646,2.646 0.219,0.156 10 false 10 1.948,1.479 2.458,1.688 0.51,0.208 10 false DC/DC

CAUTION / NOTICE / HINT

NOTICE:

Inspect the fuses for circuits related to this system before performing the following inspection procedure.


PROCEDURE

1.PERFORM ACTIVE TEST USING GTS
a.

Connect the GTS to the DLC3.


b.

Turn the power switch on (IG).


c.

Turn the GTS on.


d.

Enter the following menus: Body Electrical / Air Conditioner / Active Test.


e.

Check the operation by referring to the table below.


Air Conditioner
Tester Display Test Part Control Range Diagnostic Note
Heater Active Level Quick heater assembly Min.: 0, Max.: 31 -

OK:

Quick heater active level changes normally.


OK

PROCEED TO NEXT SUSPECTED AREA SHOWN IN PROBLEM SYMPTOMS TABLE

NG

2.INSPECT QUICK HEATER ASSEMBLY
a.
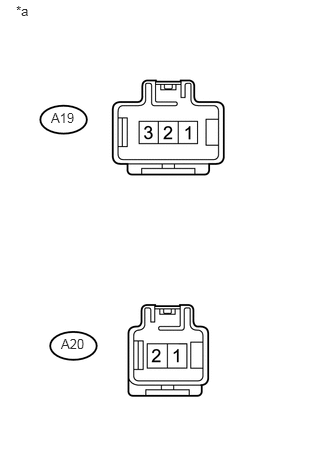
U155095E02
0.531,1.146 0.854,1.323 0.323,0.177 10 false A19 0.635,3.5 0.917,3.677 0.281,0.177 10 false A20 0.167,0.031 0.323,0.208 0.156,0.177 10 false *a

Remove the quick heater assembly (See page Vehicle Interior>HEATING / AIR CONDITIONING>PTC HEATER ASSEMBLY>REMOVAL).


b.

Measure the resistance according to the value(s) in the table below.

Standard Resistance:
Tester Connection Condition Specified Condition
A19-3 - A20-2 Always Below 1 Ω
A19-2 - A20-2 Always Below 1 Ω
A19-2 - A20-1 Always Below 1 Ω
A19-1 - A20-1 Always Below 1 Ω


Text in Illustration
*a Component without harness connected
(Quick Heater Assembly)


OK

3.CHECK HARNESS AND CONNECTOR (QUICK HEATER ASSEMBLY - BODY GROUND)

NG

3.CHECK HARNESS AND CONNECTOR (QUICK HEATER ASSEMBLY - BODY GROUND)
a.

Measure the resistance according to the value(s) in the table below.

Standard Resistance:
Tester Connection Condition Specified Condition
A20-1 - Body ground Always Below 1 Ω
A20-2 - Body ground Always Below 1 Ω


OK

4.CHECK HARNESS AND CONNECTOR (QUICK HEATER ASSEMBLY - NO. 1 INTEGRATION RELAY)

NG

REPAIR OR REPLACE HARNESS OR CONNECTOR

4.CHECK HARNESS AND CONNECTOR (QUICK HEATER ASSEMBLY - NO. 1 INTEGRATION RELAY)
a.

Disconnect the A19 quick heater assembly connector.


b.

Disconnect the 1H No. 1 integration relay connector.


c.

Measure the resistance according to the value(s) in the table below.

Standard Resistance:
Tester Connection Condition Specified Condition
A19-1 - 1H-10 (PTC1) Always Below 1 Ω
A19-2 - 1H-6 (PTC2) Always Below 1 Ω
A19-3 - 1H-9 (PTC3) Always Below 1 Ω
A19-1 - Body ground Always 10 kΩ or higher
A19-2 - Body ground Always 10 kΩ or higher
A19-3 - Body ground Always 10 kΩ or higher


OK

5.CHECK HARNESS AND CONNECTOR (NO. 1 INTEGRATION RELAY - POWER SOURCE)

NG

REPAIR OR REPLACE HARNESS OR CONNECTOR

5.CHECK HARNESS AND CONNECTOR (NO. 1 INTEGRATION RELAY - POWER SOURCE)
a.

Measure the voltage according to the value(s) in the table below.

Standard Voltage:
Tester Connection Condition Specified Condition
1 (DCDC) - Body ground Power switch off 11 to 14 V
1G-14 (IG1) - Body ground Power switch on (IG) 11 to 14 V


OK

6.CHECK HARNESS AND CONNECTOR (NO. 1 INTEGRATION RELAY - BODY GROUND)

NG

REPAIR OR REPLACE HARNESS OR CONNECTOR

6.CHECK HARNESS AND CONNECTOR (NO. 1 INTEGRATION RELAY - BODY GROUND)
a.

Disconnect the 1G No. 1 integration relay connector.


b.

Measure the resistance according to the value(s) in the table below.

Standard Resistance:
Tester Connection Condition Specified Condition
1G-22 (GND1) - Body ground Always Below 1 Ω
1H-3 (GND2) - Body ground Always Below 1 Ω


OK

7.CHECK HARNESS AND CONNECTOR (AIR CONDITIONING AMPLIFIER - NO. 1 INTEGRATION RELAY)

NG

REPAIR OR REPLACE HARNESS OR CONNECTOR

7.CHECK HARNESS AND CONNECTOR (AIR CONDITIONING AMPLIFIER - NO. 1 INTEGRATION RELAY)
a.

Disconnect the L17 air conditioning amplifier assembly connector.


b.

Measure the resistance according to the value(s) in the table below.

Standard Resistance:
Tester Connection Condition Specified Condition
L17-18 (PTC1) - 1G-17 (PTCA) Always Below 1 Ω
L17-38 (PTC2) - 1G-26 (PTCB) Always Below 1 Ω
L17-16 (PTC3) - 1G-25 (PTCC) Always Below 1 Ω
L17-18 (PTC1) - Body ground Always 10 kΩ or higher
L17-38 (PTC2) - Body ground Always 10 kΩ or higher
L17-16 (PTC3) - Body ground Always 10 kΩ or higher


OK

8.CHECK NO. 1 INTEGRATION RELAY

NG

REPAIR OR REPLACE HARNESS OR CONNECTOR

8.CHECK NO. 1 INTEGRATION RELAY
a.

Replace the No. 1 integration relay (See page Power Source / Network>POWER DISTRIBUTION>INTEGRATION RELAY>REMOVAL).

HINT:

Since the No. 1 integration relay cannot be inspected while it is removed from the vehicle, replace the No. 1 integration relay with a new or known good one and check that the condition returns to normal.


b.

Check if the same problem occurs again.

OK:

Same problem does not occur.


OK

END (NO. 1 INTEGRATION RELAY WAS DEFECTIVE)

NG

PROCEED TO NEXT SUSPECTED AREA SHOWN IN PROBLEM SYMPTOMS TABLE