LIGHTING (EXT) LIGHTING SYSTEM Back-up Light Circuit
DESCRIPTION
The power management control ECU controls the back-up light.
WIRING DIAGRAM
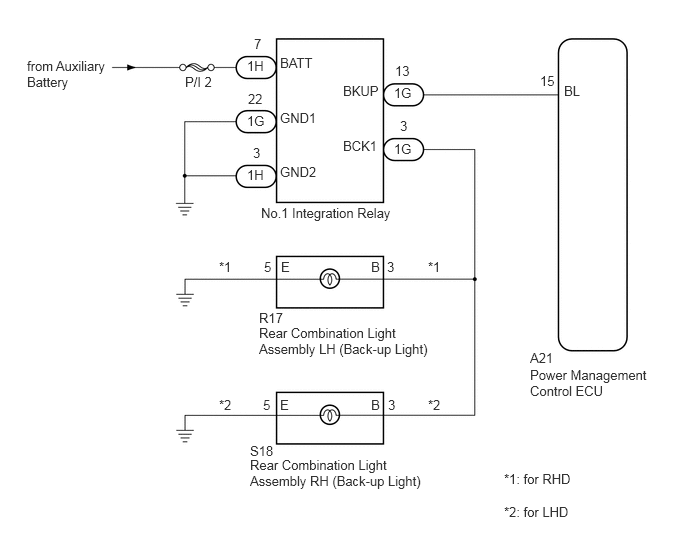
CAUTION / NOTICE / HINT
- NOTICE:
-
Inspect the fuses for circuits related to this system before performing the following inspection procedure.
PROCEDURE
Disconnect the 1H No. 1 integration relay connector.
Measure the voltage and resistance according to the value(s) in the table below.
- Standard Voltage:
Tester Connector Condition Specified Condition 1H-7 (BATT) - Body ground Power switch off 11 to 14 V
- Standard Resistance:
Tester Connection Condition Specified Condition 1H-3 (GND2) - Body ground Always Below 1 Ω
Disconnect the 1G No. 1 integration relay connector.
Measure the resistance according to the value(s) in the table below.
- Standard Resistance:
Tester Connection Condition Specified Condition 1G-22 (GND1) - Body ground Always Below 1 Ω
OK
NG
Disconnect the A21 power management control ECU connector.
Measure the resistance according to the value(s) in the table below.
- Standard Resistance:
Tester Connection Condition Specified Condition 1G-13 (BKUP) - A21-15 (BL) Always Below 1 Ω 1G-13 (BKUP) - Body ground Always 10 kΩ or higher
OK
NG
Disconnect the S18 rear combination light assembly RH connector or the R17 rear combination light assembly LH connector.
Measure the resistance according to the value(s) in the table below.
- Standard Resistance:
Tester Connection Condition Specified Condition 1G-3 (BCK1) - S18-3 (B) Always Below 1 Ω 1G-3 (BCK1) - R17-3 (B) Always Below 1 Ω 1G-3 (BCK1) - Body ground Always 10 kΩ or higher
OK
NG
Replace the No. 1 integration relay with a new or known good one (See page Power Source / Network>POWER DISTRIBUTION>INTEGRATION RELAY>REMOVAL).
Check that the back-up light operates normally.
- OK:
The back-up light operates normally.
OK
NG