VEHICLE PROXIMITY NOTIFICATION SYSTEM VEHICLE PROXIMITY NOTIFICATION SYSTEM There is No Sound Made
DESCRIPTION
The vehicle approaching speaker controller receives stop light switch signals from the stop light switch assembly, vehicle speed signals from the combination meter sub-assembly, engine oil pressure switch signals from the engine oil pressure switch assembly and P position switch signals from the transmission control ECU assembly, and produces the warning sound from the vehicle approaching speaker assembly.
WIRING DIAGRAM
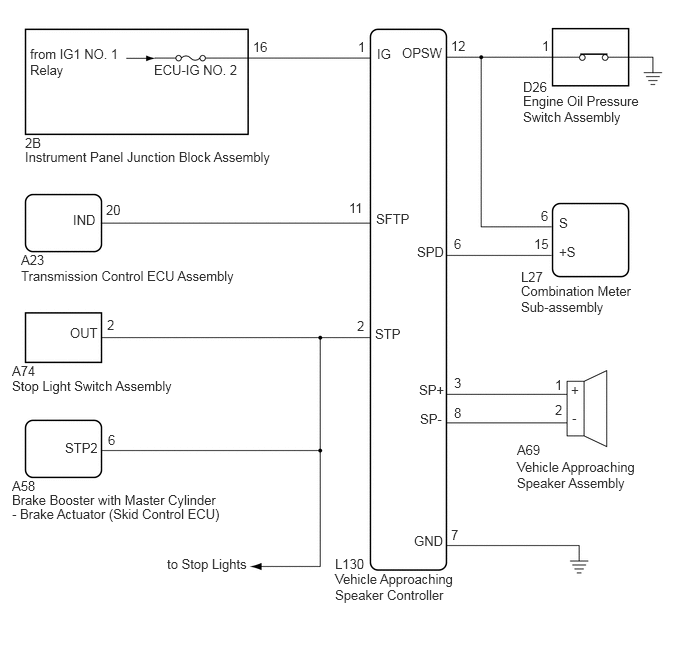
CAUTION / NOTICE / HINT
- NOTICE:
-
Inspect the fuses for circuits related to this system before performing the following inspection procedure.
PROCEDURE
Connect the GTS to the DLC3.
Turn the power switch on (IG).
Turn the GTS on.
Using the GTS, enter the following menus: Body Electrical / Vehicle Proximity Notification System / Trouble Codes.
Check for DTCs.
- Result:
Result Proceed to DTC B1350 is not output A DTC B1350 is output B Communication with the GTS is not possible C
A
B
(See pageVehicle Exterior>VEHICLE PROXIMITY NOTIFICATION SYSTEM>VEHICLE PROXIMITY NOTIFICATION SYSTEM>B1350)
C
Connect the GTS to the DLC3.
Turn the power switch on (IG).
Turn the GTS on.
Enter the following menus: Body Electrical / Vehicle Proximity Notification System / Active Test.
Perform the Active Test according to the display on the GTS.
| Tester Display | Test Part | Control Range | Diagnostic Note |
|---|---|---|---|
| Proximity Sound (Vehicle Stationary) | Proximity sound (Vehicle stationary) | OFF or ON | Produces warning sound when vehicle is stopped |
- Result:
Result Proceed to The warning sound is produced A The warning sound is not produced B
A
B
Connect the GTS to the DLC3.
Turn the power switch on (IG).
Turn the GTS on.
Enter the following menus: Body Electrical / Vehicle Proximity Notification System / Data List.
Read the Data List according to the display on the GTS.
| Tester Display | Measurement Item/Range | Normal Condition | Diagnostic Note |
|---|---|---|---|
| Stop Light SW | Stop light switch / OFF or ON | OFF: Brake pedal released
ON: Brake pedal depressed |
- |
- Result:
Result Proceed to The GTS display changes according to brake pedal operation A The GTS display does not change according to brake pedal operation B
A
B
Connect the GTS to the DLC3.
Turn the power switch on (IG).
Turn the GTS on.
Enter the following menus: Body Electrical / Vehicle Proximity Notification System / Data List.
Read the Data List according to the display on the GTS.
| Tester Display | Measurement Item/Range | Normal Condition | Diagnostic Note |
|---|---|---|---|
| Vehicle Speed | Vehicle speed / Min.: 0 km/h (0 mph), Max.: 255 km/h (158 mph) | Almost the same as actual vehicle speed | - |
- Result:
Result Proceed to The GTS display changes according to the vehicle speed A The GTS display does not change according to the vehicle speed B
A
B
Connect the GTS to the DLC3.
Turn the power switch on (IG).
Turn the GTS on.
Enter the following menus: Body Electrical / Vehicle Proximity Notification System / Data List.
Read the Data List according to the display on the GTS.
| Tester Display | Measurement Item/Range | Normal Condition | Diagnostic Note |
|---|---|---|---|
| Oil Pressure SW | Oil pressure switch / OFF or ON | OFF: Engine started
ON: Engine not started |
- |
- Result:
Result Proceed to The GTS display changes according to engine operation A The GTS display does not change according to engine operation B
A
B
Connect the GTS to the DLC3.
Turn the power switch on (IG).
Turn the GTS on.
Enter the following menus: Body Electrical / Vehicle Proximity Notification System / Data List.
Read the Data List according to the display on the GTS.
| Tester Display | Measurement Item/Range | Normal Condition | Diagnostic Note |
|---|---|---|---|
| Shift Position | P position switch / Not Parking or Parking | Not Parking or Parking | - |
- Result:
Result Proceed to The GTS display changes according to the selected shift state A The GTS display does not change according to the selected shift state B
A
(See pageVehicle Exterior>VEHICLE PROXIMITY NOTIFICATION SYSTEM>VEHICLE APPROACHING SPEAKER ECU>REMOVAL)
B
Disconnect the A23 transmission control ECU assembly connector.
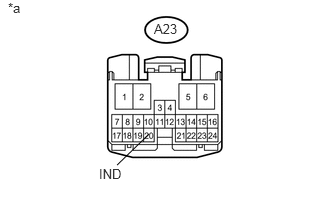
Measure the voltage according to the value(s) in the table below.
- Standard Voltage:
Tester Connection Condition Specified Condition A23-20 (IND) - Body ground Power switch on (IG) 8 V or higher Power switch off Below 1 V
| *a | Front view of wire harness connector
(to Transmission Control ECU Assembly) |
OK
NG
Reconnect the A23 transmission control ECU assembly connector.
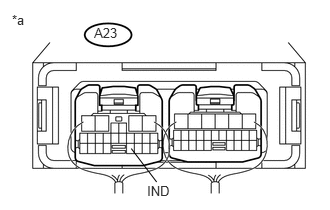
Measure the voltage according to the value(s) in the table below.
- Standard Voltage:
Tester Connection Condition Specified Condition A23-20 (IND) - Body ground Power switch on (IG), park (P) selected Below 2.5 V Power switch on (IG), park (P) not selected 8 V or higher
| *a | Component with harness connected
(Transmission Control ECU Assembly) |
OK
(See pageVehicle Exterior>VEHICLE PROXIMITY NOTIFICATION SYSTEM>VEHICLE APPROACHING SPEAKER ECU>REMOVAL)
NG
Disconnect the L130 vehicle approaching speaker controller connector.
Measure the resistance according to the value(s) in the table below.
- Standard Resistance:
Tester Connection Condition Specified Condition L130-11 (SFTP) - A23-20 (IND) Always Below 1 Ω L130-11 (SFTP) or A23-20 (IND) - Body ground Always 10 kΩ or higher
OK
(See pageVehicle Exterior>VEHICLE PROXIMITY NOTIFICATION SYSTEM>VEHICLE APPROACHING SPEAKER ECU>REMOVAL)
NG
Remove the vehicle approaching speaker assembly (see page Vehicle Exterior>VEHICLE PROXIMITY NOTIFICATION SYSTEM>VEHICLE APPROACHING SPEAKER>REMOVAL).
Inspect the vehicle approaching speaker assembly (see page Vehicle Exterior>VEHICLE PROXIMITY NOTIFICATION SYSTEM>VEHICLE APPROACHING SPEAKER>INSPECTION).
OK
NG
(See pageVehicle Exterior>VEHICLE PROXIMITY NOTIFICATION SYSTEM>VEHICLE APPROACHING SPEAKER>REMOVAL)
Disconnect the L130 vehicle approaching speaker controller connector.
Measure the resistance according to the value(s) in the table below.
- Standard Resistance:
Tester Connection Condition Specified Condition L130-3 (SP+) - A69-1 (+) Always Below 1 Ω L130-8 (SP-) - A69-2 (-) Always Below 1 Ω L130-3 (SP+) or A69-1 (+) - Body ground Always 10 kΩ or higher L130-8 (SP-) or A69-2 (-) - Body ground Always 10 kΩ or higher
OK
(See pageVehicle Exterior>VEHICLE PROXIMITY NOTIFICATION SYSTEM>VEHICLE APPROACHING SPEAKER ECU>REMOVAL)
NG
Check that the stop lights come on when the brake pedal is depressed, and go off when the brake pedal is released.
- OK:
Condition Illumination Condition Brake pedal depressed On Brake pedal released Off
OK
NG
Disconnect the L130 vehicle approaching speaker controller connector.
Disconnect the A74 stop light switch assembly connector.
Disconnect the A58 brake booster with master cylinder brake actuator (skid control ECU) connector.
Disconnect the R17 rear combination light assembly LH connector.
Disconnect the S18 rear combination light assembly RH connector.
Disconnect the d1 center stop light set connector.
Measure the resistance according to the value(s) in the table below.
- Standard Resistance:
Tester Connection Condition Specified Condition L130-2 (STP) - A74-2 (OUT) Always Below 1 Ω L130-2 (STP) or A74-2 (OUT) - Body ground Always 10 kΩ or higher L130-2 (STP) - A58-6 (STP2) Always Below 1 Ω L130-2 (STP) or A58-6 (STP2) - Body ground Always 10 kΩ or higher
OK
(See pageVehicle Exterior>VEHICLE PROXIMITY NOTIFICATION SYSTEM>VEHICLE APPROACHING SPEAKER ECU>REMOVAL)
NG
Disconnect the L130 vehicle approaching speaker controller connector.
Disconnect the L27 combination meter sub-assembly connector.
Measure the resistance according to the value(s) in the table below.
- Standard Resistance:
Tester Connection Condition Specified Condition L130-6 (SPD) - L27-15 (+S) Always Below 1 Ω L130-6 (SPD) or L27-15 (+S) - Body ground Always 10 kΩ or higher
OK
NG
Reconnect the L130 vehicle approaching speaker controller connector.
Reconnect the L27 combination meter sub-assembly connector.
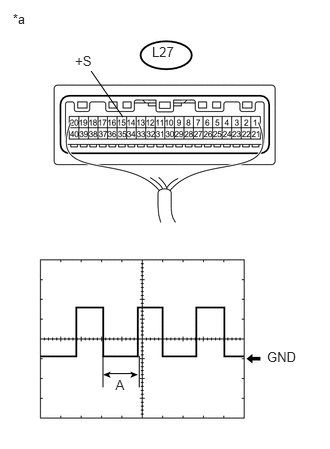
Check the input waveform.
Remove the combination meter sub-assembly with the connector(s) still connected.
Connect an oscilloscope to terminal L27-15 (+S) and body ground.
Turn the power switch on (IG).
Turn a wheel slowly.
Check the signal waveform according to the condition(s) in the table below.
| Item | Condition |
|---|---|
| Tool setting | 5 V/DIV., 20 ms./DIV. |
| Vehicle condition | Power switch on (IG), Wheel being rotated |
| *a | Component with harness connected
(Combination Meter Sub-assembly) |
- OK:
The waveform is displayed as shown in the illustration.
- HINT:
-
When the system is functioning normally, one wheel revolution generates 4 pulses. As the vehicle speed increases, the width indicated by (A) in the illustration narrows.
OK
(See pageVehicle Exterior>VEHICLE PROXIMITY NOTIFICATION SYSTEM>VEHICLE APPROACHING SPEAKER ECU>REMOVAL)
NG
(See pageVehicle Interior>METER / GAUGE / DISPLAY>METER / GAUGE SYSTEM>HOW TO PROCEED WITH TROUBLESHOOTING)
Disconnect the L130 vehicle approaching speaker controller connector.
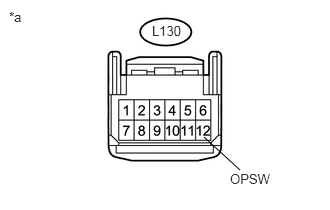
Measure the voltage according to the value(s) in the table below.
- Standard Voltage:
Tester Connection Condition Specified Condition L130-12 (OPSW) - Body ground Idling* 8 V or higher Power switch on (IG) Below 2 V
- HINT:
-
*: Put the engine in inspection mode (See page General>INTRODUCTION>REPAIR INSTRUCTION>INSPECTION MODE PROCEDURE).
| *a | Front view of wire harness connector
(Vehicle Approaching Speaker Controller) |
OK
(See pageVehicle Exterior>VEHICLE PROXIMITY NOTIFICATION SYSTEM>VEHICLE APPROACHING SPEAKER ECU>REMOVAL)
NG
Disconnect the D26 engine oil pressure switch assembly connector.
Disconnect the L27 combination meter sub-assembly connector.
Measure the resistance according to the value(s) in the table below.
- Standard Resistance:
Tester Connection Condition Specified Condition L130-12 (OPSW) - D26-1 Always Below 1 Ω L130-12 (OPSW) or D26-1 - Body ground Always 10 kΩ or higher
OK
NG