EXTERIOR PANELS / TRIM FRONT BUMPER REASSEMBLY
PROCEDURE

 57014A
1.INSTALL FRONT SIDE MEMBER BRACKET SUB-ASSEMBLY LH
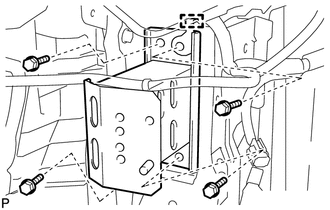
Engage the guide.
Install the front side member bracket sub-assembly LH with the 4 bolts.
- Torque:
- 50 N*m (510 kgf*cm, 37 ft.*lbf)
57013C
2.INSTALL FRONT SIDE MEMBER BRACKET SUB-ASSEMBLY RH
- HINT:
-
Use the same procedure as for the LH side.
52116A
3.INSTALL FRONT BUMPER SIDE SUPPORT LH
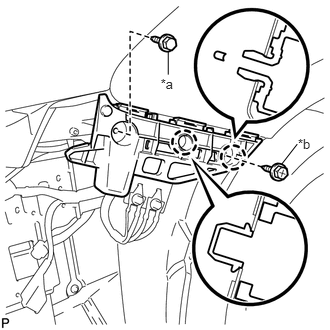
Engage the 2 claws.
| *a | Bolt |
| *b | Screw |
Install the front bumper side support LH with the bolt and screw.
- Torque:
- Bolt : 5.4 N*m (55 kgf*cm, 48 in.*lbf)
- Screw : 2.0 N*m (20 kgf*cm, 18 in.*lbf)
52115A
4.INSTALL FRONT BUMPER SIDE SUPPORT RH
- HINT:
-
Use the same procedure as for the LH side.
52021
5.INSTALL FRONT BUMPER REINFORCEMENT SUB-ASSEMBLY
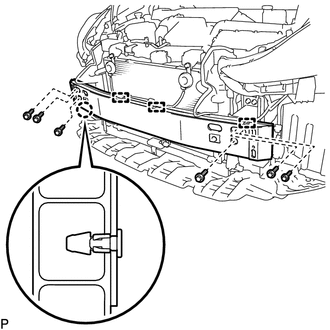
Engage the claw.
Install the front bumper reinforcement sub-assembly with the 6 bolts.
- Torque:
- 30 N*m (306 kgf*cm, 22 ft.*lbf)
Engage the 3 clamps.
52611
6.INSTALL FRONT BUMPER ENERGY ABSORBER
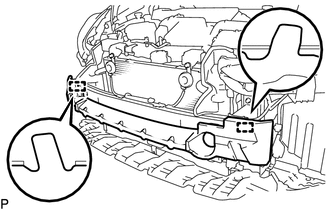
Engage the 2 guides to install the front bumper energy absorber.
52113D
7.INSTALL FRONT BUMPER EXTENSION LH
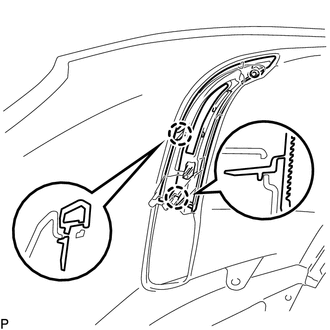
Engage the 2 claws to install the front bumper extension LH.
52112D
8.INSTALL FRONT BUMPER EXTENSION RH
- HINT:
-
Use the same procedure as for the LH side.
53879A
9.INSTALL FRONT FENDER LINER RETAINER
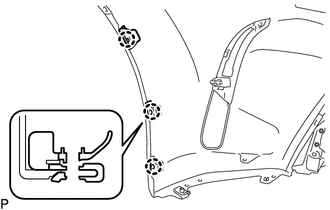
Engage the claw to install the 3 front fender liner retainers.
- HINT:
-
Use the same procedure for the RH side and LH side.
52822
10.INSTALL AIR INTAKE DUCT LH
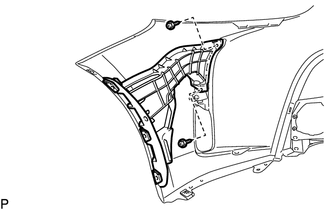
Install the 2 screws.
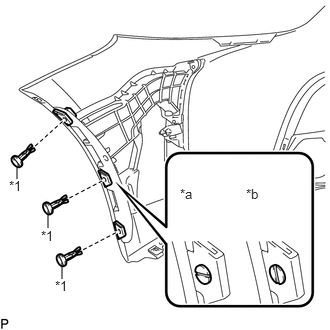
Install the air intake duct LH with the 3 pin hold clips as shown in the illustration.
| *1 | Pin Hold Clip |
| *a | Correct |
| *b | Incorrect |
- NOTICE:
-
Insert the pin hold clip with the slot aligned vertically. Do not rotate the clip after inserting it. After installation, confirm that the slot is aligned vertically.
52821
11.INSTALL AIR INTAKE DUCT RH
- HINT:
-
Use the same procedure for the RH side and LH side.
52128B
12.INSTALL FRONT BUMPER HOLE COVER LH
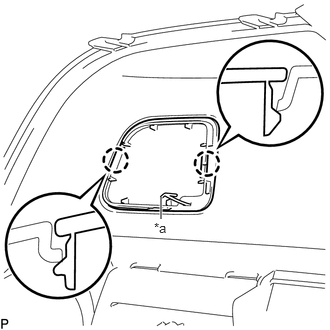
Engage the hook.
| *a | Hook |
Engage the 2 claws and install the front bumper hole cover LH.
52127C
13.INSTALL FRONT BUMPER HOLE COVER RH
- HINT:
-
Use the same procedure as for the LH side.
53102A
14.INSTALL LOWER RADIATOR GRILLE SUB-ASSEMBLY
Engage the 4 guides and 14 claws.
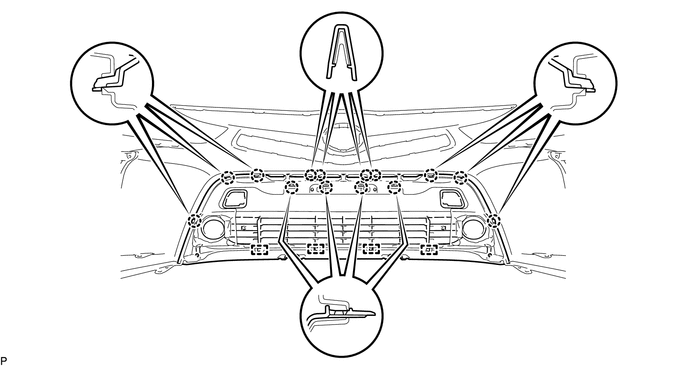
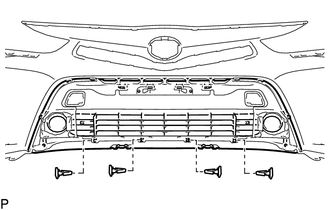
Install the 4 outside moulding retainers.
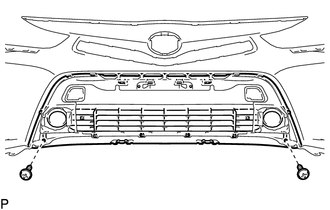
Install the lower radiator grille sub-assembly with the 2 screws.
53113E
15.INSTALL LOWER NO. 2 RADIATOR GRILLE
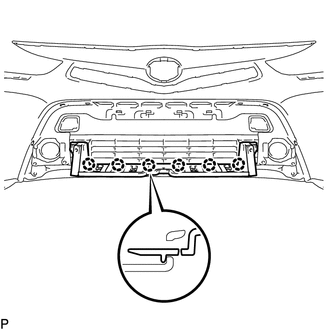
Engage the 6 claws.
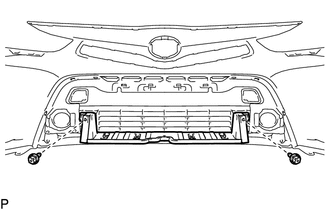
Install the lower No. 2 radiator grille with the 2 screws.
75301A
16.INSTALL FRONT BUMPER EMBLEM SUB-ASSEMBLY
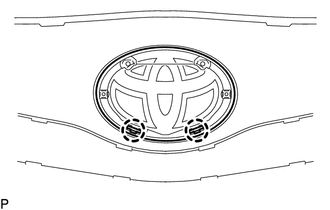
Engage the 2 claws.
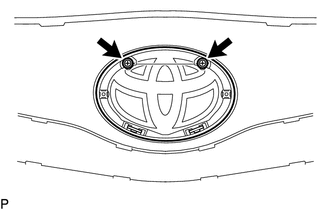
Install the front bumper emblem sub-assembly with the 2 screws.
53111
17.INSTALL RADIATOR GRILLE
Engage the guide and 16 claws.
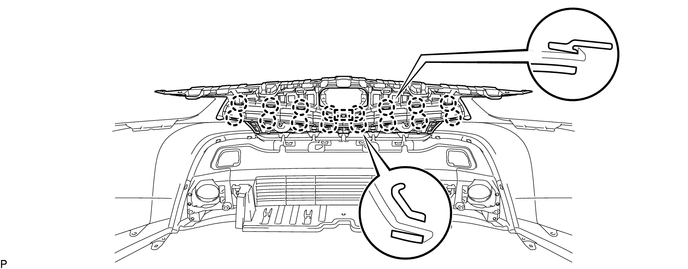
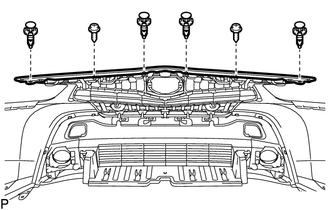
Install the 4 clips.
Install the radiator grille with the 2 screws.
53395E
18.INSTALL HOOD TO FRONT END PANEL SEAL
Clean the front bumper cover.
Remove any remaining double-sided tape from the front bumper cover.
Wipe off any tape adhesive residue with cleaner.
Remove the release paper from a new hood to front end panel seal.
- HINT:
-
After removing the release paper, keep the exposed adhesive free from foreign matter.
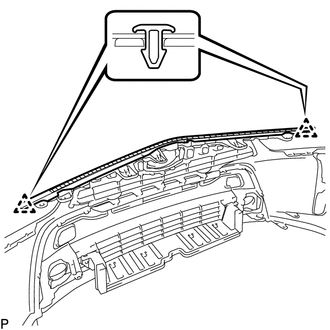
Install the hood to front end panel seal with 2 clips.

|
Double-sided Tape |
81220
19.INSTALL FOG LIGHT ASSEMBLY LH
81210A
20.INSTALL FOG LIGHT ASSEMBLY RH
- HINT:
-
Use the same procedure as for the LH side.
82113
21.INSTALL NO. 3 ENGINE ROOM WIRE
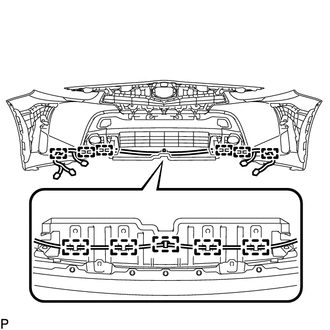
Engage the 11 clamps to install the No. 3 engine room wire.
81440B
22.INSTALL DAYTIME RUNNING LIGHT ASSEMBLY LH
81430C
23.INSTALL DAYTIME RUNNING LIGHT ASSEMBLY RH
- HINT:
-
Use the same procedure as for the LH side.
89348
24.INSTALL NO. 1 ULTRASONIC SENSOR RETAINER (w/ Intelligent Parking Assist System)
89341A
25.INSTALL NO. 1 ULTRASONIC SENSOR (w/ Intelligent Parking Assist System)
88211B
26.INSTALL MILLIMETER WAVE RADAR SENSOR ASSEMBLY (w/ Pre-collision System)