PRE-CRASH SAFETY PRE-CRASH SAFETY SYSTEM C1A4B Stop Light Relay Circuit
DESCRIPTION
The skid control ECU (brake booster with master cylinder assembly) sends a stop light operation request signal to the stop light relay (stop light switch assembly). If the skid control ECU (brake booster with master cylinder assembly) detects a malfunction in the stop light relay (stop light switch assembly) circuit, the driving support ECU assembly stores DTC C1A4B.
| DTC No. | Detection Item | DTC Detection Condition | Trouble Area |
|---|---|---|---|
| C1A4B | Stop Light Relay Circuit | Both of the following conditions are met:
1.
All of the following conditions are met: -
3 seconds have elapsed since the power switch was turned to on (IG). -
The auxiliary battery voltage is 10 V or more for 3 seconds or more. 2.
All of the following conditions are met for 1 second or more: -
Communication between the driving support ECU assembly and skid control ECU (brake booster with master cylinder assembly) is normal. -
The driving support ECU assembly receives a stop light relay circuit malfunction signal from the skid control ECU (brake booster with master cylinder assembly)
|
·
Skid control ECU (Brake booster with master cylinder assembly) ·
Stop light relay (Stop light switch assembly) ·
Rear combination light socket and wire sub-assembly LH ·
Rear combination light socket and wire sub-assembly RH ·
Center stop light set ·
Hybrid vehicle control ECU ·
Certification ECU (Smart key ECU assembly) ·
Vehicle approaching speaker controller ·
Harness or connector |
WIRING DIAGRAM
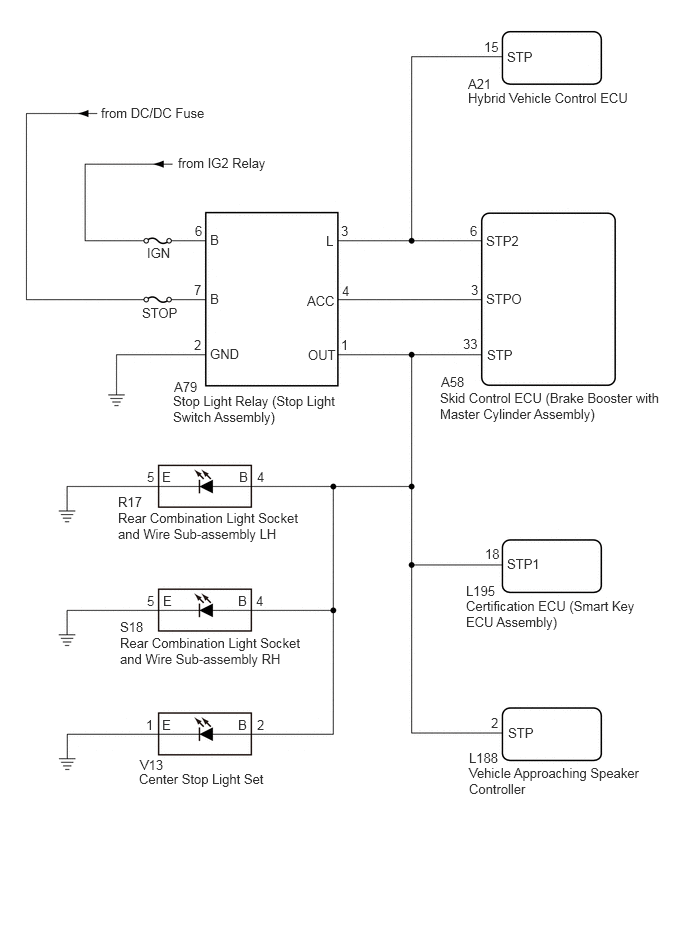
CAUTION / NOTICE / HINT
- NOTICE:
- ·
Inspect the fuses for circuits related to this system before performing the following procedure.
·Make sure that there is no looseness at the locking part and the connecting part of the connector.
·Check both the connector case and the terminals for deformation and corrosion.
PROCEDURE
Turn the power switch off.
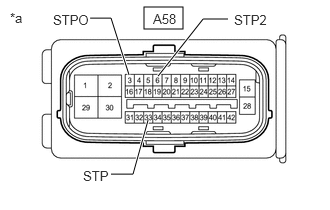
| *a | Front view of wire harness connector
(to Skid Control ECU (Brake Booster with Master Cylinder Assembly)) |
Disconnect the A58 skid control ECU (brake booster with master cylinder assembly) connector.
Measure the voltage according to the value(s) in the table below.
- Standard Voltage:
Tester Connection Condition Specified Condition A58-6 (STP2) - Body ground Brake pedal depressed 11 to 14 V Brake pedal released Below 1.5 V A58-3 (STPO) - Body ground Always 11 to 14 V A58-33 (STP) - Body ground Brake pedal depressed 11 to 14 V Brake pedal released Below 1.5 V
Connect the A58 skid control ECU (brake booster with master cylinder assembly) connector.
- Result:
Result Proceed to The voltage is as specified for every terminal. A Only the voltage at terminal STP2 is not as specified. B Only the voltage at terminal STPO is not as specified. C Only the voltage at terminal STP is not as specified. D The voltage at both terminal STPO and terminal STP are not as specified. E
A
B
C
D
E
Connect the GTS to the DLC3.
Turn the power switch on (IG).
Turn the GTS on.
Enter the following menus: Chassis / ABS/VSC/TRC / Active Test.
According to the display on the GTS, perform the Active Test Stop Light Relay.
| Tester Display | Measurement Item | Control Range | Diagnostic Note |
|---|---|---|---|
| Stop Light Relay | Stop light relay (Stop light switch assembly) | ON / OFF | Stop lights come on |
- OK:
The stop lights turn on and off correctly in response to the operation of the Active Test.
- Result:
Proceed to OK NG
OK
NG
Connect the GTS to the DLC3.
Turn the power switch on (IG).
Turn the GTS on.
Enter the following menus: Body Electrical / Pre-Crash 2 / Trouble Codes.
Clear the DTCs.
Click hereVehicle Interior>PRE-CRASH SAFETY>PRE-CRASH SAFETY SYSTEM>DTC CHECK / CLEAR
Enter the following menus: Chassis / ABS/VSC/TRC / Active Test.
According to the display on the GTS, perform the Active Test Stop Light Relay.
| Tester Display | Measurement Item | Control Range | Diagnostic Note |
|---|---|---|---|
| Stop Light Relay | Stop light relay (Stop light switch assembly) | ON / OFF | Stop lights come on |
Enter the following menus: Body Electrical / Pre-Crash 2 / Trouble Codes.
Check for DTCs.
Click hereVehicle Interior>PRE-CRASH SAFETY>PRE-CRASH SAFETY SYSTEM>DTC CHECK / CLEAR
- OK:
DTC C1A4B is not output
- Result:
Proceed to OK NG
OK
Click hereGeneral>INTRODUCTION>HOW TO TROUBLESHOOT ECU CONTROLLED SYSTEMS>HOW TO PROCEED WITH TROUBLESHOOTING
NG
for LHD: Click hereBrake>BRAKE SYSTEM (OTHER)>BRAKE BOOSTER (for LHD)>COMPONENTS
for RHD: Click hereBrake>BRAKE SYSTEM (OTHER)>BRAKE BOOSTER (for RHD)>COMPONENTS
Inspect the stop light relay (stop light switch assembly).
Click hereVehicle Exterior>LIGHTING (EXT)>STOP LIGHT SWITCH>INSPECTION
- OK:
The stop light relay (stop light switch assembly) is normal.
- Result:
Proceed to OK NG
OK
for LHD: Click hereBrake>BRAKE SYSTEM (OTHER)>BRAKE BOOSTER (for LHD)>COMPONENTS
for RHD: Click hereBrake>BRAKE SYSTEM (OTHER)>BRAKE BOOSTER (for RHD)>COMPONENTS
NG
Turn the power switch off.
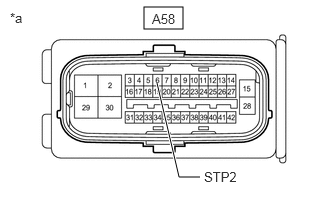
| *a | Front view of wire harness connector
(to Skid Control ECU (Brake Booster with Master Cylinder Assembly)) |
Disconnect the A58 skid control ECU (brake booster with master cylinder assembly) connector.
Measure the voltage according to the value(s) in the table below.
- Standard Voltage:
Tester Connection Condition Specified Condition A58-6 (STP2) - Body ground Brake pedal released Below 1.5 V
Connect the A58 skid control ECU (brake booster with master cylinder assembly) connector.
- Result:
Proceed to OK NG
OK
NG
Disconnect the A58 skid control ECU (brake booster with master cylinder assembly) connector.
Disconnect the A21 hybrid vehicle control ECU connector.
Measure the voltage according to the value(s) in the table below.
- Standard Voltage:
Tester Connection Condition Specified Condition A58-6 (STP2) - Body ground Brake pedal depressed 11 to 14 V
Connect the A21 hybrid vehicle control ECU connector.
Connect the A58 skid control ECU (brake booster with master cylinder assembly) connector.
- Result:
Proceed to OK NG
OK
NG
Turn the power switch off.
Disconnect the A58 skid control ECU (brake booster with master cylinder assembly) connector.
Disconnect the A79 stop light relay (stop light switch assembly) connector.
Measure the resistance according to the value(s) in the table below.
- Standard Resistance:
Tester Connection Condition Specified Condition A58-6 (STP2) - A79-3 (L) Always Below 1 Ω A58-6 (STP2) or A79-3 (L) - Body ground Always 10 kΩ or higher
Connect the A79 stop light relay (stop light switch assembly) connector.
Connect the A58 skid control ECU (brake booster with master cylinder assembly) connector.
- Result:
Proceed to OK NG
OK
NG
Turn the power switch off.
Disconnect the A58 skid control ECU (brake booster with master cylinder assembly) connector.
Disconnect the A79 stop light relay (stop light switch assembly) connector.
Measure the voltage according to the value(s) in the table below.
- Standard Voltage:
Tester Connection Condition Specified Condition A58-6 (STP2) or A79-3 (L) - Body ground Brake pedal released Below 1.5 V
Connect the A79 stop light relay (stop light switch assembly) connector.
Connect the A58 skid control ECU (brake booster with master cylinder assembly) connector.
- Result:
Proceed to OK NG
OK
NG
Disconnect the A58 skid control ECU (brake booster with master cylinder assembly) connector.
Disconnect the A21 hybrid vehicle control ECU connector.
Measure the voltage according to the value(s) in the table below.
- Standard Voltage:
Tester Connection Condition Specified Condition A58-6 (STP2) - Body ground Brake pedal released Below 1.5 V
Connect the A21 hybrid vehicle control ECU connector.
Connect the A58 skid control ECU (brake booster with master cylinder assembly) connector.
- Result:
Proceed to OK NG
OK
NG
Turn the power switch off.
Disconnect the A79 stop light relay (stop light switch assembly) connector.
Disconnect the A58 skid control ECU (brake booster with master cylinder assembly) connector.
Measure the resistance according to the value(s) in the table below.
- Standard Resistance:
Tester Connection Condition Specified Condition A58-3 (STPO) - A79-4 (ACC) Always Below 1 Ω
Connect the A58 skid control ECU (brake booster with master cylinder assembly) connector.
Connect the A79 stop light relay (stop light switch assembly) connector.
- Result:
Proceed to OK NG
OK
NG
Turn the power switch off.
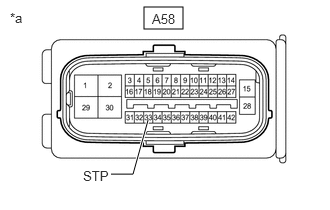
| *a | Front view of wire harness connector
(to Skid Control ECU (Brake Booster with Master Cylinder Assembly)) |
Disconnect the A58 skid control ECU (brake booster with master cylinder assembly) connector.
Measure the voltage according to the value(s) in the table below.
- Standard Voltage:
Tester Connection Condition Specified Condition A58-33 (STP) - Body ground Brake pedal released Below 1.5 V
Connect the A58 skid control ECU (brake booster with master cylinder assembly) connector.
- Result:
Proceed to OK NG
OK
NG
Disconnect the A58 skid control ECU (brake booster with master cylinder assembly) connector.
Disconnect the L195 certification ECU (smart key ECU assembly) connector.
Measure the voltage according to the value(s) in the table below.
- Standard Voltage:
Tester Connection Condition Specified Condition A58-33 (STP) - Body ground Brake pedal depressed 11 to 14 V
Connect the L195 certification ECU (smart key ECU assembly) connector.
Connect the A58 skid control ECU (brake booster with master cylinder assembly) connector.
- Result:
Proceed to OK NG
OK
NG
Disconnect the A58 skid control ECU (brake booster with master cylinder assembly) connector.
Disconnect the L188 vehicle approaching speaker controller connector.
Measure the voltage according to the value(s) in the table below.
- Standard Voltage:
Tester Connection Condition Specified Condition A58-33 (STP) - Body ground Brake pedal depressed 11 to 14 V
Connect the L188 vehicle approaching speaker controller connector.
Connect the A58 skid control ECU (brake booster with master cylinder assembly) connector.
- Result:
Proceed to OK NG
OK
Click hereVehicle Exterior>VEHICLE PROXIMITY NOTIFICATION SYSTEM>VEHICLE APPROACHING SPEAKER ECU>COMPONENTS
NG
Disconnect the A58 skid control ECU (brake booster with master cylinder assembly) connector.
Disconnect the R17 rear combination light socket and wire sub-assembly LH connector.
Measure the voltage according to the value(s) in the table below.
- Standard Voltage:
Tester Connection Condition Specified Condition A58-33 (STP) - Body ground Brake pedal depressed 11 to 14 V
Connect the R17 rear combination light socket and wire sub-assembly LH connector.
Connect the A58 skid control ECU (brake booster with master cylinder assembly) connector.
- Result:
Proceed to OK NG
OK
NG
Disconnect the A58 skid control ECU (brake booster with master cylinder assembly) connector.
Disconnect the S18 rear combination light socket and wire sub-assembly RH connector.
Measure the voltage according to the value(s) in the table below.
- Standard Voltage:
Tester Connection Condition Specified Condition A58-33 (STP) - Body ground Brake pedal depressed 11 to 14 V
Connect the S18 rear combination light socket and wire sub-assembly RH connector.
Connect the A58 skid control ECU (brake booster with master cylinder assembly) connector.
- Result:
Proceed to OK NG
OK
NG
Disconnect the A58 skid control ECU (brake booster with master cylinder assembly) connector.
Disconnect the V13 center stop light set connector.
Measure the voltage according to the value(s) in the table below.
- Standard Voltage:
Tester Connection Condition Specified Condition A58-33 (STP) - Body ground Brake pedal depressed 11 to 14 V
Connect the V13 center stop light set connector.
Connect the A58 skid control ECU (brake booster with master cylinder assembly) connector.
- Result:
Proceed to OK NG
OK
NG
Turn the power switch off.
Disconnect the A58 skid control ECU (brake booster with master cylinder assembly) connector.
Disconnect the A79 stop light relay (stop light switch assembly) connector.
Measure the resistance according to the value(s) in the table below.
- Standard Resistance:
Tester Connection Condition Specified Condition A79-3 (L) - A58-6 (STP2) Always Below 1 Ω A79-1 (OUT) - A58-33 (STP) Always Below 1 Ω A79-1 (OUT) or A58-33 (STP) - Body ground Always 10 kΩ or higher
Connect the A79 stop light relay (stop light switch assembly) connector.
Connect the A58 skid control ECU (brake booster with master cylinder assembly) connector.
- Result:
Proceed to OK NG
OK
NG
Disconnect the A58 skid control ECU (brake booster with master cylinder assembly) connector.
Disconnect the A79 stop light relay (stop light switch assembly) connector.
Measure the voltage according to the value(s) in the table below.
- Standard Voltage:
Tester Connection Condition Specified Condition A58-33 (STP) - Body ground Brake pedal released Below 1.5 V
Connect the A79 stop light relay (stop light switch assembly) connector.
Connect the A58 skid control ECU (brake booster with master cylinder assembly) connector.
- Result:
Proceed to OK NG
OK
NG
Disconnect the A58 skid control ECU (brake booster with master cylinder assembly) connector.
Disconnect the L195 certification ECU (smart key ECU assembly) connector.
Measure the voltage according to the value(s) in the table below.
- Standard Voltage:
Tester Connection Condition Specified Condition A58-33 (STP) - Body ground Brake pedal released Below 1.5 V
Connect the L195 certification ECU (smart key ECU assembly) connector.
Connect the A58 skid control ECU (brake booster with master cylinder assembly) connector.
- Result:
Proceed to OK NG
OK
NG
Disconnect the A58 skid control ECU (brake booster with master cylinder assembly) connector.
Disconnect the L188 vehicle approaching speaker controller connector.
Measure the voltage according to the value(s) in the table below.
- Standard Voltage:
Tester Connection Condition Specified Condition A58-33 (STP) - Body ground Brake pedal released Below 1.5 V
Connect the L188 vehicle approaching speaker controller connector.
Connect the A58 skid control ECU (brake booster with master cylinder assembly) connector.
- Result:
Proceed to OK NG
OK
Click hereVehicle Exterior>VEHICLE PROXIMITY NOTIFICATION SYSTEM>VEHICLE APPROACHING SPEAKER ECU>COMPONENTS
NG
Disconnect the A58 skid control ECU (brake booster with master cylinder assembly) connector.
Disconnect the R17 rear combination light socket and wire sub-assembly LH connector.
Measure the voltage according to the value(s) in the table below.
- Standard Voltage:
Tester Connection Condition Specified Condition A58-33 (STP) - Body ground Brake pedal released Below 1.5 V
Connect the R17 rear combination light socket and wire sub-assembly LH connector.
Connect the A58 skid control ECU (brake booster with master cylinder assembly) connector.
- Result:
Proceed to OK NG
OK
NG
Disconnect the A58 skid control ECU (brake booster with master cylinder assembly) connector.
Disconnect the S18 rear combination light socket and wire sub-assembly RH connector.
Measure the voltage according to the value(s) in the table below.
- Standard Voltage:
Tester Connection Condition Specified Condition A58-33 (STP) - Body ground Brake pedal released Below 1.5 V
Connect the S18 rear combination light socket and wire sub-assembly RH connector.
Connect the A58 skid control ECU (brake booster with master cylinder assembly) connector.
- Result:
Proceed to OK NG
OK
NG
Disconnect the A58 skid control ECU (brake booster with master cylinder assembly) connector.
Disconnect the V13 center stop light set connector.
Measure the voltage according to the value(s) in the table below.
- Standard Voltage:
Tester Connection Condition Specified Condition A58-33 (STP) - Body ground Brake pedal released Below 1.5 V
Connect the V13 center stop light set connector.
Connect the A58 skid control ECU (brake booster with master cylinder assembly) connector.
- Result:
Proceed to OK NG
OK
NG
Turn the power switch off.
Disconnect the A79 stop light relay (stop light switch assembly) connector.
Disconnect the A58 skid control ECU (brake booster with master cylinder assembly) connector.
Measure the resistance according to the value(s) in the table below.
- Standard Resistance:
Tester Connection Condition Specified Condition A58-3 (STPO) or A79-4 (ACC) - Body ground Always 10 kΩ or higher
Connect the A58 skid control ECU (brake booster with master cylinder assembly) connector.
Connect the A79 stop light relay (stop light switch assembly) connector.
- Result:
Proceed to OK NG
OK
NG
Inspect the stop light relay (stop light switch assembly).
Click hereVehicle Exterior>LIGHTING (EXT)>STOP LIGHT SWITCH>INSPECTION
- OK:
The stop light relay (stop light switch assembly) is normal.
- Result:
Result Proceed to OK A NG (Stop light relay (Stop light switch assembly)) B NG (Power source circuit or Body ground circuit) C
A
B
C