METER / GAUGE / DISPLAY METER / GAUGE SYSTEM Operating Light Control Rheostat does not Change Light Brightness
DESCRIPTION
The combination meter sub-assembly receives signals from this circuit to adjust the illumination of the meter. The combination meter sub-assembly sets the illumination level based on the user operation of the light control rheostat switch.
- HINT:
- ·
The meter illumination level can be adjusted by operating the hazard warning signal switch assembly (light control rheostat switch).
- ·
The meter illumination dims when the light control switch is turned to the tail, head, or AUTO position at night.
- ·
Setting the meter illumination to maximum brightness cancels the above dimming of the meter illumination.
WIRING DIAGRAM
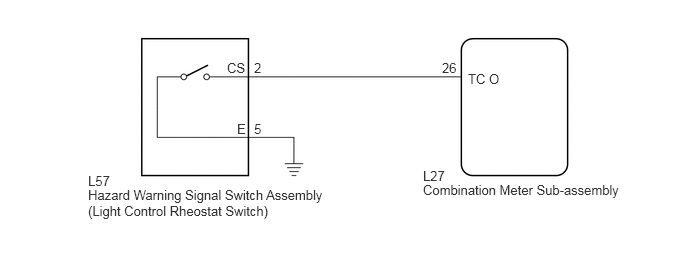
PROCEDURE
Connect the GTS to the DLC3.
Turn the power switch on (IG).
Turn the GTS on.
Enter the following menus: Body Electrical / Combination Meter / Data List.
Check the values by referring to the table below.
| Tester Display | Measurement Item/Range | Normal Condition | Diagnostic Note |
|---|---|---|---|
| Light Control Switch | Light control rheostat switch / OFF or ON | OFF: Light control rheostat switch not pressed | - |
| ON: Light control rheostat switch pressed |
- OK:
The value displayed on the GTS gradually changes as the actual light control rheostat switch operation.
OK
NG
Remove the hazard warning signal switch assembly (See page Vehicle Exterior>LIGHTING (EXT)>HAZARD WARNING SWITCH>REMOVAL).
Inspect the hazard warning signal switch assembly (See pageVehicle Exterior>LIGHTING (EXT)>HAZARD WARNING SWITCH>INSPECTION).
OK
NG
Disconnect the L27 combination meter sub-assembly connector.
Measure the resistance according to the value(s) in the table below.
- Standard Resistance:
Tester Connection Condition Specified Condition L27-26 (TC O) - L57-2 (CS) Always Below 1 Ω L57-5 (E) - Body ground Always Below 1 Ω L27-26 (TC O) - Body ground Always 10 kΩ or higher
OK
NG