Home › Engine / Hybrid System › HYBRID / BATTERY CONTROL › HYBRID CONTROL SYSTEM

DTC    P0A08-264    DC / DC Converter Status Circuit

for Preparation Click here


DESCRIPTION

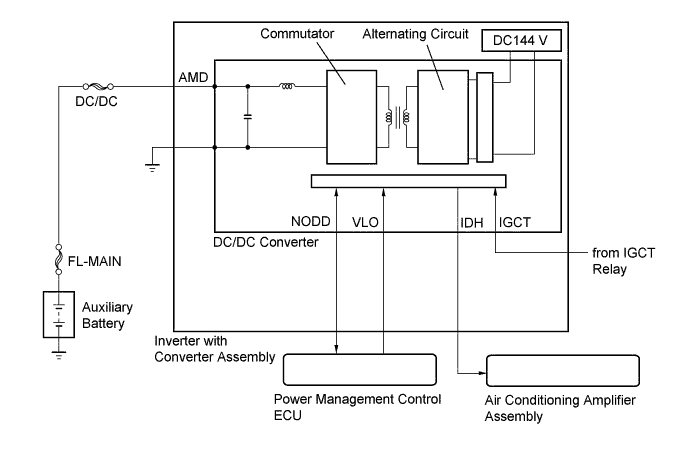
The DC/DC converter converts the DC 144 V of the HV battery into DC 12 V in order to supply power to areas such as the vehicle's lighting, audio, and ECU systems. In addition, it charges the auxiliary battery. A transistor bridge circuit initially converts DC 144 V into alternating current, and a transformer lowers its voltage. Then, it is rectified and smoothed (into DC) and converted into DC 12 V. The DC/DC converter controls the output voltage in order to keep a constant voltage at the terminals of the auxiliary battery.
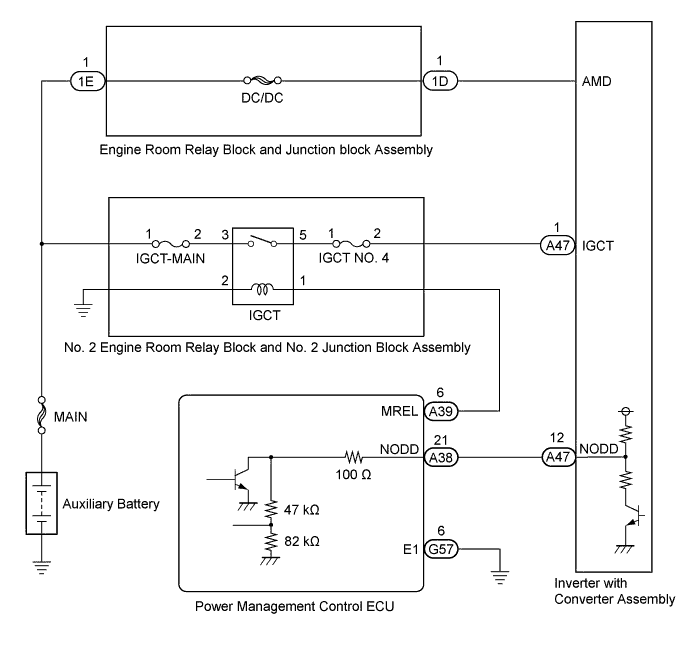
The power management control ECU uses the NODD signal line to transmit a stop command to the DC/DC converter and receive signals indicating the normal or abnormal condition of the 12 V charging system. If the vehicle is being driven with an inoperative DC/DC converter, the voltage of the auxiliary battery will drop, which will prevent the continued operation of the vehicle. Therefore, the power management control ECU monitors the operation of the DC/DC converter and alerts the driver if it detects a malfunction.

A275998E02

This DTC is stored when the DC/DC converter circuit has a malfunction or its operation is prohibited by a fail-safe function, or the auxiliary battery voltage drops to 11 V or less with the ignition switch to ON (READY). A signal indicating an auxiliary battery malfunction is sent from the DC/DC converter to the power management control ECU via the NODD signal line.

DTC No.
INF Code
DTC Detection Condition
Trouble Area
Master Warning Light
MIL
P0A08
264
The DC/DC converter is malfunctioning (charging has stopped) or the auxiliary battery voltage drops to 11 V or less.
(1 trip detection logic)
  1. Wire harness or connector
  2. Inverter cooling system
  3. Hybrid vehicle transaxle assembly
  4. Motor cable
  5. Inverter with converter assembly
  6. Fusible link (DC/DC)
  7. Power management control ECU
Comes on
Does not come on

Related Data List 
DTC No.
Data List
P0A08-264
  1. +B
  2. Inverter Coolant Water Temperature
  3. Inverter Temp- (MG1)
  4. Inverter Temp- (MG2)
  5. Motor Temp No1
  6. Motor Temp No2
  7. Short Wave Highest Val
The following items can be helpful when performing repair:
Data List
  1. Ready Signal
  2. State of Charge (All Bat)
  3. Prohibit DC/DC conv sig
Operation History Data
  1. Coolant Heating
  2. Auxiliary Battery Low

HINT:
  1. If the NODD signal line is open or shorted to ground, DC/DC converter control will be prohibited and the auxiliary battery voltage will be approximately 12 V (or less).
  2. When the transistor in the power management control ECU is on, a signal is sent to the inverter via the NODD signal circuit to prohibit DC/DC converter control. When the transistor in the inverter is on, a malfunction signal is sent to the power management control ECU.


WIRING DIAGRAM


A308158E01

Refer to the wiring diagram for DTC P0AA6-526 .

INSPECTION PROCEDURE

CAUTION:
  1. Before inspecting the high-voltage system or disconnecting the low voltage connector of the inverter with converter assembly, take safety precautions such as wearing insulated gloves and removing the service plug grip to prevent electrical shocks. After removing the service plug grip, put it in your pocket to prevent other technicians from accidentally reconnecting it while you are working on the high-voltage system.
  2. After removing the service plug grip, wait for at least 10 minutes before touching any of the high-voltage connectors or terminals. After waiting for 10 minutes, check the voltage at the terminals in the inspection point in the inverter with converter assembly. The voltage should be 0 V before beginning work (Click here).

    HINT:
    Waiting for at least 10 minutes is required to discharge the high-voltage capacitor inside the inverter with converter assembly.

NOTICE:
After turning the ignition switch off, waiting time may be required before disconnecting the cable from the negative (-) auxiliary battery terminal. Therefore, make sure to read the disconnecting the cable from the negative (-) auxiliary battery terminal notices before proceeding with work (Click here).

HINT:
  1. If there is a malfunction in the DC/DC converter internal circuit, P0A08-264 is stored within 2 minutes of the power switch being turned on (READY) regardless of the auxiliary battery voltage.
  2. If the auxiliary battery voltage is low, the power switch will turn off regardless of DTCs being stored or not.
  3. After repair, clear the DTCs, turn the ignition switch off and wait for 30 seconds or more and perform the following procedure to confirm that the auxiliary battery low voltage indicated by this DTC has been repaired.
    1. Wait for 2 minutes with the shift lever in P, the ignition switch to ON (READY) and the following conditions met, then confirm that Data List item "+B" is between 13.0 and 15.0 V.
      (If charging is not performed and the electrical load increases, +B voltage may not be steady and gradually drops.)
      1. Headlight switch is in the HI position.
      2. A/C blower fan switch is in the HI position.
      3. Window defogger switch is turned on.
    1. If the DC/DC converter has an internal malfunction, DTC P0A08-264 is stored regardless of the auxiliary battery voltage after performing this procedure.
    2. If the auxiliary battery voltage drops, the ignition switch turns off regardless of DTCs being stored or not.
  4. By performing the following procedure, the DC/DC converter function can be checked.
    1. Connect the AC/DC 400 A probe to the positive auxiliary battery cable.
      1. Turn the ignition switch to ON (READY) and leave the vehicle as it is until the electric current flowing into the auxiliary battery becomes 10 A or less.
      2. Turn the ignition switch to ON (READY) and the headlight switch and A/C blower fan switch in the HI position, and the window defogger turned on.
      3. Confirm that the current drawn from the auxiliary battery is 0 A or lower and the auxiliary battery voltage is between 13.0 and 15.0 V.
  5. This DTC may be also stored when a part other than the DC/DC converter is malfunctioning or depending on user operation.

    Malfunction cases to store DTC P0A08-264 
    Malfunction Case
    Remarks
    Inspection Step
    Fuse is blown. (DC/DC)
    -
    4
    High-voltage insulation between the inverter, generator (MG1), motor (MG2) and body ground is poor (body ground).
    DTC P0AA6 may be stored if the ground potential fluctuates due to a high-voltage insulation malfunction.
    1
    A signal connector of the power management control ECU or inverter is not connected securely.
    -
    2, 3
    The DC/DC converter is malfunctioning.
    Inspect the DC/DC converter function.
    9
    Control is suspended due to overheating. (The inverter water pump assembly is malfunctioning, the coolant is not sufficient, a hose is clogged, etc.)
    When the inverter is overheating, the DC/DC converter has self protection control that suspends the DC/DC converter control. As that time, this DTC may be stored.
    The suspended DC/DC converter control will return to normal by clearing the DTCs and turning the ignition switch off.
    10 to 13, 17
  6. If this vehicle is used to jump start another vehicle with a discharged battery, a fuse may blow due to overcurrent or the DC/DC converter self-protection may be activated.
    In addition, if this vehicle is jump started by a vehicle with a 24 V auxiliary battery or the auxiliary battery cables are connected to the opposite auxiliary battery terminals, the same malfunction may occur and this DTC may be stored. (The suspended DC/DC converter control will return to normal by clearing the DTCs and turning the power switch off.)
  7. Confirm that high electrical load equipment such as a high-capacitance audio device or electric kettle is used on the vehicle. (A fuse of the auxiliary battery may be blown due to overcurrent.)
  8. If the DC/DC converter is malfunctioning, the auxiliary battery cannot be charged. Therefore, once the ignition switch is turned off, it may be impossible to turn it on (READY) again if the auxiliary battery is completely discharged. In this case, charge the auxiliary battery. Be careful as charging is not performed during the inspection.
  9. If the ignition switch turns off immediately after it is turned on (READY), the auxiliary battery voltage may be low. Charge the auxiliary battery.

1.CHECK DTC OUTPUT (HYBRID CONTROL)
  1. Connect the Techstream to the DLC3.

  1. Turn the ignition switch to ON (IG).

  1. Enter the following menus: Powertrain / Hybrid Control / Trouble Codes.

  1. Check if DTCs are output.

    Result:
    Result
    Proceed to
    Only P0A08-264 is output, or DTCs other than the ones in the table below are also output.
    A
    Any of the following DTCs including pending DTCs are also output.
    B


    DTC No.
    Relevant Diagnosis
    P0A93-346
    Inverter Cooling System Performance
    P0A94-547, 548, 549
    DC / DC Converter Performance
    P0AA6-526, 613
    Hybrid Battery Voltage System Isolation Fault
    P0ADB-227
    Hybrid Battery Positive Contactor Control Circuit Low
    P0ADF-229
    Hybrid Battery Negative Contactor Control Circuit Low
    P0AE6-225
    Hybrid Battery Precharge Contactor Control Circuit Low
    P0C73-776
    Motor Electronics Coolant Pump "A" Control Performance
    P3004-131, 803
    High Voltage Power Resource
    P314A-828
    Inverter Coolant Pump Speed Signal

  1. Turn the ignition switch off.


B
GO TO DTC CHART (HYBRID CONTROL SYSTEM) (Click here)
A


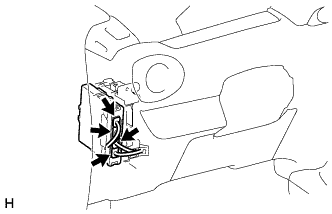
2.CHECK CONNECTOR CONNECTION CONDITION (POWER MANAGEMENT CONTROL ECU CONNECTOR)


    A269501
  1. Check the connector connections and contact pressure of the relevant terminals for the power management control ECU connectors (Click here).

    OK:
    The connectors are connected securely and there are no contact pressure problems.


NG
CONNECT SECURELY
OK


3.CHECK CONNECTOR CONNECTION CONDITION (INVERTER WITH CONVERTER ASSEMBLY CONNECTOR)

CAUTION:
Be sure to wear insulated gloves.

  1. Check that the service plug grip is not installed.
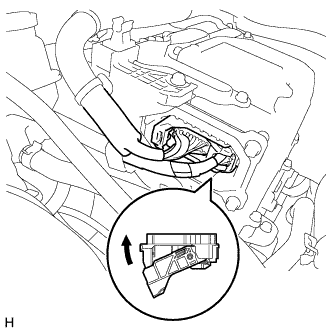
    NOTICE:
    After removing the service plug grip, do not turn the ignition switch to ON (READY), unless instructed by the repair manual because this may cause a malfunction.


    A267460
  1. Check the connector connections and contact pressure of the low voltage connectors of the inverter with converter assembly (Click here).

    NOTICE:
    Before disconnecting the connector, confirm that it is properly connected by checking that the locking claws are engaged and that the connector does not pull out.

    OK:
    The connectors are connected securely and there are no contact pressure problems.

    HINT:
    When connecting the connector, insert it with the locking lever in the raised position. Rotate the lever downward and make sure that the connector is pulled into its socket. When the locking lever is in its fully closed position, a click will be heard as its locking claws engage. After the click is heard, pull up on the connector to confirm that it is properly connected.


NG
CONNECT SECURELY
OK


4.CHECK FUSIBLE LINK (DC/DC)
  1. Disconnect connector 1E from the engine room relay block and junction block assembly.
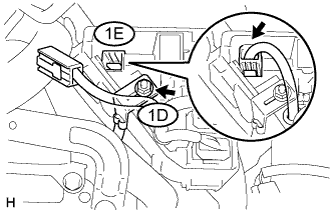


    A268238E02
  1. Measure the resistance according to the value(s) in the table below.

    Standard Resistance:
    Tester Connection
    Condition
    Specified Condition
    1E-1 - 1D-1 (AMD)
    Always
    Below 1 Ω

  1. Check the fusible link (DC/DC) in the engine room relay block and junction block assembly for improper installation.

    OK:
    The fusible link is installed securely.

  1. Connect the 1E connector to the engine room relay block and junction block assembly.


NG
REPLACE FUSIBLE LINK (DC/DC)
OK


5.CHECK CABLE AND WIRE HARNESS

CAUTION:
Be sure to wear insulated gloves.

  1. Check that the service plug grip is not installed.
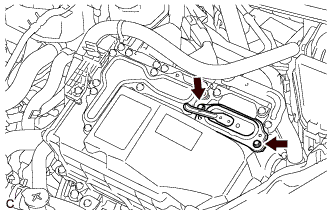
    NOTICE:
    After removing the service plug grip, do not turn the ignition switch to ON (READY), unless instructed by the repair manual because this may cause a malfunction.


    A258644
  1. Remove the inverter terminal cover from the inverter with converter assembly.
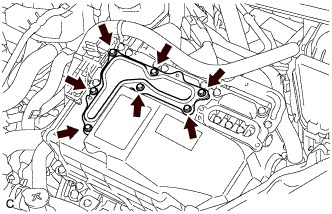


    A258645
  1. Remove the inverter cover from the inverter with converter assembly.
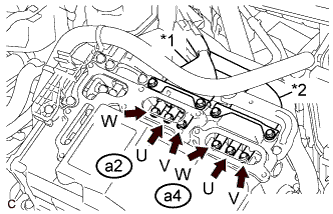


    A264959E02
  1. Using a megohmmeter set to 500 V, measure the insulation resistance according to the value(s) in the table below.

    NOTICE:
    Be sure to set the megohmmeter to 500 V when performing this test. Using a setting higher than 500 V can result in damage to the component being inspected.

    Standard Resistance:
    Tester Connection
    Switch Condition
    Specified Condition
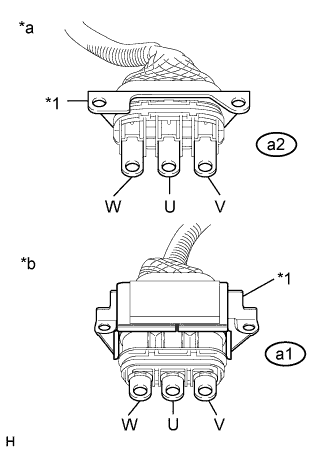
    a2-1 (W) - Body ground and shield ground
    Ignition switch off
    1 MΩ or higher
    a2-2 (U) - Body ground and shield ground
    Ignition switch off
    1 MΩ or higher
    a2-3 (V) - Body ground and shield ground
    Ignition switch off
    1 MΩ or higher
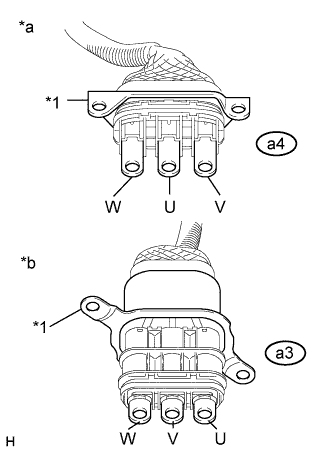
    a4-1 (W) - Body ground and shield ground
    Ignition switch off
    1 MΩ or higher
    a4-2 (U) - Body ground and shield ground
    Ignition switch off
    1 MΩ or higher
    a4-3 (V) - Body ground and shield ground
    Ignition switch off
    1 MΩ or higher

    Text in Illustration  
    *1
    Motor Cable (for MG1)
    *2
    Motor Cable (for MG2)

    HINT:
    Perform this inspection while the motor cable (for MG1) and motor cable (for MG2) are connected.

  1. Install the inverter cover.

  1. Install the inverter terminal cover.


NG
Go to step 14
OK


6.CHECK AMD TERMINAL VOLTAGE (ENGINE ROOM RELAY BLOCK AND JUNCTION BLOCK ASSEMBLY)

CAUTION:
Be sure to wear insulated gloves.

  1. Connect the cable to the negative (-) auxiliary battery terminal.
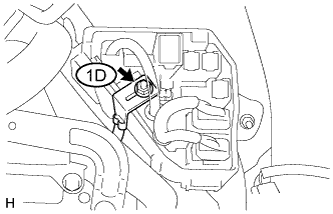


    A267465E03
  1. Measure the voltage according to the value(s) in the table below.

    Standard Voltage:
    Tester Connection
    Switch Condition
    Specified Condition
    1D-1 (AMD) - Body ground
    Ignition switch off
    Same as auxiliary battery voltage

  1. Disconnect the cable from the negative (-) auxiliary battery terminal.


NG
REPAIR OR REPLACE HARNESS OR CONNECTOR
OK


7.CHECK AMD TERMINAL CONNECTION CONDITION

CAUTION:
Be sure to wear insulated gloves.

  1. Check that the service plug grip is not installed.
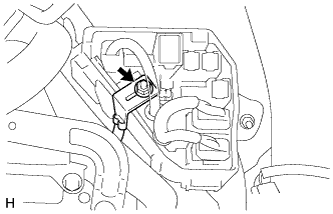
    NOTICE:
    After removing the service plug grip, do not turn the ignition switch to ON (READY), unless instructed by the repair manual because this may cause a malfunction.


    A267465
  1. Check that the bolt for the AMD terminal is tightened to the specified torque, the AMD terminal is connected securely, and there is no contact problem.

    Torque:
    T=8.0 N*m {82 kgf*cm, 71in.*lbf }

    Result:
    Result
    Proceed to
    There are no arc marks.
    The terminal is connected securely and there is no contact problem.
    A
    There are no arc marks.
    The terminal is not connected securely and there is a contact problem.
    B
    There are arc marks.
    -
    C


B
CONNECT SECURELY

C
REPLACE MALFUNCTIONING PARTS
A


8.CHECK HARNESS AND CONNECTOR (RESISTANCE VALUE OF NODD INSIDE POWER MANAGEMENT CONTROL ECU)

CAUTION:
Be sure to wear insulated gloves.

  1. Check that the service plug grip is not installed.

    NOTICE:
    After removing the service plug grip, do not turn the ignition switch to ON (READY), unless instructed by the repair manual because this may cause a malfunction.

  1. Disconnect connector A47 from the inverter with converter assembly.
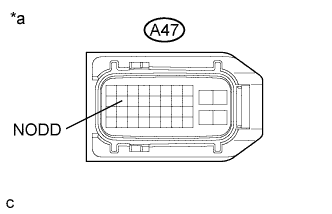


    A215725E68
  1. Measure the resistance according to the value(s) in the table below.

    Standard Resistance:
    Tester Connection
    Switch Condition
    Specified Condition
    A47-12 (NODD) - Body ground
    Ignition switch off
    110 to 150 kΩ

    Text in Illustration 
    *a
    Front view of wire harness connector
    (to Inverter with Converter Assembly)

  1. Connect the inverter with converter assembly connector.


NG
Go to step 16
OK


9.CHECK DC/DC CONVERTER FUNCTION

HINT:
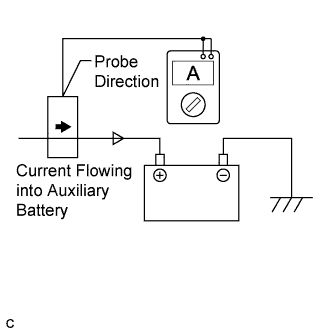
The current at the AMD terminal cannot be measured directly because of space limitations. Measure the current flowing at the auxiliary battery instead.


    A174427E02
  1. Connect the AC/DC 400 A probe to the positive auxiliary battery line.

  1. Install the service plug grip.

  1. Connect the cable to the negative (-) auxiliary battery terminal.

  1. Turn the ignition switch to ON (READY) and leave the vehicle as it is until the electric current flowing into the auxiliary battery becomes 10 A or less.
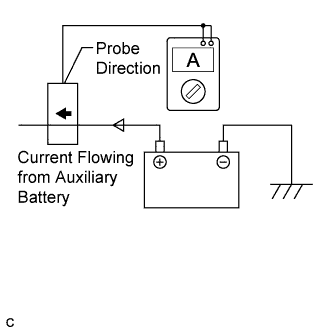
    HINT:
    If the ignition switch turns off immediately after it is turned on (READY), auxiliary battery voltage may be low. Recharge the auxiliary battery and perform this procedure again.


    A174428E02
  1. Measure the current flowing from the auxiliary battery with the ignition switch to ON (READY), the headlight position switch and blower motor switch in the HI position, and the rear window defogger turned on.

    Standard Current:
    Item
    Condition
    Specified Condition
    Current flowing from auxiliary battery
    Ignition switch ON (READY)
    (The headlight position switch and blower motor switch are in the HI position, and the rear window defogger is turned on.)
    0 A or less
    (no current from auxiliary battery)

  1. Measure the voltage according to the value(s) in the table below.

    Standard Voltage:
    Item
    Condition
    Specified Condition
    Auxiliary battery voltage
    Ignition switch ON (READY)
    (The headlight position switch and blower motor switch are in the HI position, and the rear window defogger is turned on.)
    13 to 15 V

  1. Turn the ignition switch off.


NG
REPLACE INVERTER WITH CONVERTER ASSEMBLY (Click here)
OK


10.CHECK QUANTITY OF HV COOLANT
  1. Check the HV coolant level in the inverter reserve tank.

  1. Check for HV coolant leaks.
    Result 
    Result
    Proceed to
    No leaks are found and coolant level in the inverter reserve tank assembly is above the low line.
    A
    No leaks are found and coolant level in the inverter reserve tank assembly is below the low line.
    B
    HV coolant leaks are evident.
    C

    HINT:
    1. After repairing the HV coolant leaks and adding coolant, perform the "Activate the Water Pump" Active Test (HV Active Test item) and the "Control the Electric Cooling Fan" Active Test (Engine Active Test item) and make sure that there are no malfunctions.
    2. The inverter water pump assembly will not malfunction due to coolant leaks.


B
ADD HV COOLANT

C
INSPECT FOR HV COOLANT LEAK AND ADD HV COOLANT
A


11.CHECK COOLANT HOSE
  1. Check if the hoses of the cooling system are kinked or clogged.


NG
CORRECT THE PROBLEM
OK


12.PERFORM ACTIVE TEST USING TECHSTREAM (CONTROL THE ELECTRIC COOLING FAN)
  1. Connect the Techstream to the DLC3.

  1. Turn the ignition switch to ON (IG).

  1. Clear DTCs (Click here).

  1. Enter the following menus: Powertrain / Engine and ECT / Active Test / Control the Electric Cooling Fan.

  1. Perform the "Control the Electric Cooling Fan" Active Test.

    OK:
    The cooling fan rotates.

  1. Turn the ignition switch off.


NG
CHECK COOLING FAN SYSTEM (Click here)
OK


13.CHECK HV COOLANT (CHECK FOR CONDITIONS THAT MAY HAVE CAUSED FREEZING)
  1. Connect the Techstream to the DLC3.

  1. Turn the ignition switch to ON (IG).

  1. Enter the following menus: Powertrain / Hybrid Control / Trouble Codes.

  1. Read the freeze frame data Ambient Temperature using the Techstream.

  1. Check if the freeze frame data Ambient Temperature is below freezing.

    Result:
    Result
    Proceed to
    Ambient Temperature value is above freezing temperature of the HV coolant.
    A
    Ambient Temperature value is below freezing temperature of the HV coolant.
    B

    HINT:
    1. HV coolant (SLLC) with a 30% concentration freezes at -15 °C (5°F) and HV coolant (SLLC) with a 50% concentration freezes at -35°C (-31°F).
    2. If the HV coolant freezes in the HV radiator or HV water pump, the coolant temperature in the inverter with converter assembly rises because the HV coolant cannot circulate. As a result, a DTC may be set.
    3. A DTC is set when the water pump impeller cannot rotate due to freezing of the HV coolant.
    4. If a DTC is set due to freezing of HV coolant, the problem cannot be reproduced. Judge whether freezing of HV coolant occurred according to the freeze point of the HV coolant, HV coolant change history and ambient temperature when the DTC was set.

  1. Turn the ignition switch off.


B
Go to step 17
A

REPLACE INVERTER WITH CONVERTER ASSEMBLY (Click here)  

14.CHECK HYBRID VEHICLE TRANSAXLE ASSEMBLY (MG1)

CAUTION:
Be sure to wear insulated gloves.

  1. Check that the service plug grip is not installed.

    NOTICE:
    After removing the service plug grip, do not turn the ignition switch to ON (READY), unless instructed by the repair manual because this may cause a malfunction.


    A258644
  1. Remove the inverter terminal cover from the inverter with converter assembly.


    A258645
  1. Remove the inverter cover from the inverter with converter assembly.


    A258647
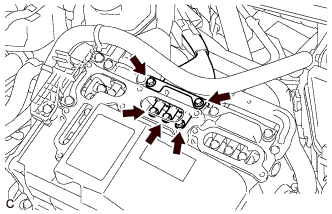
  1. Disconnect the motor cable (for MG1) from the inverter with converter assembly.


    A268150E06
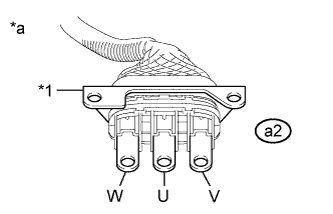
  1. Using a megohmmeter set to 500 V, measure the insulation resistance according to the value(s) in the table below.

    NOTICE:
    Be sure to set the megohmmeter to 500 V when performing this test. Using a setting higher than 500 V can result in damage to the component being inspected.

    Standard Resistance:
    Tester Connection
    Switch Condition
    Specified Condition
    a2-1 (W) - Body ground and shield ground
    Ignition switch off
    100 MΩ or higher
    a2-2 (U) - Body ground and shield ground
    Ignition switch off
    100 MΩ or higher
    a2-3 (V) - Body ground and shield ground
    Ignition switch off
    100 MΩ or higher

    Text in Illustration 
    *1
    Shield Ground
    *a
    Motor Cable (for MG1)
    (Inverter with Converter Assembly Side)

  1. Connect the motor cable (for MG1).

  1. Install the inverter cover.

  1. Install the inverter terminal cover.


NG
Go to step 18
OK


15.CHECK HYBRID VEHICLE TRANSAXLE ASSEMBLY (MG2)

CAUTION:
Be sure to wear insulated gloves.

  1. Check that the service plug grip is not installed.

    NOTICE:
    After removing the service plug grip, do not turn the ignition switch to ON (READY), unless instructed by the repair manual because this may cause a malfunction.


    A258644
  1. Remove the inverter terminal cover from the inverter with converter assembly.


    A258646
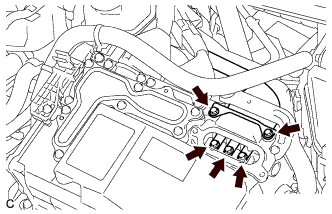
  1. Disconnect the motor cable (for MG2) from the inverter with converter assembly.


    A268151E07
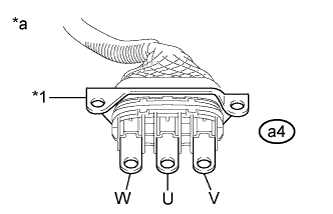
  1. Using a megohmmeter set to 500 V, measure the insulation resistance according to the value(s) in the table below.

    NOTICE:
    Be sure to set the megohmmeter to 500 V when performing this test. Using a setting higher than 500 V can result in damage to the component being inspected.

    Standard Resistance:
    Tester Connection
    Switch Condition
    Specified Condition
    a4-1 (W) - Body ground and shield ground
    Ignition switch off
    100 MΩ or higher
    a4-2 (U) - Body ground and shield ground
    Ignition switch off
    100 MΩ or higher
    a4-3 (V) - Body ground and shield ground
    Ignition switch off
    100 MΩ or higher

    Text in Illustration 
    *1
    Shield Ground
    *a
    Motor Cable (for MG2)
    (Inverter with Converter Assembly Side)

  1. Connect the motor cable (for MG2).

  1. Install the inverter terminal cover.


NG
Go to step 20
OK

REPLACE INVERTER WITH CONVERTER ASSEMBLY (Click here)  

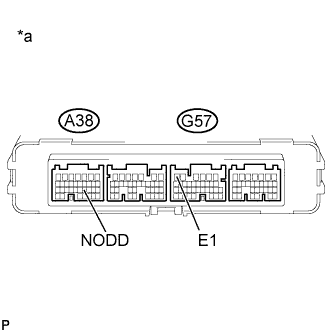
16.INSPECT POWER MANAGEMENT CONTROL ECU (RESISTANCE VALUE OF NODD INSIDE POWER MANAGEMENT CONTROL ECU)


    A204442E33
  1. Disconnect all the connectors from the power management control ECU.

  1. Measure the resistance according to the value(s) in the table below.

    Standard Resistance:
    Tester Connection
    Switch Condition
    Specified Condition
    A38-21 (NODD) - G57-6 (E1)
    Ignition switch off
    110 to 150 kΩ

    Text in Illustration 
    *a
    Component without harness connected
    (Power Management Control ECU)

  1. Connect the power management control ECU connectors.


NG
REPLACE POWER MANAGEMENT CONTROL ECU (Click here)
OK

REPAIR OR REPLACE HARNESS OR CONNECTOR 

17.REPLACE HV COOLANT
  1. Replace the HV coolant with coolant having an appropriate concentration (appropriate freeze point) for the vehicle usage conditions (Click here).


NEXT

COMPLETED 

18.CHECK HYBRID VEHICLE TRANSAXLE ASSEMBLY (MOTOR CABLE (FOR MG1) CONNECTION CONDITION)

CAUTION:
Be sure to wear insulated gloves.

  1. Check that the service plug grip is not installed.

    NOTICE:
    After removing the service plug grip, do not turn the ignition switch to ON (READY), unless instructed by the repair manual because this may cause a malfunction.

  1. Remove the inverter with converter assembly (Click here).
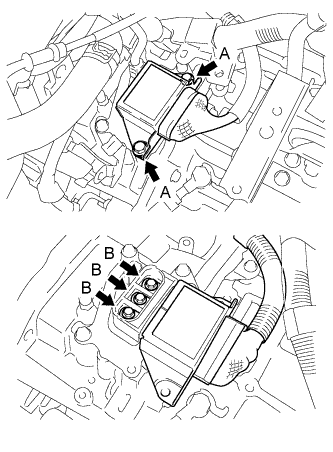


    A258652E01
  1. Check that the bolts for the motor cable (for MG1) are tightened to the specified torque, the motor cable (for MG1) is connected securely, and there are no contact problems.

    Specified Condition:
    Bolt A:
    T=19.5 N*m (199 kgf*cm, 14 ft.*lbf)
    Bolt B:
    T=10 N*m (102 kgf*cm, 7 ft.*lbf)

    NOTICE:
    1. Make sure that the tightening torque of the bolt A is between 13.5 and 25 N*m (138 and 255 kgf*cm, 10 and 18 ft.*lbf).
    2. Make sure that the tightening torque of the bolt B is between 8 and 12 N*m (82 and 122 kgf*cm, 71 and 106 in.*lbf).

  1. Disconnect the motor cable (for MG1) from the hybrid vehicle transaxle assembly.

  1. Check for arc marks at the terminals for the motor cable (for MG1).

    Result:
    Result
    Proceed to
    The terminals are connected securely and there are no contact problems.
    There are no arc marks.
    A
    The terminals are not connected securely and there is a contact problem.
    There are arc marks.
    B
    The terminals are not connected securely and there is a contact problem.
    There are no arc marks.
    C
    The terminals are connected securely and there are no contact problems.
    There are arc marks.
    B

  1. Connect the motor cable (for MG1) to the hybrid vehicle transaxle assembly.

  1. Install the inverter with converter assembly.


B
REPLACE MALFUNCTIONING PARTS

C
CONNECT SECURELY
A


19.CHECK MOTOR CABLE (FOR MG1)

CAUTION:
Be sure to wear insulated gloves.

  1. Check that the service plug grip is not installed.
    NOTICE:
    After removing the service plug grip, do not turn the ignition switch to ON (READY), unless instructed by the repair manual because this may cause a malfunction.

  1. Remove the motor cable (Click here).


    A258650E02
  1. Using a megohmmeter set to 500 V, measure the resistance according to the value(s) in the table below.

    NOTICE:
    Be sure to set the megohmmeter to 500 V when performing this test. Using a setting higher than 500 V can result in damage to the component being inspected.

    Standard Resistance:
    Tester Connection
    Switch Condition
    Specified Condition
    a2-1 (W) - Body ground and shield ground
    Ignition switch off
    100 MΩ or higher
    a2-2 (U) - Body ground and shield ground
    Ignition switch off
    100 MΩ or higher
    a2-3 (V) - Body ground and shield ground
    Ignition switch off
    100 MΩ or higher

    Text in Illustration 
    *1
    Shield ground
    *a
    Motor Cable (for MG1)
    (Inverter with Converter Assembly Side)
    *b
    Motor Cable (for MG1)
    (Hybrid Vehicle Transaxle Assembly Side)

    NOTICE:
    Wrap the terminal of the motor cable (for MG1) with insulating tape to prevent them from coming into contact with body ground

  1. Measure the resistance according to the value(s) in the table below.

    Standard Resistance:
    Tester Connection
    Switch Condition
    Specified Condition
    a2-1 (W) - a1-1 (W)
    Ignition switch off
    Below 1 Ω
    a2-2 (U) - a1-2 (U)
    Ignition switch off
    Below 1 Ω
    a2-3 (V) - a1-3 (V)
    Ignition switch off
    Below 1 Ω
    a2-1 (W) - a1-2 (U)
    Ignition switch off
    100 MΩ or higher
    a2-2 (U) - a1-3 (V)
    Ignition switch off
    100 MΩ or higher
    a2-3 (V) - a1-1 (W)
    Ignition switch off
    100 MΩ or higher

  1. Install the motor cable.


NG
REPLACE MOTOR CABLE (Click here)
OK

REPLACE HYBRID VEHICLE TRANSAXLE ASSEMBLY (Click here)  

20.CHECK HYBRID VEHICLE TRANSAXLE ASSEMBLY (MOTOR CABLE (FOR MG2) CONNECTION CONDITION)

CAUTION:
Be sure to wear insulated gloves.

  1. Check that the service plug grip is not installed.

    NOTICE:
    After removing the service plug grip, do not turn the ignition switch to ON (READY), unless instructed by the repair manual because this may cause a malfunction.


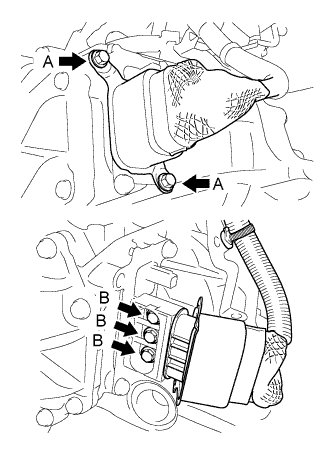
    A258653E01
  1. Check that the bolts for the motor cable (for MG2) are tightened to the specified torque, the motor cable (for MG2) is connected securely, and there are no contact problems.

    Specified Condition:
    Bolt A:
    T=19.5 N*m (199 kgf*cm, 14 ft.*lbf)
    Bolt B:
    T=10 N*m (102 kgf*cm, 7 ft.*lbf)

    NOTICE:
    1. Make sure that the tightening torque of the bolt A is between 13.5 and 25 N*m (138 and 255 kgf*cm, 10 and 18 ft.*lbf).
    2. Make sure that the tightening torque of the bolt B is between 8 and 12 N*m (82 and 122 kgf*cm, 71 and 106 in.*lbf).

  1. Disconnect the motor cable (for MG2) from the hybrid vehicle transaxle assembly.

  1. Check for arc marks at the terminals for the motor cable (for MG2).

    Result:
    Result
    Proceed to
    The terminals are connected securely and there are no contact problems.
    There are no arc marks.
    A
    The terminals are not connected securely and there is a contact problem.
    There are arc marks.
    B
    The terminals are not connected securely and there is a contact problem.
    There are no arc marks.
    C
    The terminals are connected securely and there are no contact problems.
    There are arc marks.
    B

  1. Connect the motor cable (for MG2) to the hybrid vehicle transaxle assembly.


B
REPLACE MALFUNCTIONING PARTS

C
CONNECT SECURELY
A


21.CHECK MOTOR CABLE (FOR MG2)

CAUTION:
Be sure to wear insulated gloves.

  1. Check that the service plug grip is not installed.

    NOTICE:
    After removing the service plug grip, do not turn the ignition switch to ON (READY), unless instructed by the repair manual because this may cause a malfunction.

  1. Remove the motor cable (Click here).


    A258651E01
  1. Using a megohmmeter set to 500 V, measure the resistance according to the value(s) in the table below.

    NOTICE:
    Be sure to set the megohmmeter to 500 V when performing this test. Using a setting higher than 500 V can result in damage to the component being inspected.

    Standard Resistance:
    Tester Connection
    Switch Condition
    Specified Condition
    a4-1 (W) - Body ground and shield ground
    Ignition switch off
    100 MΩ or higher
    a4-2 (U) - Body ground and shield ground
    Ignition switch off
    100 MΩ or higher
    a4-3 (V) - Body ground and shield ground
    Ignition switch off
    100 MΩ or higher

    Text in Illustration 
    *1
    Shield ground
    *a
    Motor Cable (for MG2)
    (Inverter with Converter Assembly Side)
    *b
    Motor Cable (for MG2)
    (Hybrid Vehicle Transaxle Assembly Side)

    NOTICE:
    Wrap the terminal of the motor cable (for MG2) with insulating tape to prevent them from coming into contact with body ground

  1. Measure the resistance according to the value(s) in the table below.

    Standard Resistance:
    Tester Connection
    Switch Condition
    Specified Condition
    a4-1 (W) - a3-1 (W)
    Ignition switch off
    Below 1 Ω
    a4-2 (U) - a3-3 (U)
    Ignition switch off
    Below 1 Ω
    a4-3 (V) - a3-2 (V)
    Ignition switch off
    Below 1 Ω
    a4-1 (W) - a3-3 (U)
    Ignition switch off
    100 MΩ or higher
    a4-2 (U) - a3-2 (V)
    Ignition switch off
    100 MΩ or higher
    a4-3 (V) - a3-1 (W)
    Ignition switch off
    100 MΩ or higher

  1. Install the motor cable.


NG
REPLACE MOTOR CABLE (Click here)
OK

REPLACE HYBRID VEHICLE TRANSAXLE ASSEMBLY (Click here)