 |
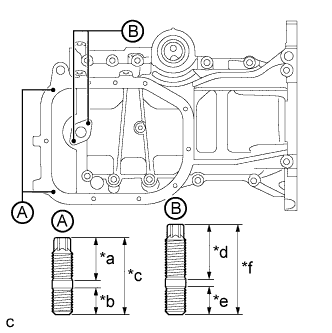
Using an E5 "TORX" socket wrench, install the 4 stud bolts.
| *a | 13 mm (0.512 in.) |
| *b | 8 mm (0.315 in.) |
| *c | 22.5 mm (0.886 in.) |
| *d | 16.5 mm (0.650 in.) |
| *e | 9 mm (0.354 in.) |
| *f | 27.5 mm (1.08 in.) |
- Torque:
- 5.0 N*m{ 51 kgf*cm , 44 in.*lbf }
ENGINE UNIT > REASSEMBLY |
| 1. INSTALL OIL PAN SUB-ASSEMBLY |
|
Using an E5 "TORX" socket wrench, install the 4 stud bolts.
| *a | 13 mm (0.512 in.) |
| *b | 8 mm (0.315 in.) |
| *c | 22.5 mm (0.886 in.) |
| *d | 16.5 mm (0.650 in.) |
| *e | 9 mm (0.354 in.) |
| *f | 27.5 mm (1.08 in.) |
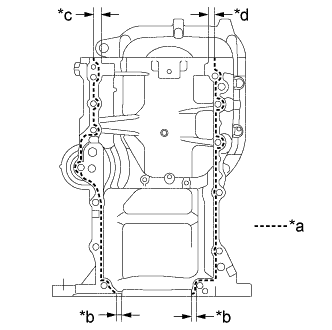 |
Apply seal packing to the oil pan sub-assembly as shown in the illustration.
| *a | Apply Seal Packing |
| *b | 4 mm (0.157 in.) |
| *c | 11 mm (0.433 in.) |
| *d | 9 mm (0.354 in.) |
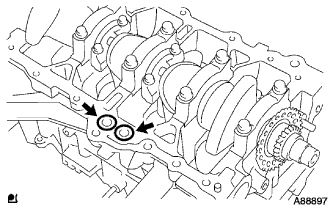 |
Install 2 new O-rings to the cylinder block and temporarily install the oil pan sub-assembly with the 13 bolts.
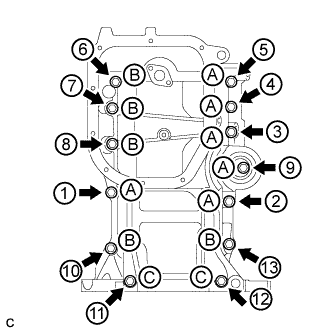 |
Using several steps, uniformly tighten the 13 bolts in the sequence shown in the illustration.
| Item | Length Of The Bolt From The Seat To The End. |
| Bolt A | 49 mm (1.93 in.) |
| Bolt B | 88 mm (3.46 in.) |
| Bolt C | 143.7 mm (5.66 in.) |
| 2. INSTALL REAR ENGINE OIL SEAL |
Apply MP grease to the lip of a new rear engine oil seal.
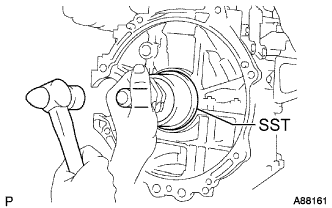 |
Using SST and a hammer, tap in the rear engine oil seal until its surface is flush with the rear engine oil seal retainer edge.
| 3. INSTALL OIL STRAINER SUB-ASSEMBLY |
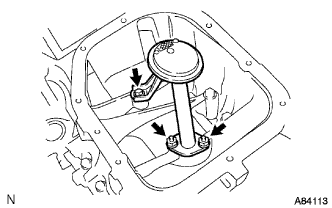 |
Install a new gasket and the oil strainer sub-assembly with the 2 nuts and bolt.
| 4. INSTALL NO. 2 OIL PAN SUB-ASSEMBLY |
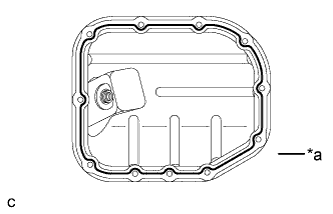 |
Apply seal packing to the No. 2 oil pan sub-assembly as shown in the illustration below.
| *a | Apply Seal Packing |
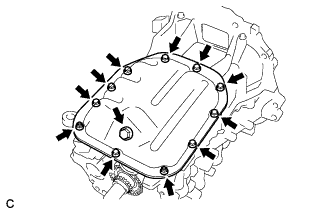 |
Install the No. 2 oil pan sub-assembly with the 9 bolts and 2 nuts.
Install the oil pan drain plug with a new gasket.
| 5. INSTALL OIL FILTER UNION |
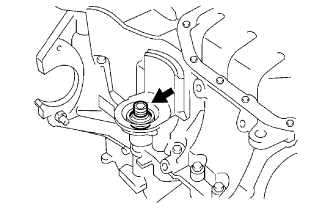 |
Using a 12 mm hexagon socket wrench, install the oil filter union.
| 6. INSTALL OIL FILTER SUB-ASSEMBLY |
Check and clean the oil filter installation surface.
Apply clean engine oil to the gasket of a new oil filter.
Lightly screw the oil filter into place by hand. Tighten it until the gasket contacts the seat.
Using SST, tighten the oil filter.
Depending on the work space available, choose from the following:
| 7. INSTALL CYLINDER HEAD GASKET |
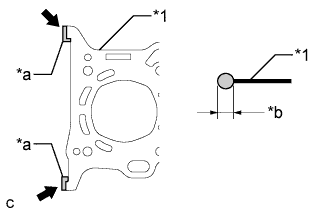 |
Apply seal packing to a new cylinder head gasket as shown in the illustration.
| *1 | Cylinder Head Gasket |
| *a | Apply Seal Packing To The Inner Corners |
| *b | 4.5 to 5.5 mm (0.177 to 0.217 in.) |
 | Seal Packing Black |
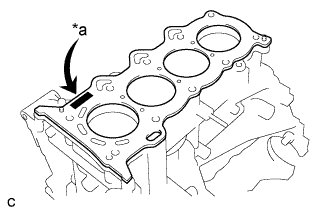 |
Place the cylinder head gasket on the cylinder block with the Lot No. facing upward.
| *a | Lot Number |
| 8. INSTALL CYLINDER HEAD SUB-ASSEMBLY |
Place the cylinder head sub-assembly on the cylinder block.
Apply a light coat of engine oil to the threads and under the heads of the 10 cylinder head bolts.
Step 1:
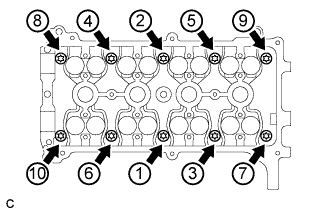 |
Using several steps, uniformly install and tighten the 10 cylinder head bolts and 10 washers with an 8 mm bi-hexagon wrench in the order shown in the illustration.
Step 2:
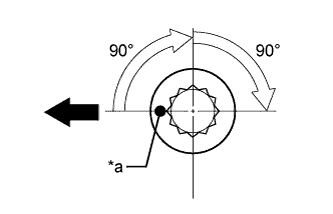 |
Mark each cylinder head bolt head with paint as shown in the illustration.
| *a | Paint Mark |
 | Engine Front |
Further tighten the cylinder head bolts 90°, and then an additional 90° as shown in the illustration.
Check that the paint mark is now at a 180° angle to the front.
After tightening the cylinder head bolts, wipe off the seal packing material that seeped out from the contact surface between the cylinder head sub-assembly and cylinder block.
| 9. INSTALL CAMSHAFT TIMING GEAR ASSEMBLY |
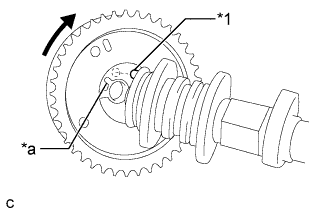 |
Put the camshaft timing gear assembly and camshaft together with the straight pin and key groove misaligned as shown in the illustration.
| *1 | Straight Pin |
| *a | Key Groove |
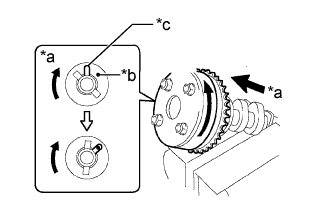 |
Turn the camshaft timing gear assembly as shown in the illustration while pushing it gently against the camshaft. Push further at the position where the pin fits into the groove.
| *a | View A |
| *b | Straight Pin |
| *c | Key Groove |
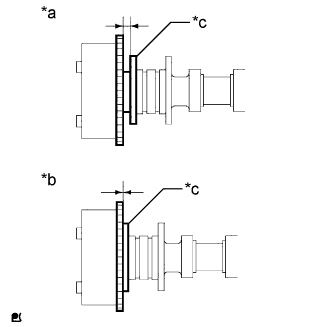 |
Check that there is no clearance between the camshaft timing gear assembly and camshaft flange.
| *a | INCORRECT |
| *b | CORRECT |
| *c | Flange |
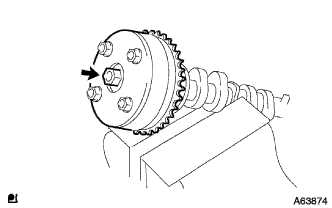 |
Tighten the bolt with the camshaft timing gear assembly secured in place.
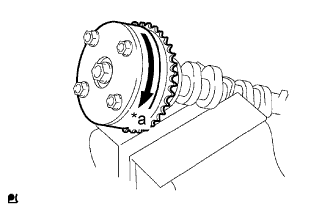 |
Check that the camshaft timing gear assembly can move to the retard direction (clockwise) and is locked in the most retarded position.
| *a | Lock |
| 10. INSTALL CAMSHAFT |
Apply a light coat of engine oil to the camshaft and cylinder head sub-assembly journals.
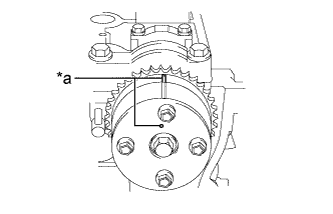 |
Place the camshaft on the cylinder head sub-assembly with the timing mark on the camshaft timing gear assembly facing upward.
| *a | Timing Mark |
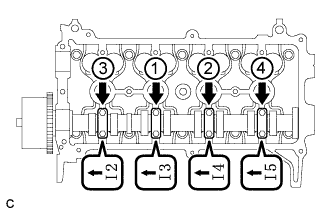 |
Examine the front marks and numbers, and tighten the 4 No. 2 camshaft bearing caps with the 8 bolts in the sequence shown in the illustration.
| 11. INSTALL CAMSHAFT TIMING GEAR OR SPROCKET |
Clamp the No. 2 camshaft in a vise.
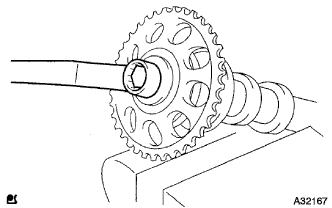 |
Align the knock pin hole of the camshaft timing gear or sprocket with the knock pin of the No. 2 camshaft, and tighten the camshaft timing gear or sprocket with the bolt.
| 12. INSTALL NO. 2 CAMSHAFT |
Apply a light coat of engine oil to the No. 2 camshaft and cylinder head sub-assembly journals.
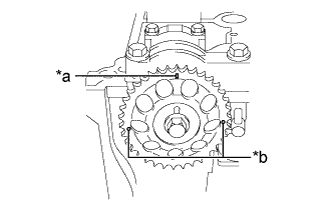 |
Place the No. 2 camshaft on the cylinder head with the timing mark on the camshaft timing gear or sprocket facing upward.
| *a | Timing Mark (Rectangle) |
| *b | Mark (Circle) |
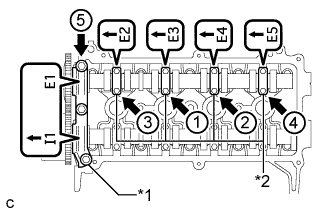 |
Examine the front marks and numbers, and tighten the No. 1 camshaft bearing cap and No. 2 camshaft bearing caps with the 11 bolts in the sequence shown in the illustration.
| *1 | No. 1 Camshaft Bearing Cap |
| *2 | No. 2 Camshaft Bearing Cap |
| 13. INSTALL CHAIN SUB-ASSEMBLY |
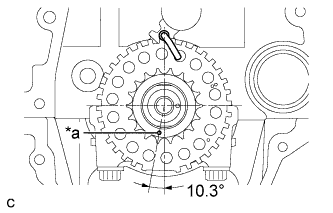 |
Set the crankshaft in the position shown in the illustration.
| *a | Timing Mark |
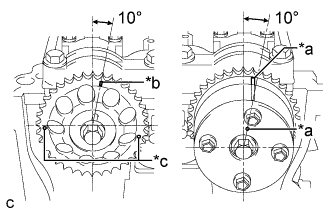 |
Set the camshaft timing gear assembly and camshaft timing sprocket in the positions shown in the illustration.
| *a | Timing Mark |
| *b | Timing Mark (Rectangle) |
| *c | Mark (Circle) |
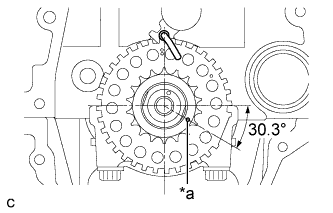 |
Set the crankshaft in the position shown in the illustration.
| *a | Timing Mark |
Install the No. 1 chain vibration damper with the 2 bolts.
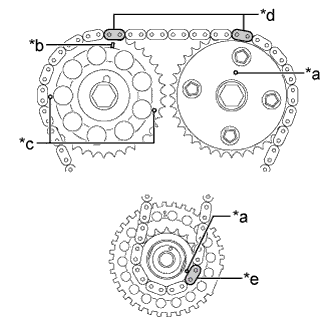 |
Align the timing marks of the camshaft and crankshaft with the mark plates of the timing chain sub-assembly and install the timing chain sub-assembly.
| *a | Timing Mark |
| *b | Timing Mark (Rectangle) |
| *c | Mark (Circle) |
| *d | Orange Mark Plate |
| *e | Yellow Mark Plate |
Install the chain tensioner slipper.
Install the No. 1 chain tensioner assembly with the 2 bolts.
Remove the hexagon wrench from the No. 1 chain tensioner assembly.
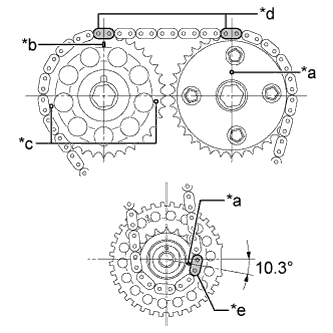 |
Turn the crankshaft approximately 20° counterclockwise to set it to TDC. Make sure that the timing marks and mark plates are correctly positioned.
| *a | Timing Mark |
| *b | Timing Mark (Rectangle) |
| *c | Mark (Circle) |
| *d | Orange Mark Plate |
| *e | Yellow Mark Plate |
| 14. INSTALL OIL PUMP SEAL |
Apply MP grease to the lip of a new oil pump seal.
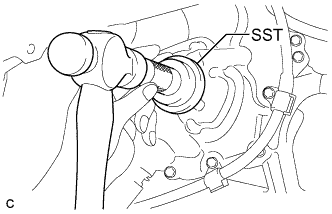 |
Using SST and a hammer, tap in the oil pump seal until its surface is flush with the front oil pump seal retainer edge.
| 15. INSTALL SCREW PLUG |
Apply a few drops of adhesive to 2 or 3 threads of the screw plug.
Using an 8 mm hexagon socket wrench, install the screw plug.
| 16. INSTALL TIMING CHAIN COVER |
Install 2 new O-rings to the cylinder block and oil pan.
Apply seal packing to the timing chain cover and engine assembly as shown in the illustration below.
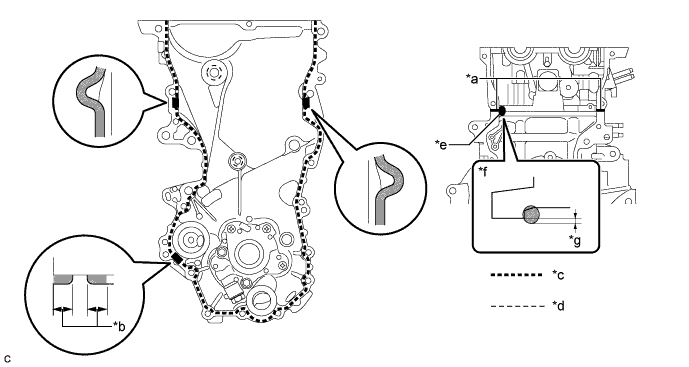
| *a | Apply Seal Packing To The Inner Corners | *b | 2.5 mm Or Higher |
| *c | Seal Packing Application Width 3.5 to 4.5 mm | *d | Seal Packing Application Width 1.5 to 2.0 mm |
| *e | Seal Packing Application Width 10 mm or more | *f | Upper View |
| *g | Apply enough seal packing so that it will protrude beyond the timing chain cover installation surface | - | - |
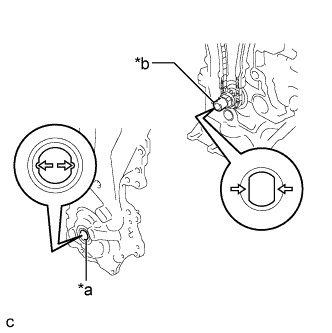 |
Align the oil pump drive rotor spline and the crankshaft as shown in the illustration.
| *a | Drive Rotor Spline |
| *b | Crankshaft |
Temporarily install the timing chain cover and 2 wire harness clamp brackets with the 18 bolts and nut.
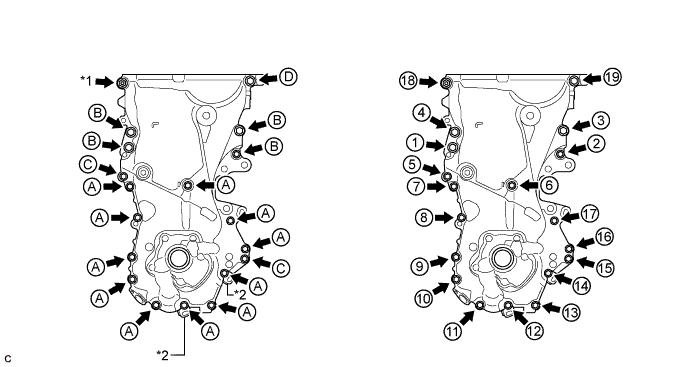
| *1 | Nut | *2 | Wire Harness Clamp Bracket |
| Item | Length | Thread Diameter |
| Bolt A | 20 mm (0.787 in.) | 6 mm (0.236 in.) |
| Bolt B | 30 mm (1.18 in.) | 8 mm (0.315 in.) |
| Bolt C | 35 mm (1.38 in.) | 6 mm (0.236 in.) |
| Bolt D | 20 mm (0.787 in.) | 8 mm (0.315 in.) |
Tighten the 18 bolts and nut in the sequence shown in the illustration.
| 17. INSTALL CRANKSHAFT DAMPER SUB-ASSEMBLY |
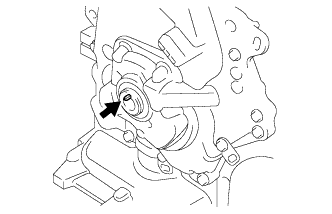 |
Install the straight pin to the crankshaft.
Align the hole of the crankshaft damper sub-assembly with the straight pin, then install the crankshaft damper sub-assembly.
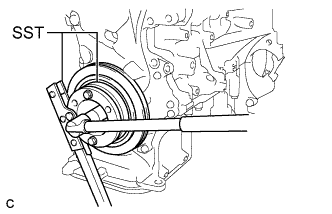 |
Using SST, hold the crankshaft damper sub-assembly in place and tighten the bolt.
| 18. INSTALL ENGINE MOUNTING BRACKET RH |
Temporarily install the engine mounting bracket RH with the 4 bolts.
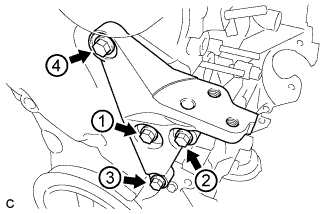 |
Tighten the 4 bolts in the sequence shown in the illustration.
| 19. INSTALL WATER INLET HOUSING |
Install a new gasket to the water inlet housing.
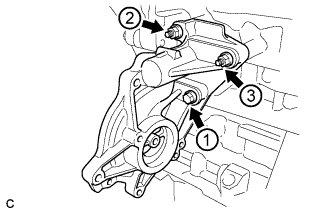 |
Temporarily install the water inlet housing with the bolt and 2 nuts.
Tighten the bolt and 2 nuts in the sequence shown in the illustration.
| 20. INSTALL ENGINE WATER PUMP ASSEMBLY |
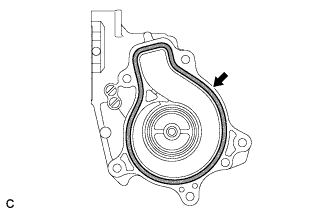 |
Install a new gasket to the engine water pump assembly.
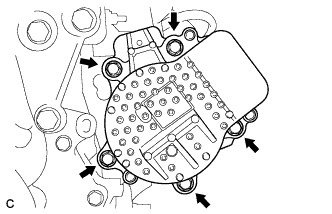 |
Install the engine water pump assembly with the 5 bolts.
| 21. INSTALL WATER INLET WITH THERMOSTAT SUB-ASSEMBLY |
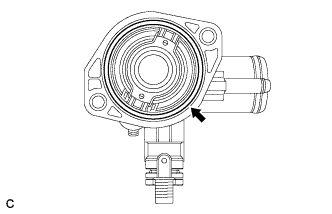 |
Install a new gasket to the water inlet with thermostat sub-assembly.
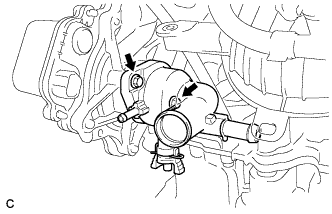 |
Install the water inlet with thermostat sub-assembly with the 2 bolts.
| 22. INSPECT VALVE CLEARANCE |
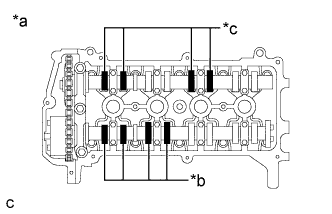 |
Check only the valves indicated.
| *a | No. 1 Cylinder TDC/Compression |
| *b | Intake Side |
| *c | Exhaust Side |
Using a feeler gauge, measure the clearance between the valve lifter and camshaft.
| Item | Specified Condition |
| Intake | 0.15 to 0.25 mm (0.00591 to 0.00984 in.) |
| Exhaust | 0.25 to 0.35 mm (0.00984 to 0.0138 in.) |
Turn the crankshaft 1 revolution (360°) and set the No. 4 cylinder to TDC/compression.
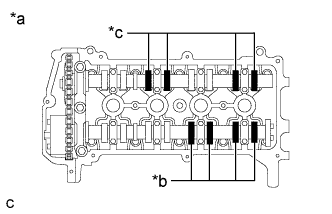 |
Check only the valves indicated.
| *a | No. 4 Cylinder TDC/Compression |
| *b | Intake Side |
| *c | Exhaust Side |
Using a feeler gauge, measure the clearance between the valve lifter and camshaft.
| Item | Specified Condition |
| Intake | 0.15 to 0.25 mm (0.00591 to 0.00984 in.) |
| Exhaust | 0.25 to 0.35 mm (0.00984 to 0.0138 in.) |
| 23. ADJUST VALVE CLEARANCE |
Remove the camshaft (Click here).
Remove the valve lifters.
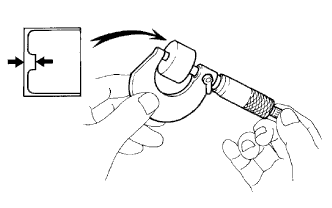 |
Using a micrometer, measure the thickness of the removed valve lifters.
Calculate the thickness of a new valve lifter so that the valve clearance comes within the specified range.
| Item | Specification |
| Intake | A = B + (C - 0.20 mm (0.00787 in.)) |
| Exhaust | A = B + (C - 0.30 mm (0.0118 in.)) |
| A | New valve lifter thickness |
| B | Used valve lifter thickness |
| C | Measured valve clearance |
Select a new lifter with a thickness as close as possible to the calculated values.
Valve lifter selection chart (intake).
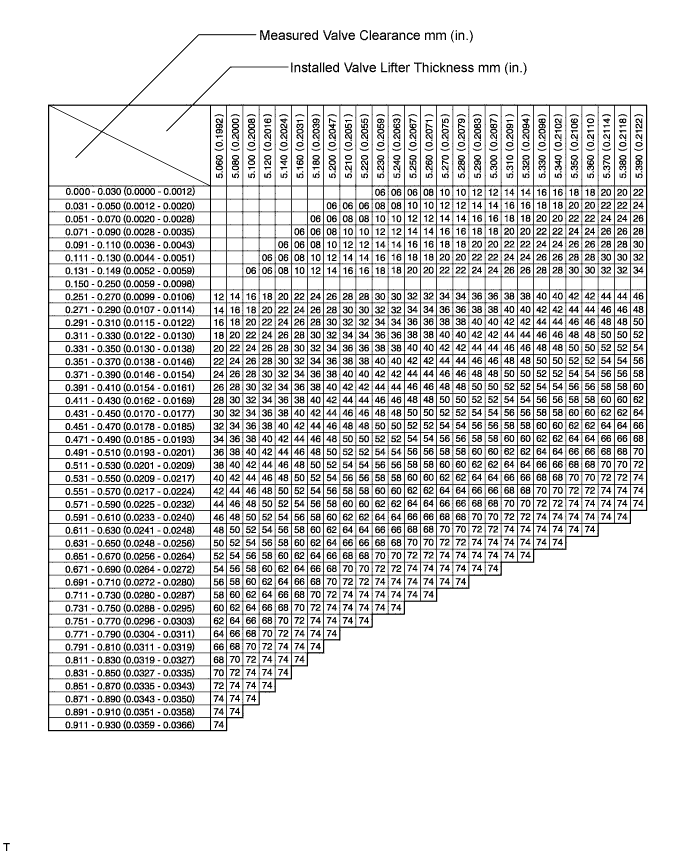
Valve lifter selection chart (intake) (continued).
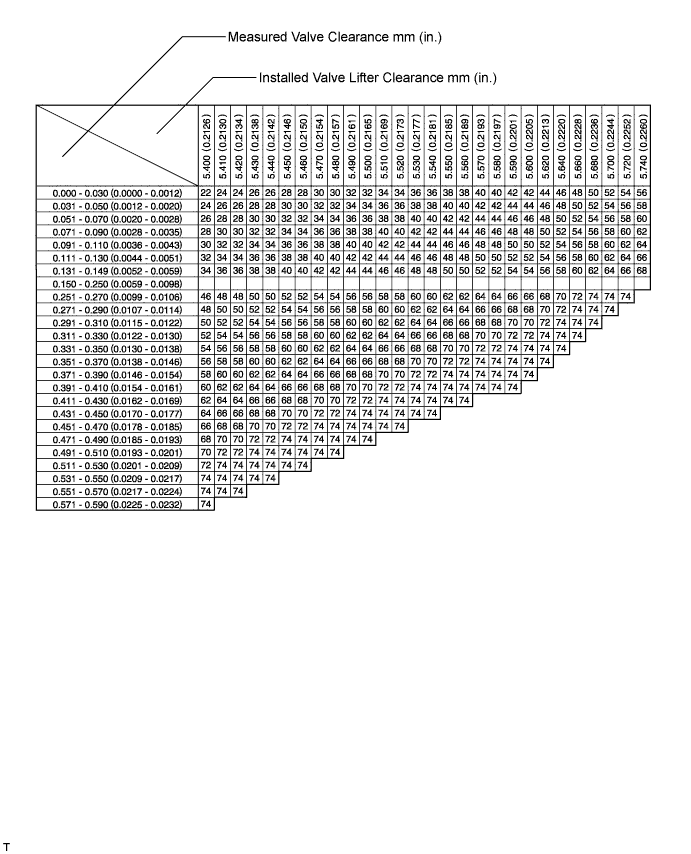
| Lifter No. | Thickness | Lifter No. | Thickness | Lifter No. | Thickness |
| 06 | 5.060 mm (0.1992 in.) | 30 | 5.300 mm (0.2087 in.) | 54 | 5.540 mm (0.2181 in.) |
| 08 | 5.080 mm (0.2000 in.) | 32 | 5.320 mm (0.2094 in.) | 56 | 5.560 mm (0.2189 in.) |
| 10 | 5.100 mm (0.2008 in.) | 34 | 5.340 mm (0.2102 in.) | 58 | 5.580 mm (0.2197 in.) |
| 12 | 5.120 mm (0.2016 in.) | 36 | 5.360 mm (0.2110 in.) | 60 | 5.600 mm (0.2205 in.) |
| 14 | 5.140 mm (0.2024 in.) | 38 | 5.380 mm (0.2118 in.) | 62 | 5.620 mm (0.2213 in.) |
| 16 | 5.160 mm (0.2031 in.) | 40 | 5.400 mm (0.2126 in.) | 64 | 5.640 mm (0.2220 in.) |
| 18 | 5.180 mm (0.2039 in.) | 42 | 5.420 mm (0.2134 in.) | 66 | 5.660 mm (0.2228 in.) |
| 20 | 5.200 mm (0.2047 in.) | 44 | 5.440 mm (0.2142 in.) | 68 | 5.680 mm (0.2236 in.) |
| 22 | 5.220 mm (0.2055 in.) | 46 | 5.460 mm (0.2150 in.) | 70 | 5.700 mm (0.2244 in.) |
| 24 | 5.240 mm (0.2063 in.) | 48 | 5.480 mm (0.2157 in.) | 72 | 5.720 mm (0.2252 in.) |
| 26 | 5.260 mm (0.2071 in.) | 50 | 5.500 mm (0.2165 in.) | 74 | 5.740 mm (0.2260 in.) |
| 28 | 5.280 mm (0.2079 in.) | 52 | 5.520 mm (0.2173 in.) | - | - |
Valve lifter selection chart (exhaust).
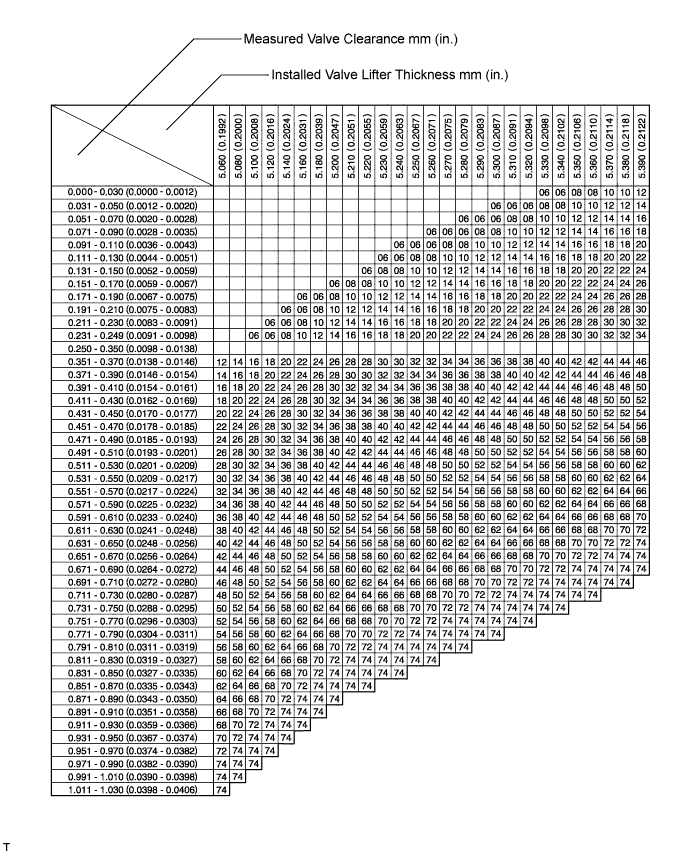
Valve selection chart (exhaust) (continued).
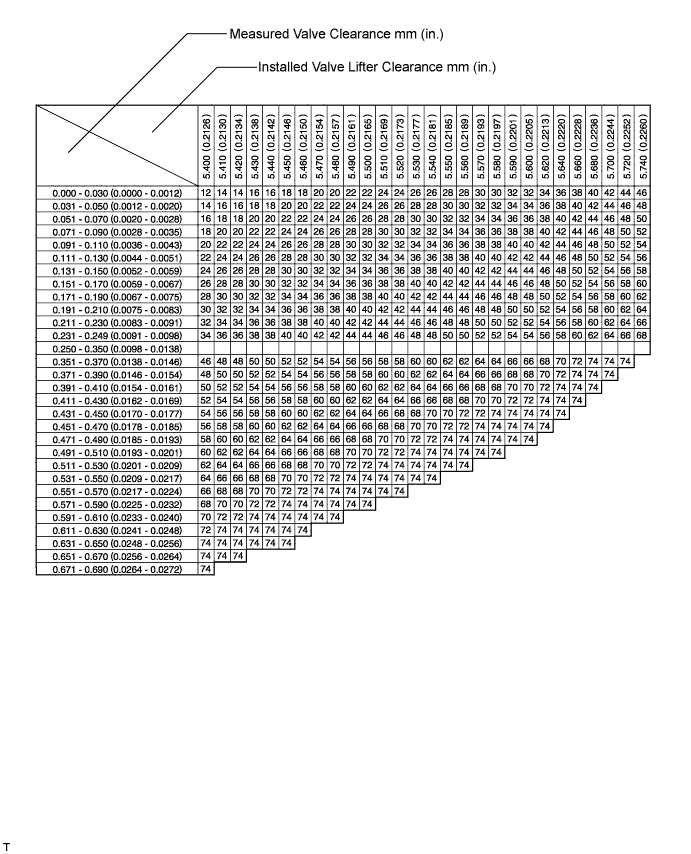
| Lifter No. | Thickness | Lifter No. | Thickness | Lifter No. | Thickness |
| 06 | 5.060 mm (0.1992 in.) | 30 | 5.300 mm (0.2087 in.) | 54 | 5.540 mm (0.2181 in.) |
| 08 | 5.080 mm (0.2000 in.) | 32 | 5.320 mm (0.2094 in.) | 56 | 5.560 mm (0.2189 in.) |
| 10 | 5.100 mm (0.2008 in.) | 34 | 5.340 mm (0.2102 in.) | 58 | 5.580 mm (0.2197 in.) |
| 12 | 5.120 mm (0.2016 in.) | 36 | 5.360 mm (0.2110 in.) | 60 | 5.600 mm (0.2205 in.) |
| 14 | 5.140 mm (0.2024 in.) | 38 | 5.380 mm (0.2118 in.) | 62 | 5.620 mm (0.2213 in.) |
| 16 | 5.160 mm (0.2031 in.) | 40 | 5.400 mm (0.2126 in.) | 64 | 5.640 mm (0.2220 in.) |
| 18 | 5.180 mm (0.2039 in.) | 42 | 5.420 mm (0.2134 in.) | 66 | 5.660 mm (0.2228 in.) |
| 20 | 5.200 mm (0.2047 in.) | 44 | 5.440 mm (0.2142 in.) | 68 | 5.680 mm (0.2236 in.) |
| 22 | 5.220 mm (0.2055 in.) | 46 | 5.460 mm (0.2150 in.) | 70 | 5.700 mm (0.2244 in.) |
| 24 | 5.240 mm (0.2063 in.) | 48 | 5.480 mm (0.2157 in.) | 72 | 5.720 mm (0.2252 in.) |
| 26 | 5.260 mm (0.2071 in.) | 50 | 5.500 mm (0.2165 in.) | 74 | 5.740 mm (0.2260 in.) |
| 28 | 5.280 mm (0.2079 in.) | 52 | 5.520 mm (0.2173 in.) | - | - |
Install the selected valve lifter.
Install the camshaft (Click here).
| 24. INSTALL FUEL INJECTOR ASSEMBLY |
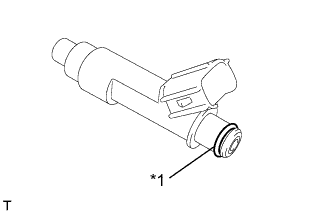 |
Apply a light coat of gasoline or spindle oil to new O-rings, and then install one onto each fuel injector.
| *1 | O-ring |
Apply a light coat of gasoline or spindle oil to the contact surfaces of the new O-ring on each fuel injector assembly.
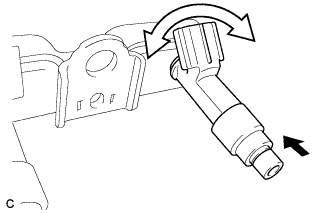 |
While turning the fuel injector assembly left and right, install it onto the fuel delivery pipe sub-assembly.
| Push |
 | Turn |
Check that the fuel injector rotates smoothly. If the fuel injector does not rotate, replace the O-ring.
| 25. INSTALL INJECTOR VIBRATION INSULATOR |
Install the 4 new injector vibration insulators onto the cylinder head.
| 26. INSTALL FUEL DELIVERY SPACER |
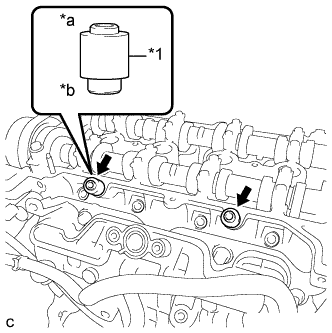 |
Install the 2 fuel delivery spacers onto the cylinder head.
| *1 | Fuel Delivery Spacer |
| *a | Fuel Delivery Pipe Side |
| *b | Cylinder Head Side |
| 27. INSTALL FUEL DELIVERY PIPE |
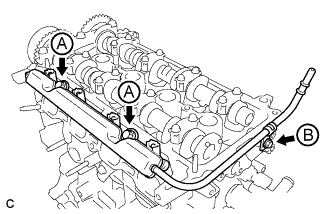 |
Install the fuel delivery pipe with the 3 bolts.
| 28. INSTALL CYLINDER HEAD COVER SUB-ASSEMBLY |
Install a new gasket to the cylinder head cover sub-assembly.
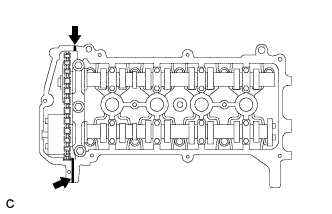 |
Apply seal packing to the 2 locations shown in the illustration.
| Apply Seal Packing |
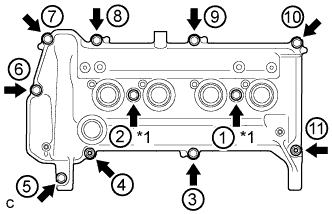 |
Temporarily install the cylinder head cover sub-assembly with the 9 bolts, 2 nuts and 2 new seal washers.
| *1 | Seal Washer |
Using several steps, uniformly tighten the bolts and nuts in the sequence shown in the illustration.
| 29. INSTALL VENTILATION VALVE SUB-ASSEMBLY |
Apply adhesive to 2 or 3 threads of the ventilation valve sub-assembly.
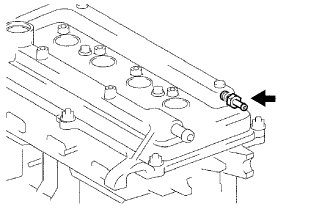 |
Using a 19 mm deep socket wrench, install the ventilation valve sub-assembly.
| 30. INSTALL ENGINE OIL LEVEL DIPSTICK GUIDE |
Apply a light coat of engine oil to a new O-ring and install the O-ring to the engine oil level dipstick guide.
Install the engine oil level dipstick guide with the bolt.
| 31. INSTALL OIL FILLER CAP GASKET |
Install a new oil filler cap gasket to the oil filler cap.
| 32. INSTALL OIL FILLER CAP SUB-ASSEMBLY |
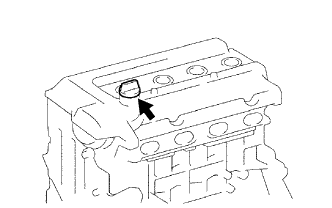 |
Install the oil filler cap sub-assembly to the cylinder head cover sub-assembly.
| 33. INSTALL ENGINE OIL PRESSURE SWITCH ASSEMBLY |
Apply adhesive to 2 or 3 threads of the engine oil pressure switch assembly.
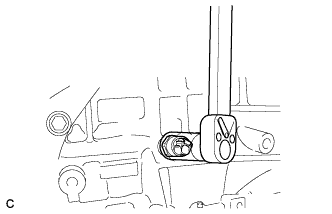 |
Using a 24 mm deep socket wrench, install the engine oil pressure switch assembly.
| 34. INSTALL ENGINE COOLANT TEMPERATURE SENSOR |
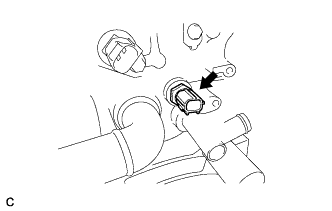 |
Using a 19 mm union nut wrench, install a new gasket and the engine coolant temperature sensor.
| 35. INSTALL KNOCK CONTROL SENSOR |
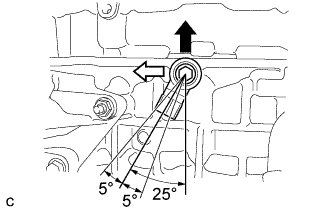 |
Install the knock control sensor with the bolt.
| Up |
| Engine Front |
| 36. INSTALL CRANKSHAFT POSITION SENSOR |
Apply a light coat of engine oil to a new O-ring and install it to the crankshaft position sensor.
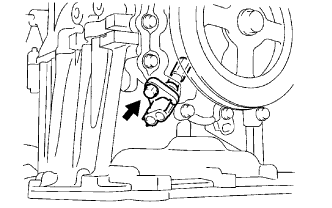 |
Install the crankshaft position sensor with the bolt.
| 37. INSTALL CAMSHAFT TIMING OIL CONTROL VALVE ASSEMBLY |
Apply a light coat of engine oil to a new O-ring and install it to the camshaft timing oil control valve assembly.
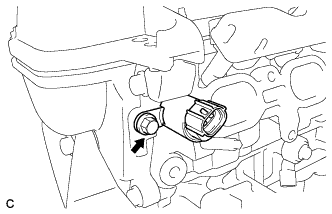 |
Install the camshaft timing oil control valve assembly with the bolt.
| 38. INSTALL CAMSHAFT POSITION SENSOR |
Apply a light coat of engine oil to the O-ring on the camshaft position sensor.
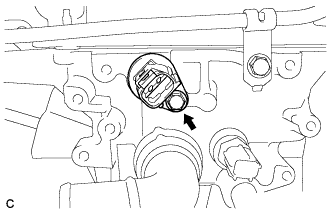 |
Install the camshaft position sensor with the bolt.
| 39. INSTALL SPARK PLUG |
Using a 16 mm spark plug wrench, install the 4 spark plugs.