Home › Drivetrain › AXLE AND DIFFERENTIAL › REAR AXLE HUB

REAR AXLE HUB > ON-VEHICLE INSPECTION

for Preparation Click here


NOTICE:
  1. When the brake pedal is first depressed after replacing the brake shoes or pushing back the wheel brake cylinder piston, DTC C1214 may be output. As there is no malfunction, clear the DTC.
  2. While the auxiliary battery is connected, even if the ignition switch is off, the brake control system activates when the brake pedal is depressed or the door courtesy switch is turned on. Therefore, even if only brake shoes are to be removed and installed, be sure to perform the Disable Brake Control procedure and disconnect the cable from the negative (-) terminal of the auxiliary battery before beginning work.

HINT:
  1. Use the same procedure for the RH side and LH side.
  2. The procedure listed below is for the LH side.


1. PRECAUTION

NOTICE:
After turning the ignition switch off, waiting time may be required before disconnecting the cable from the negative (-) auxiliary battery terminal. Therefore, make sure to read the disconnecting the cable from the negative (-) auxiliary battery terminal notice before proceeding with work (Click here).


2. DISABLE BRAKE CONTROL
  1. Wait at least 2 minutes after turning the ignition switch off.

    NOTICE:
    When the brake pedal is depressed or the door courtesy switch is turned on even if the ignition switch is off, the brake control system activates. Therefore do not depress the brake pedal or open/close the doors until the reservoir level switch connector is disconnected.


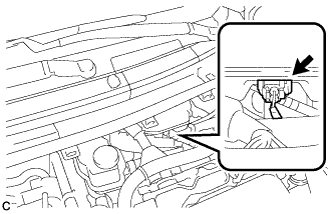
    C250008
  1. Disconnect the reservoir level switch connector with the parking brake applied.

  1. Disconnect the cable from the negative (-) auxiliary battery terminal (Click here).

  1. Depress the brake pedal 40 times or more to return all the fluid in the accumulator back to the reservoir.

  1. Check that the brake pedal can not be further depressed.

  1. Release the parking brake.


3. REMOVE REAR WHEEL


4. REMOVE REAR BRAKE DRUM SUB-ASSEMBLY


    C233134
  1. Release the parking brake and remove the rear brake drum sub-assembly.
    Text in Illustration 
    V100135
    Contract

    HINT:
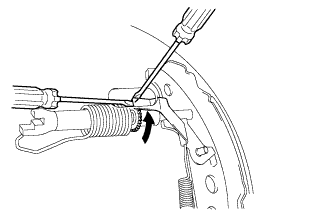
    If the rear brake drum sub-assembly cannot be removed easily, perform the following procedure.


    1. Remove the shoe adjusting hole plug and insert a screwdriver through the hole into the backing plate, and hold the automatic adjust lever away from the adjuster.

    2. Using another screwdriver, contract the brake shoe by turning the adjusting bolt.


5. INSPECT REAR AXLE HUB BEARING LOOSENESS


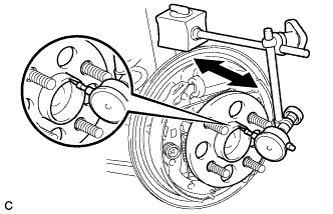
    C249956
  1. Using a dial indicator, check for looseness near the center of the rear axle hub.

    Maximum looseness:
    0.05 mm (0.00196 in.)

    NOTICE:
    1. Ensure that the dial indicator is set perpendicular to the measurement surface.
    2. Keep the magnet of the dial indicator away from the rear axle hub and bearing assembly (rear speed sensor).

    If the looseness exceeds the maximum, replace the rear axle hub and bearing assembly.


6. INSPECT REAR AXLE HUB RUNOUT


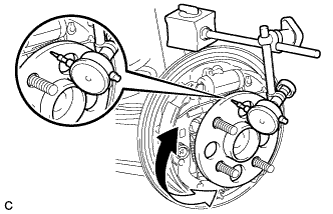
    C249957
  1. Using a dial indicator, check for runout on the surface of the axle hub outside the rear axle hub bolts.

    Maximum runout:
    0.07 mm (0.00276 in.)

    NOTICE:
    1. Ensure that the dial indicator is set perpendicular to the measurement surface.
    2. Make sure to set the tip of the dial indicator towards the outside of the rear axle hub bolts.
    3. Keep the magnet of the dial indicator away from the rear axle hub and bearing assembly (rear speed sensor).

    If the runout exceeds the maximum, replace the rear axle hub and bearing assembly.


7. INSTALL REAR BRAKE DRUM SUB-ASSEMBLY
  1. Install the rear brake drum sub-assembly.


8. INSTALL REAR WHEEL

Torque:
103 N*m{ 1050 kgf*cm , 76 ft.*lbf }


9. CONNECT CABLE TO NEGATIVE AUXILIARY BATTERY TERMINAL
  1. Connect the cable to the negative (-) auxiliary battery terminal .

  1. Connect the reservoir level switch connector.

  1. Clear the DTCs (Click here).