Home › Engine / Hybrid System › 1NZ-FXE FUEL › FUEL TANK

FUEL TANK > INSTALLATION

for Preparation Click here


1. INSTALL BREATHER TUBE CLAMP
  1. Engage the claw and clamp and install the breather tube clamp.


2. INSTALL FUEL TANK FILLER PIPE PROTECTOR
  1. Engage the 2 claws and install the fuel tank filler pipe protector.

  1. Engage the 2 claws and install the No. 1 fuel tube support protector.

  1. Install the clip to the fuel tank filler pipe protector.


3. INSTALL FUEL TANK VENT HOSE SUB-ASSEMBLY
  1. Install the fuel tank vent hose sub-assembly onto the fuel tank assembly.


4. INSTALL FUEL TANK MAIN TUBE SUB-ASSEMBLY
  1. Install the fuel tank main tube onto the fuel tank assembly.


5. INSTALL FUEL TANK ASSEMBLY
  1. Clean and degrease the bolt holes.

  1. Using an engine lifter, set the fuel tank assembly in the installation position.

    NOTICE:
    Do not drop the fuel tank.

  1. Install the fuel tank assembly with 4 new bolts.

    Torque:
    14 N*m{ 146 kgf*cm , 11 ft.*lbf }

  1. Engage the claw and install the fuel tank filler pipe.

  1. Install the bolt.

    Torque:
    34 N*m{ 347 kgf*cm , 25 ft.*lbf }


6. INSTALL CHARCOAL CANISTER ASSEMBLY
  1. Install the charcoal canister assembly with the 3 bolts.

    Torque:
    19 N*m{ 194 kgf*cm , 14 ft.*lbf }

  1. Connect the vent line tube.

    NOTICE:
    1. Check that there are no scratches or foreign matter around the connected part of the tube connector and pipe before performing this work.
    2. After connecting the air line tube, check that the vent line tube is securely connected by pulling on the tube connector and the charcoal canister.

  1. Connect the purge line hose.

  1. Connect the air line tube.

    NOTICE:
    1. Check that there are no scratches or foreign matter around the connected part of the tube connector and pipe before performing this work.
    2. After connecting the air line tube, check that the air line tube is securely connected by pulling on the tube connector and the charcoal canister.

  1. Connect the connector to the charcoal canister leak detection pump sub-assembly.


7. CONNECT FUEL TANK MAIN TUBE SUB-ASSEMBLY


    A267909E02
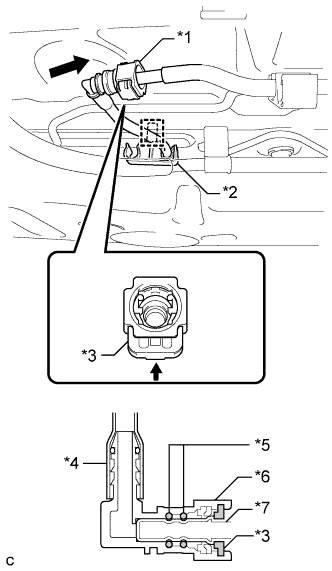
  1. Align the fuel tube connector with the fuel pipe, connect the fuel tube connector and push the retainer in until the retainer makes a "click" sound to lock the claws of the retainer.
    Text in Illustration 
    *1
    Fuel Tank Main Tube Sub-assembly
    *2
    Fuel Tank Pipe Setting Holder
    *3
    Retainer
    *4
    Nylon Tube
    *5
    O-ring
    *6
    Fuel Tube Connector
    *7
    Fuel Pipe

    NOTICE:
    1. Check that there is no damage or foreign matter around the connecting parts of the fuel tube connector and fuel pipe before starting this step.
    2. After connecting the fuel tube connector, check that the fuel tube connector is securely connected by pulling on the fuel tube connector.
  1. Engage the clamp and install the fuel tank pipe setting holder.


8. INSTALL NO. 1 FUEL TUBE PROTECTOR
  1. Install the No. 1 fuel tube protector to the fuel tube connector.


9. INSTALL NO. 1 FUEL TANK PROTECTOR SUB-ASSEMBLY
  1. Install the No. 1 fuel tank protector sub-assembly with the bolt and clip.

    Torque:
    5.4 N*m{ 55 kgf*cm , 48 in.*lbf }


10. INSTALL FRONT NO. 4 FLOOR HEAT INSULATOR


    A267873E01
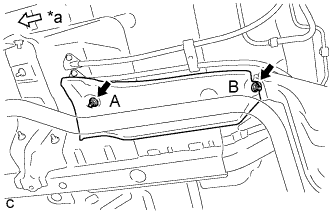
  1. Install the front No. 4 floor heat insulator with the 2 nuts.
    Text in Illustration 
    *a
    Front

    Torque:
    Nut A:
    5.5 N*m{ 56 kgf*cm , 49 in.*lbf }
    Nut B:
    5.4 N*m{ 55 kgf*cm , 48 in.*lbf }


11. INSTALL FUEL TANK CAP ASSEMBLY


12. INSTALL FUEL SUCTION TUBE WITH PUMP AND GAUGE ASSEMBLY
(Click here)


13. ADD FUEL


14. INSTALL REAR WHEEL (for LH Side)

Torque:
103 N*m{ 1050 kgf*cm , 76 ft.*lbf }