Home › Engine / Hybrid System › HYBRID / BATTERY CONTROL › HYBRID BATTERY SYSTEM

DTC    P0AFC-123    Hybrid Battery Pack Sensor Module

for Preparation Click here


DESCRIPTION

  1. If the battery smart unit detects an internal malfunction, it sends an error signal to the power management control ECU. When the power management control ECU receives the error signal from the battery smart unit, the ECU warns the driver and performs fail-safe control.

DTC No.
INF Code
DTC Detection Condition
Trouble Area
P0AFC
123
The power management control ECU receives an error signal from the battery smart unit.
(1 trip detection logic)
  1. Battery smart unit
  2. Wire harness or connector

Related Data List 
DTC No.
Data List
P0AFC-123
Auxiliary Battery Vol

MONITOR DESCRIPTION

If the battery smart unit detects an internal malfunction in the unit itself, the power management control ECU will illuminate the MIL and set a DTC.

MONITOR STRATEGY


Related DTCs
P0AFC (INF 123): Power supply circuit malfunction
Required sensors / components
Battery smart unit
Frequency of operation
Continuous
Duration
TMC's intellectual property
MIL operation
TMC's intellectual property
Sequence of operation
None

TYPICAL ENABLING CONDITIONS


The monitor will run whenever the following DTCs are not present
TMC's intellectual property
Other conditions belong to TMC's intellectual property
-

TYPICAL MALFUNCTION THRESHOLDS


TMC's intellectual property
-

COMPONENT OPERATING RANGE


Battery smart unit
DTC P0AFC (INF 123) is not detected

CONFIRMATION DRIVING PATTERN

  1. Connect the Techstream to the DLC3.
  2. Turn the ignition switch to ON (IG) and turn the Techstream on.
  3. Clear the DTCs (even if no DTCs are stored, perform the clear DTC procedure).
  4. Turn the ignition switch off and wait for 30 seconds or more.
  5. Turn the ignition switch to ON (IG) and wait for 10 seconds or more.
  6. Perform the universal trip.
  7. Enter the following menus: Powertrain / HV / Trouble Codes.
  8. Read the current DTCs.

    HINT:
    1. If a current DTC is output, the system is malfunctioning.
    2. If a current DTC is not output, perform the following procedure.

  9. Check that permanent DTCs are cleared. If no permanent DTC is output, the system is normal.

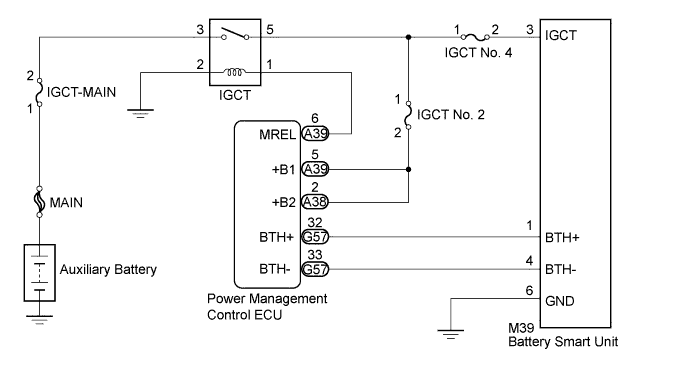
WIRING DIAGRAM


A244329E02


INSPECTION PROCEDURE

CAUTION:
  1. Before inspecting the high-voltage system, take safety precautions to prevent electrical shocks, such as wearing insulated gloves and removing the service plug grip. After removing the service plug grip, put it in your pocket to prevent other technicians from accidentally reconnecting it while you are working on the high-voltage system.
  2. After removing the service plug grip, wait for at least 10 minutes before touching any of the high-voltage connectors or terminals. After waiting for 10 minutes, check the voltage at the terminals in the inspection point in the inverter with converter assembly. The voltage should be 0 V before beginning work (Click here).

    HINT:
    At least 10 minutes is required to discharge the high-voltage capacitor inside the inverter with converter assembly.

NOTICE:
After turning the ignition switch off, waiting time may be required before disconnecting the cable from the negative (-) auxiliary battery terminal. Therefore, make sure to read the disconnecting the cable from the negative (-) auxiliary battery terminal notices before proceeding with work (Click here).

HINT:
After the repair, clear the DTCs and perform the following procedure to check that DTCs are not output.
  1. Turn the ignition switch to ON (IG) and wait for 10 seconds or more.

1.CHECK HARNESS AND CONNECTOR (IGCT VOLTAGE)

CAUTION:
Be sure to wear insulated gloves.

  1. Check that the service plug grip is not installed.

    NOTICE:
    After removing the service plug grip, do not turn the ignition switch to ON (READY), unless instructed by the repair manual because this may cause a malfunction.

  1. Remove the No. 1 hybrid battery exhaust duct .
  1. Connect the cable to the negative (-) auxiliary battery terminal.

    NOTICE:
    Check and record any DTCs, INF codes and freeze frame data, then disconnect the cable from the negative (-) auxiliary battery terminal.

  1. Turn the ignition switch to ON (IG).


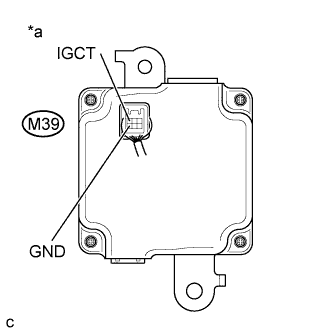
    A260174E03
  1. Measure the voltage according to the value(s) in the table below.

    Standard Voltage:
    Tester Connection
    Switch Condition
    Specified Condition
    M39-3 (IGCT) - M39-6 (GND)
    Ignition switch ON (IG)
    11 to 14 V

    Text in Illustration 
    *a
    Component with harness connected
    (Battery Smart Unit)

NOTICE:
Turning the ignition switch to ON (IG) with the service grip removed causes other DTCs to be stored. Clear the DTCs after performing this inspection.

  1. Turn the ignition switch off.

  1. Disconnect the cable from the negative (-) auxiliary battery terminal.

  1. Install the No. 1 hybrid battery exhaust duct.


NG
Go to step 2
OK

REPLACE BATTERY SMART UNIT (Click here)  

2.CHECK HARNESS AND CONNECTOR (GND - BODY GROUND)

CAUTION:
Be sure to wear insulated gloves.

  1. Check that the service plug grip is not installed.

    NOTICE:
    After removing the service plug grip, do not turn the ignition switch to ON (READY), unless instructed by the repair manual because this may cause a malfunction.

  1. Remove the No. 1 hybrid battery exhaust duct .


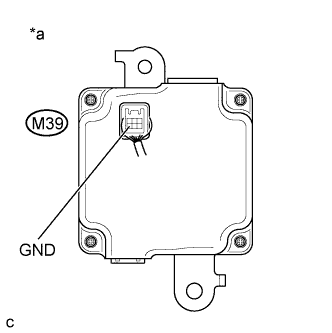
    A260174E04
  1. Measure the resistance according to the value(s) in the table below.

    Standard Resistance:
    Tester Connection
    Switch Condition
    Specified Condition
    M39-6 (GND) - Body ground
    Ignition switch off
    Below 1 Ω

    Text in Illustration 
    *a
    Component with harness connected
    (Battery Smart Unit)

  1. Install the No. 1 hybrid battery exhaust duct.


NG
REPAIR OR REPLACE HARNESS OR CONNECTOR (GND - BODY GROUND)
OK

REPAIR OR REPLACE HARNESS OR CONNECTOR (BATT VL SSR FUSE - BATTERY SMART UNIT)