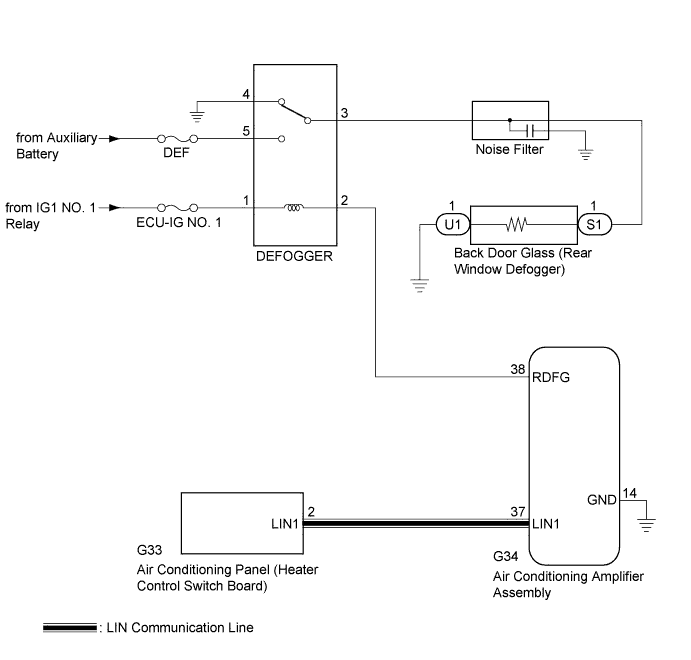
WINDOW DEFOGGER SYSTEM > Rear Window Defogger System does not Operate |
| 1.CHECK AIR CONDITIONING SYSTEM |
Check the air conditioning system.
|
| ||||
| OK | |
 |
| 2.PERFORM ACTIVE TEST USING TECHSTREAM (DEFOGGER RELAY) |
Connect the Techstream to the DLC3.
Turn the ignition switch to ON (IG).
Turn the Techstream on.
Enter the following menus: Body Electrical / Air Conditioner / Active Test.
Perform the Active Test according to the display on the Techstream.
| Tester Display | Test Part | Control Range | Diagnostic Note |
| Defogger Relay (Rear) | Rear window defogger wire | OFF or ON | - |
|
| ||||
| OK | |
|
| 3.REPLACE AIR CONDITIONING AMPLIFIER ASSEMBLY |
Temporarily replace the air conditioning amplifier assembly with a new or known good one (Click here).
Check that the rear window defogger system operates normally.
|
| ||||
| OK | ||
 | ||
| ||
| 4.INSPECT DEFOGGER RELAY |
Inspect the defogger relay (Click here).
|
| ||||
| OK | |
|
| 5.CHECK HARNESS AND CONNECTOR (DEFOGGER RELAY - IG1 NO. 1 RELAY AND AUXILIARY BATTERY) |
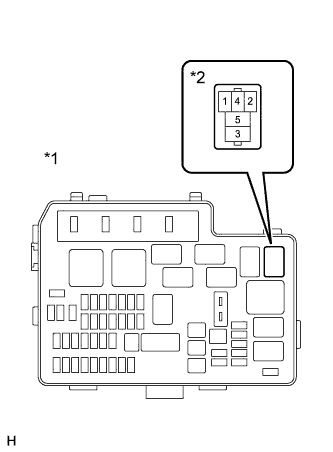 |
Remove the defogger relay from the engine room relay block.
Measure the voltage according to the value(s) in the table below.
| Tester Connection | Condition | Specified Condition |
| Defogger relay holder terminal-1 - Body ground | Ignition switch ON (IG) | 11 to 14 V |
| Defogger relay holder terminal-5 - Body ground | Always | 11 to 14 V |
| *1 | NO. 2 Engine Room Relay Block and NO. 2 Junction Block Assembly |
| *2 | Defogger Relay Holder |
|
| ||||
| OK | |
|
| 6.CHECK HARNESS AND CONNECTOR (DEFOGGER RELAY - AIR CONDITIONING AMPLIFIER ASSEMBLY) |
|
Disconnect the G34 air conditioning amplifier assembly connector.
Measure the resistance according to the value(s) in the table below.
| Tester Connection | Condition | Specified Condition |
| Defogger relay holder terminal-2 - G34-38 (RDFG) | Always | Below 1 Ω |
| Defogger relay holder terminal-2 - Body ground | Always | 10 kΩ or higher |
| *1 | NO. 2 Engine Room Relay Block and NO. 2 Junction Block Assembly |
| *2 | Defogger Relay Holder |
|
| ||||
| OK | |
|
| 7.CHECK AIR CONDITIONING AMPLIFIER ASSEMBLY |
Reconnect the G34 air conditioning amplifier assembly connector.
Reinstall the defogger relay.
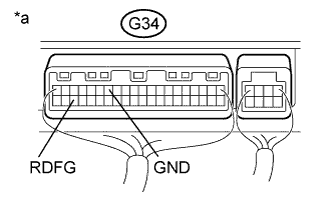 |
Remove the air conditioning amplifier assembly with its connectors still connected (Click here).
Measure the voltage according to the value(s) in the table below.
| Tester Connection | Condition | Specified Condition |
| G34-38 (RDFG) - G34-14 (GND) | Ignition switch ON (IG) Rear window defogger switch ON | Below 1 V |
| G34-38 (RDFG) - G34-14 (GND) | Ignition switch ON (IG) Rear window defogger switch OFF | 11 to 14 V |
| *a | Component with harness connected (Air Conditioning Amplifier Assembly) |
|
| ||||
| OK | |
|
| 8.CHECK HARNESS AND CONNECTOR (BACK DOOR GLASS (REAR WINDOW DEFOGGER) - DEFOGGER RELAY AND BODY GROUND) |
|
Disconnect the S1 and U1 back door glass (rear window defogger) connectors.
Remove the defogger relay from the engine room relay block.
Measure the resistance according to the value(s) in the table below.
| Tester Connection | Condition | Specified Condition |
| S1-1 - Defogger relay holder terminal-3 | Always | Below 1 Ω |
| U1-1 - Body ground | Always | Below 1 Ω |
| S1-1 - Body ground | Always | 10 kΩ or higher |
| *1 | NO. 2 Engine Room Relay Block and NO. 2 Junction Block Assembly |
| *2 | Defogger Relay Holder |
|
| ||||
| OK | ||
| ||
| ||

