Home › Engine / Hybrid System › 1NZ-FXE INTAKE / EXHAUST › EXHAUST MANIFOLD

EXHAUST MANIFOLD > INSTALLATION

for Preparation Click here


1. INSTALL HEATED OXYGEN SENSOR


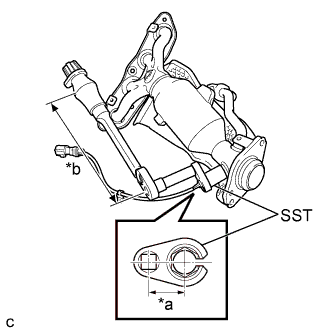
    A267865E01
  1. Using SST, install the heated oxygen sensor onto the front exhaust pipe.
    Text in Illustration 
    *a
    Fulcrum Length
    30 mm (1.18 in.)
    *b
    Fulcrum Length
    260 mm (10.2 in.)

    SST
    09224-00010  

    Torque:
    without SST:
    44 N*m{ 449 kgf*cm , 32 ft.*lbf }
    with SST:
    39 N*m{ 398 kgf*cm , 29 ft.*lbf }

    NOTICE:
    1. The "with SST" torque value is effective when using SST with a fulcrum length of 30 mm (1.18 in.) and a torque wrench with a fulcrum length of 260 mm (10.2 in.) (Click here).
    2. The "with SST" torque value is effective when SST is parallel to the torque wrench.

    HINT:
    Perform "Inspection After Repair" after replacing the heated oxygen sensor (Click here).


2. INSTALL NO. 2 EXHAUST MANIFOLD HEAT INSULATOR
  1. Install the No. 2 exhaust manifold heat insulator with the 3 bolts.

    Torque:
    8.0 N*m{ 82 kgf*cm , 71 in.*lbf }


3. INSTALL EXHAUST MANIFOLD
  1. Set a new gasket to the cylinder head sub-assembly.

  1. Temporarily install the exhaust manifold with the 3 bolts and 2 nuts.

  1. Temporarily install the manifold support bracket with the 3 bolts.


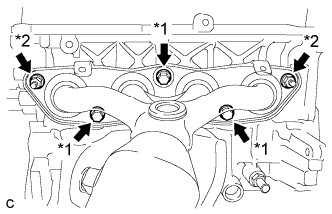
    A267694E01
  1. Tighten the exhaust manifold with the 3 bolts and 2 nuts.
    Text in Illustration 
    *1
    Bolt
    *2
    Nut

    Torque:
    30 N*m{ 306 kgf*cm , 22 ft.*lbf }

  1. Connect the wire harness clamp and heated oxygen sensor connector.

  1. Remove the 3 bolts and manifold support bracket.


4. INSTALL NO. 1 EGR PIPE
  1. Install a new gasket and No. 1 EGR pipe with the bolt and nut.

    Torque:
    31 N*m{ 316 kgf*cm , 23 ft.*lbf }


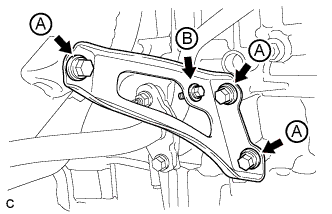
5. INSTALL MANIFOLD SUPPORT BRACKET


    A267692E01
  1. Install the manifold support bracket with the 4 bolts.

    Torque:
    Bolt A:
    44 N*m{ 449 kgf*cm , 32 ft.*lbf }
    Bolt B:
    10 N*m{ 102 kgf*cm , 7 ft.*lbf }


6. INSTALL NO. 1 EXHAUST MANIFOLD HEAT INSULATOR
  1. Install the No. 1 exhaust manifold heat insulator with the 3 bolts.

    Torque:
    8.0 N*m{ 82 kgf*cm , 71 in.*lbf }


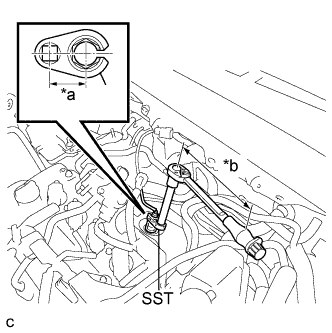
7. INSTALL AIR FUEL RATIO SENSOR


    A267411E01
  1. Using SST, install the air fuel ratio sensor.
    Text in Illustration 
    *a
    Fulcrum Length
    30 mm (1.18 in.)
    *b
    Fulcrum Length
    260 mm (10.2 in.)

    SST
    09224-00010  

    Torque:
    without SST:
    44 N*m{ 449 kgf*cm , 32 ft.*lbf }
    with SST:
    39 N*m{ 398 kgf*cm , 29 ft.*lbf }

    NOTICE:
    1. The "with SST" torque value is effective when using SST with a fulcrum length of 30 mm (1.18 in.) and a torque wrench with a fulcrum length of 260 mm (10.2 in.) (Click here).
    2. The "with SST" torque value is effective when SST is parallel to the torque wrench.

    HINT:
    Perform "Inspection After Repair" after replacing the air fuel ratio sensor (Click here).

  1. Connect the air fuel ratio sensor connector and 2 clamps.


8. INSTALL FRONT EXHAUST PIPE ASSEMBLY

NOTICE:
When installing the water hose, ensure that the exhaust heat recirculation system is filled with coolant. Otherwise, the engine water pump assembly may be damaged.


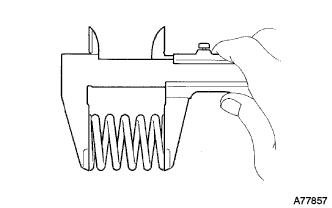
    A077857
  1. Using a vernier caliper, measure the free length of the compression springs.
    Minimum (front)
    41.5 mm (1.64 in.)
    Minimum (rear)
    38.5 mm (1.52 in.)

    HINT:
    If the free length is less than minimum, replace the compression spring.

  1. Fully insert 2 new gaskets to the exhaust manifold converter and front exhaust pipe assembly.


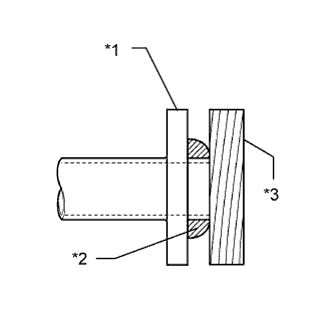
    A181728E17
  1. Using a plastic hammer and wooden block, tap in each new gasket until its surface is flush with the exhaust manifold and front exhaust pipe assembly.
    Text in Illustration 
    *1
    Exhaust Manifold and Front Exhaust Pipe Assembly
    *2
    Gasket
    *3
    Wooden Block

    NOTICE:
    1. Be careful with the installation direction of the gaskets.
    2. Do not reuse the gaskets.
    3. Do not damage the gaskets.
    4. Do not push in the gaskets by using the exhaust pipe when connecting it.

  1. Connect the front exhaust pipe assembly to the 3 exhaust pipe supports.


  1. Install the front exhaust pipe assembly with the 2 compression springs and 2 bolts.

    Torque:
    43 N*m{ 438 kgf*cm , 32 ft.*lbf }


    HINT:
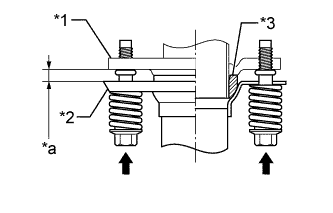
    A258941E01
    After installation, check that the gaps between the flanges of the exhaust manifold and front exhaust pipe assembly are consistent front-to-rear and left-to-right.

    Text in Illustration 
    *1
    Exhaust Manifold
    *2
    Front Exhaust Pipe Assembly
    *3
    Gasket
    *a
    Space between flanges: 8.5 mm (0.335 in.)


  1. Install the front exhaust pipe assembly with the 2 compression springs and 2 bolts.

    Torque:
    43 N*m{ 438 kgf*cm , 32 ft.*lbf }


    HINT:
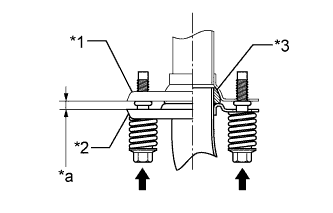
    A258966E01
    After installation, check that the gaps between the flanges of the tail exhaust pipe assembly and front exhaust pipe assembly are consistent front-to-rear and left-to-right.

    Text in Illustration 
    *1
    Tail Exhaust Pipe Assembly
    *2
    Front Exhaust Pipe Assembly
    *3
    Gasket
    *a
    Space between flanges: 6.5 mm (0.256 in.)

  1. Connect the 2 heater water hoses.


9. INSTALL EGR COOLER ASSEMBLY
(Click here


10. INSPECT FOR EXHAUST GAS LEAK