Home › Brake › BRAKE (FRONT) › FRONT BRAKE FLEXIBLE HOSE

FRONT BRAKE FLEXIBLE HOSE > INSTALLATION

for Preparation Click here


NOTICE:
  1. Because the left and right hoses are not interchangeable, verify the part number when installing the flexible hoses.
  2. If the hoses are to be reused, connect them after checking the identification marks placed when each hose was disconnected.

HINT:
  1. Use the same procedure for the LH side and RH side.
  2. The following procedure is for the LH side.


1. INSTALL FRONT FLEXIBLE HOSE


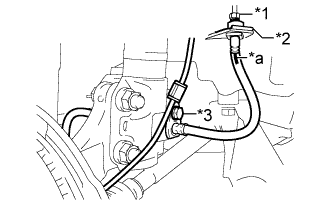
    C252582E01
  1. Install a new clip to the front flexible hose.
    Text in Illustration 
    *1
    Brake Line
    *2
    Clip
    *3
    Bolt
    *a
    Identification Mark

    NOTICE:
    1. Install the clip as far as it will go.
    2. When installing the front flexible hose, face the identification mark to the outside of the vehicle and minimize twisting of the hose.

  1. Using a union nut wrench, connect the brake line to the front flexible hose while holding the flexible hose with a wrench.

    Torque:
    15 N*m{ 155 kgf*cm , 11 ft.*lbf }

    NOTICE:
    1. Do not kink or damage the brake line.
    2. Do not allow any foreign matter such as dirt or dust to enter the brake line from the clip or bracket.
    3. Use the formula to calculate special torque values for situations where the union nut wrench is combined with a torque wrench (Click here).

  1. Install the front flexible hose and front speed sensor bracket to the absorber bracket with the bolt.

    Torque:
    29 N*m{ 300 kgf*cm , 22 ft.*lbf }

    NOTICE:
    Install the first front speed sensor bracket and then the front flexible hose.


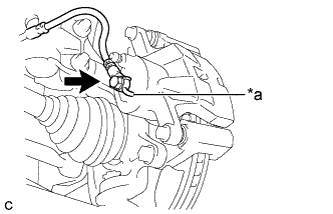
    C249580E01
  1. Connect the front flexible hose to the front disc brake cylinder assembly with a new union bolt and a new gasket.
    Text in Illustration 
    *a
    Lock Hole

    Torque:
    30 N*m{ 310 kgf*cm , 22 ft.*lbf }

    NOTICE:
    Install the flexible hose lock securely into the lock hole in the front disc brake cylinder.


2. CONNECT CABLE TO AUXILIARY BATTERY NEGATIVE TERMINAL


3. BLEED BRAKE LINE


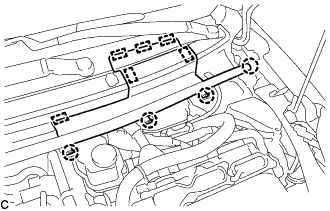
    C250009
  1. Disengage the 4 claws and 6 guides, and separate the center No. 1 cowl top ventilator louver.


  1. Bleed brake line.


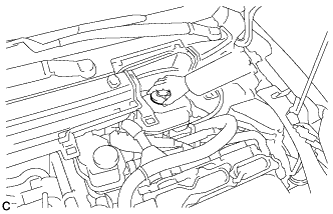
      C250010
    1. Remove the brake master cylinder reservoir filler cap assembly.

    2. Add brake fluid into the reservoir between the MAX and MIN lines on the brake fluid reservoir.

      Brake fluid:
      SAE J1703 or FMVSS No. 116 DOT3

    3. Connect the Techstream to the DLC3 and turn the ignition switch to ON (IG).

    4. Turn the Techstream on and enter the following menus: Chassis / ABS/VSC/TRAC / Air Bleeding.

    5. Select "Usual air bleeding" on the Techstream display, and bleed air from the brake fluid following the instructions on the Techstream.

    6. After air bleeding, tighten each bleeder plug.

      Torque:
      front bleeder plug:
      8.3 N*m{ 85 kgf*cm , 73 in.*lbf }
      rear bleeder plug:
      8.5 N*m{ 87 kgf*cm , 75 in.*lbf }

    7. Clear the DTCs (Click here).

    8. Turn the Techstream off and turn the ignition switch off.

    9. Install the brake master cylinder reservoir filler cap.
  1. Inspect for brake fluid leaks.

  1. Engage the 4 claws and 6 guides to install the center No. 1 cowl top ventilator louver.


4. INSTALL FRONT WHEEL

Torque:
103 N*m{ 1050 kgf*cm , 76 ft.*lbf }