Home › Brake › BRAKE CONTROL / DYNAMIC CONTROL SYSTEMS › BRAKE PEDAL STROKE SENSOR (for RHD)

BRAKE PEDAL STROKE SENSOR (for RHD) > INSTALLATION

for Preparation Click here


NOTICE:
While the battery is connected, even if the power switch is off, the brake control system activates when the brake pedal is depressed or any door courtesy switch turns on. Therefore, when servicing the brake system components, do not operate the brake pedal or open/close the doors while the battery is connected.


1. INSPECT AND ADJUST BRAKE PEDAL


  1. Check the brake pedal height.

    1. Turn back the carpet.

    2. Turn back the dash silencer from the slit provided on the dash silencer.


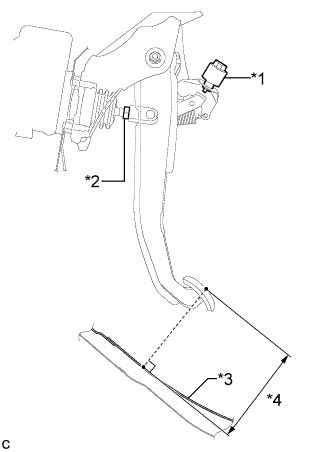
    3. C233746E02
    4. Measure the shortest distance between the brake pedal surface and floor panel.
      Text in Illustration 
      *1
      Stop Light Switch Assembly
      *2
      Clevis Lock Nut
      *3
      Floor Panel
      *4
      Brake Pedal Height

      Brake pedal height from floor panel:
      131.3 to 141.3 mm (5.17 to 5.56 in.)

  1. Adjust the brake pedal height.

    1. Remove the stop light switch assembly (Click here).

    2. Loosen the clevis lock nut.

    3. Adjust the brake pedal height by turning the push rod.

    4. Tighten the clevis lock nut.

      Torque:
      26 N*m{ 260 kgf*cm , 19 ft.*lbf }

    5. Install and adjust the stop light switch assembly (Click here).


2. INSTALL BRAKE PEDAL STROKE SENSOR ASSEMBLY

NOTICE:
  1. Do not drop the brake pedal stroke sensor assembly.
  2. If the brake pedal stroke sensor assembly has been dropped, replace the brake pedal stroke sensor assembly with a new one.


  1. When installing a new brake pedal stroke sensor assembly:

    NOTICE:
    Do not break the brake pedal stroke sensor assembly lever set pin before installing the brake pedal stroke sensor assembly with the 2 nuts.


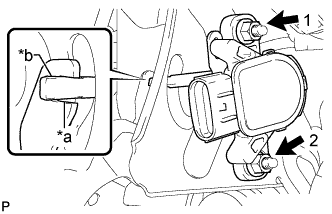
      C233727E05
    1. Install a new brake pedal stroke sensor assembly with the 2 nuts.
      Text in Illustration 
      *a
      Brake Pedal Groove
      *b
      Brake Pedal Stroke Sensor Assembly Lever

      Torque:
      7.0 N*m{ 71 kgf*cm , 62 in.*lbf }

      NOTICE:
      1. Engage the brake pedal stroke sensor assembly lever with the brake pedal groove.
      2. Check that there is no foreign matter attached to the contact surface of the brake pedal stroke sensor assembly.
      3. Check that the tip of the brake pedal stroke sensor assembly lever is protruding from the brake pedal groove.
      4. Tighten the 2 nuts in the order shown in the illustration.

    2. Connect the connector to the brake pedal stroke sensor assembly.

    3. Firmly depress the brake pedal and break the brake pedal stroke sensor assembly lever set pin.

    4. Remove the broken brake pedal stroke sensor assembly lever set pin.


  1. When reusing the brake pedal stroke sensor assembly:


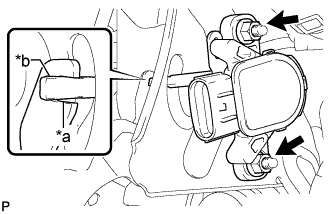
      C233727E06
    1. Temporarily install the brake pedal stroke sensor assembly with the 2 nuts.
      Text in Illustration 
      *a
      Brake Pedal Groove
      *b
      Brake Pedal Stroke Sensor Assembly Lever

      NOTICE:
      1. Engage the brake pedal stroke sensor assembly lever with the brake pedal groove.
      2. Check that there is no foreign matter attached to the contact surface of the brake pedal stroke sensor assembly.

    2. Connect the connector to the brake pedal stroke sensor assembly.


3. INSTALL ECU INTEGRATION BOX RH


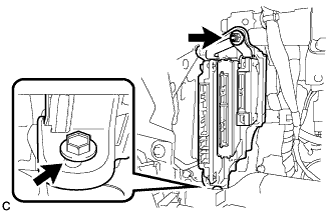
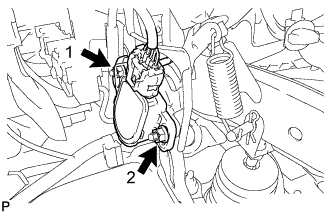
    C208064
  1. Install the ECU integration box RH with the nut and bolt.

    Torque:
    14 N*m{ 138 kgf*cm , 10 ft.*lbf }

  1. Connect the connectors.


4. INSTALL LOWER INSTRUMENT PANEL FINISH PANEL

HINT:
Perform the same procedure as for the LHD .


5. INSTALL COWL SIDE TRIM SUB-ASSEMBLY RH

HINT:
Perform the same procedure as for the LHD .


6. INSTALL FRONT DOOR SCUFF PLATE RH

HINT:
Perform the same procedure as for the LHD .


7. CONNECT CABLE TO NEGATIVE BATTERY TERMINAL

NOTICE:
When disconnecting the cable, some systems need to be initialized after the cable is reconnected (Click here).


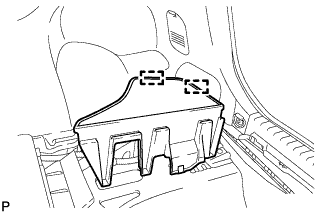
8. INSTALL REAR NO. 3 FLOOR BOARD


    B227791
  1. Engage the 2 guides to install the rear No. 3 floor board.


9. INSTALL REAR DECK FLOOR BOX
  1. Install the rear deck floor box.


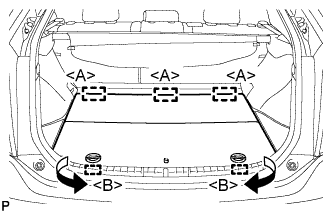
10. INSTALL REAR NO. 2 FLOOR BOARD


    B227788E01
  1. Engage the 3 guides <A>.

  1. Engage the 2 guides <B> and install the rear No. 2 floor board as shown in the illustration.


11. ADJUST BRAKE PEDAL STROKE SENSOR ASSEMBLY

NOTICE:
When the brake pedal stroke sensor assembly is being reused, perform the following procedure to adjust it.

  1. Connect the intelligent tester to the DLC3.

  1. Turn the power switch on (IG).

  1. Turn the intelligent tester on.

  1. Enter the following menus: Chassis / ABS/VSC/TRC / Data List "Stroke Sensor".


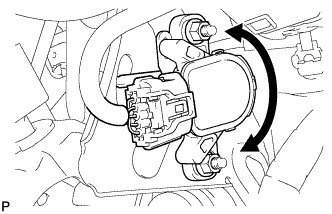
    C233730
  1. Read the stroke sensor value in the Data List, and turn the brake pedal stroke sensor assembly slowly to the right or left to adjust the output voltage so that it is within the following range.

    Standard voltage (without the brake pedal depressed):
    0.8 to 1.2 V


    C233738E01
  1. Fully tighten the 2 nuts.

    Torque:
    7.0 N*m{ 71 kgf*cm , 62 in.*lbf }

    NOTICE:
    1. Do not depress the brake pedal after turning the power switch on (IG).
    2. Tighten the 2 nuts in the order shown in the illustration.

  1. Turn the intelligent tester off.

  1. Turn the power switch off.

  1. Disconnect the intelligent tester.


12. CHECK AND CLEAR DTC
(Click here)


13. PERFORM LINEAR VALVE OFFSET LEARNING
(Click here)