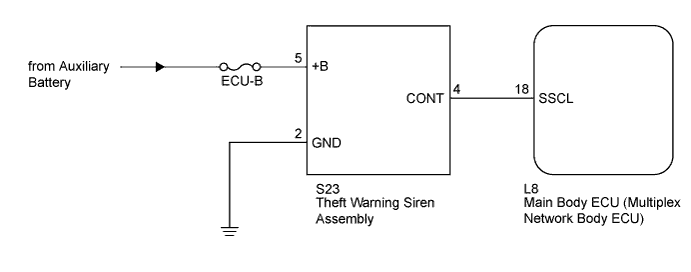
THEFT DETERRENT SYSTEM > Theft Warning Siren Circuit |
| 1.PERFORM ACTIVE TEST USING INTELLIGENT TESTER (THEFT WARNING SIREN) |
Connect the intelligent tester to the DLC3.
Turn the power switch on (IG).
Turn the intelligent tester on.
Select the item below in the Active Test and then check that the theft warning siren operates.
Operate the intelligent tester according to the steps on the display and select "Active Test".
| Tester Display | Test Part | Control Range | Diagnostic Note |
| Security Horn2 | Theft warning siren | ON / OFF | - |
|
| ||||
| OK | ||
 | ||
| ||
| 2.INSPECT THEFT WARNING SIREN |
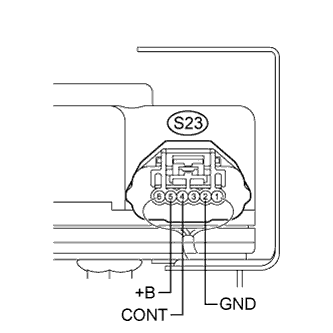 |
Remove the theft warning siren assembly with harness connected (Click here).
Measure the voltage according to the value(s) in the table below.
| Tester Connection | Condition | Specified Condition |
| S23-5 (+B) - Body ground | Always | 11 to 14 V |
| S23-2 (GND) - Body ground | Always | Below 1 V |
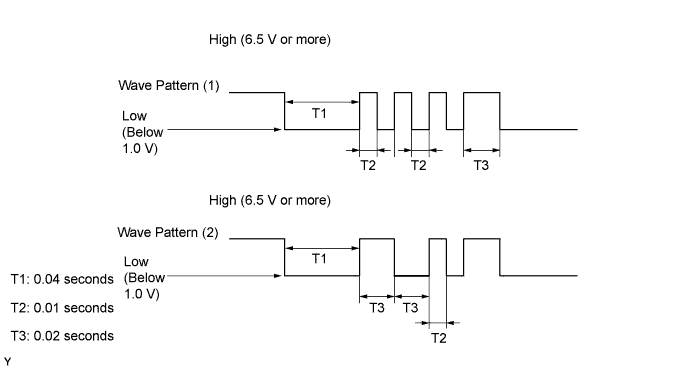
| S23-4 (CONT) - Body ground | When switched from armed state or arming preparation state to disarmed state (1) | Wave pattern (1) shown in chart below |
| When switched from arming preparation state to armed state (2) | Wave pattern (2) shown in chart below | |
| Normal condition (Except (1) and (2)) | 11 to 14 V |
Wave pattern
|
| ||||
| OK | ||
| ||
| ||
| 3.CHECK HARNESS AND CONNECTOR (MAIN BODY ECU - THEFT WARNING SIREN) |
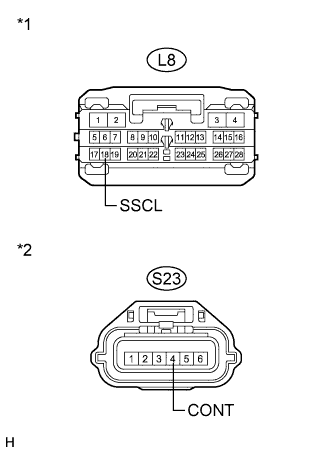 |
Disconnect the L8 main body ECU (multiplex network body ECU) and S23 theft warning siren assembly connectors.
Measure the resistance according to the value(s) in the table below.
| Tester Connection | Condition | Specified Condition |
| L8-18 (SSCL) - S23-4 (CONT) | Always | Below 1 Ω |
| L8-18 (SSCL) - Body ground | Always | 10 kΩ or higher |
| *1 | Front view of wire harness connector (to Main Body ECU (Multiplex Network Body ECU)) |
| *2 | Front view of wire harness connector (to Theft Warning Siren Assembly) |
|
| ||||
| OK | |
 |
| 4.CHECK HARNESS AND CONNECTOR (THEFT WARNING SIREN ASSEMBLY - BODY GROUND) |
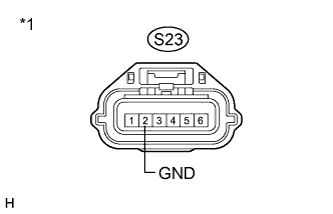 |
Measure the resistance according to the value(s) in the table below.
| Tester Connection | Condition | Specified Condition |
| S23-2 (GND) - Body ground | Always | Below 1 Ω |
| *1 | Front view of wire harness connector (to Theft Warning Siren Assembly) |
|
| ||||
| OK | ||
| ||
| ||

