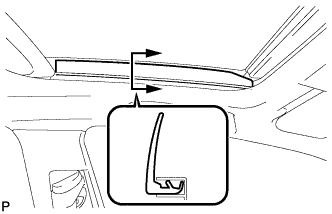
SLIDING ROOF HOUSING > INSTALLATION |
| 1. TEMPORARILY INSTALL REAR SLIDE ROOF PANEL SUB-ASSEMBLY |
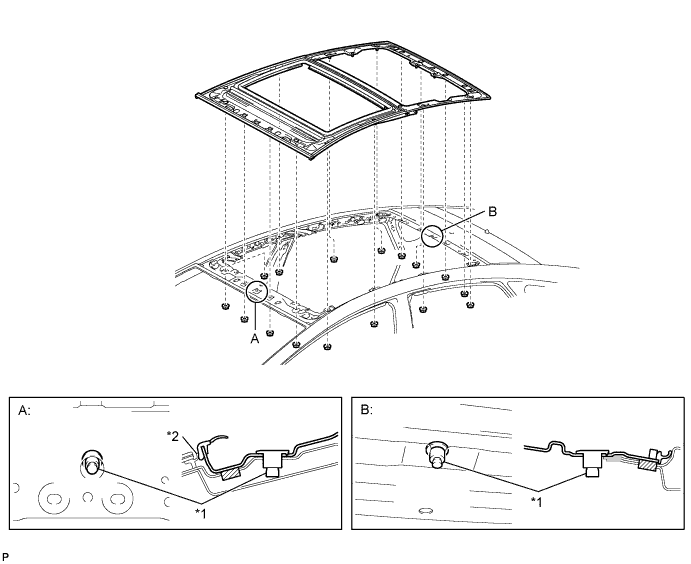
Temporarily install the rear slide roof panel sub-assembly with the 16 nuts.
Check that the alignment bolts are firmly installed.

| *1 | Alignment Bolt | *2 | Windshield Glass Moulding |
| 2. FULLY TIGHTEN REAR SLIDE ROOF PANEL SUB-ASSEMBLY |
![]() |
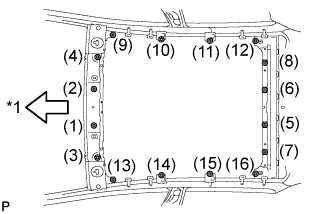
Fully tighten the 16 nuts to install the rear slide roof panel sub-assembly.
| *1 | Front Side |
| 3. CLEAN MOON ROOF GLASS ASSEMBLY |
![]() |
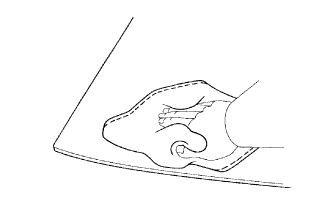
Clean the outer edge of the moon roof glass with a non-residue solvent.
| 4. INSTALL MOON ROOF GLASS ASSEMBLY |
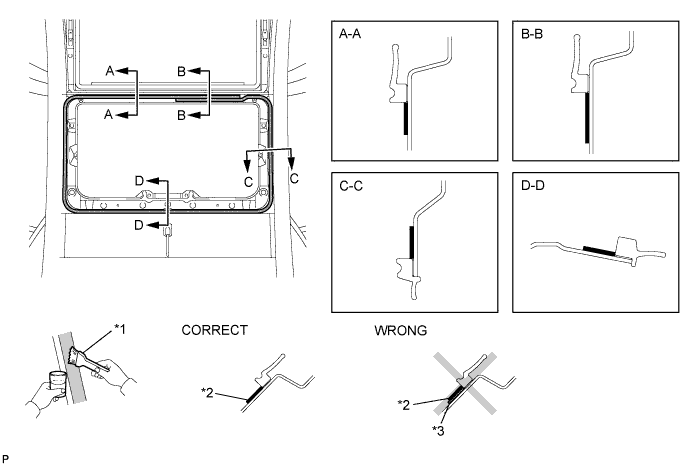
Using a brush, coat the installation surface on the rear slide roof panel sub-assembly with Primer M.

| *1 | Brush | *2 | Primer M |
| *3 | Adhesive | - | - |
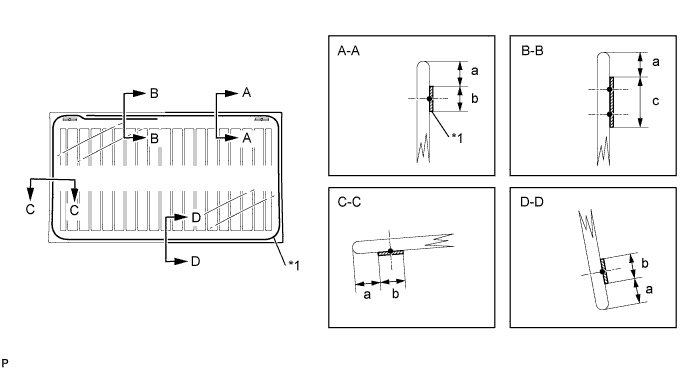
Using a brush or a sponge, coat the application area of the adhesive with Primer G.

| *1 | Primer G |
| Area | Dimension |
| a | 7.0 mm (0.276 in.) |
| b | 8.0 mm (0.315 in.) |
| c | 16.0 mm (0.630 in.) |
Apply adhesive to the rear sliding roof rail sub-assembly.
![]() |
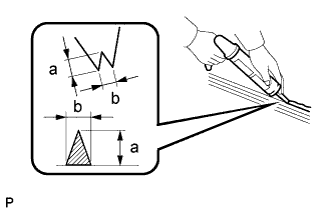
Cut off the tip of the cartridge nozzle as shown in the illustration.
| Area | Dimension |
| a | 12.0 mm (0.472 in.) |
| b | 8.0 mm (0.315 in.) |
| Temperature | Usage Time Frame |
| 35°C (95°F) | 15 minutes |
| 20°C (68°F) | 1 hour and 40 minutes |
| 5°C (41°F) | 8 hours |
Load the sealer gun with cartridge.
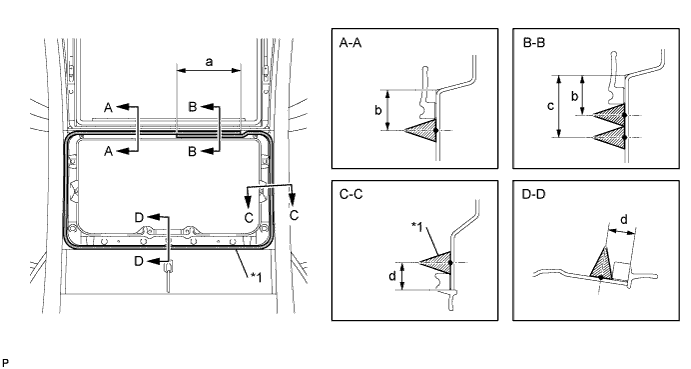
Apply adhesive to the rear sliding roof rail sub-assembly as shown in the illustration.

| *1 | Adhesive |
| Area | Dimension |
| a | 100 mm (3.94 in.) |
| b | 14.0 mm (0.551 in.) |
| c | 22.0 mm (0.866 in.) |
| d | 8.0 mm (0.315 in.) |
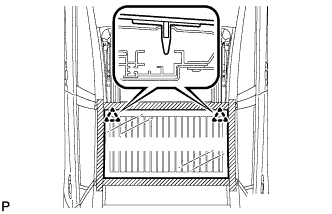
Install the moon roof glass assembly.
![]() |
Position the moon roof glass assembly so that the matchmarks are aligned, and press it in gently along the rim (when glass without a clip is used).
| *1 | Matchmark |
Lightly press the moon roof glass assembly to ensure that the moon roof glass assembly is securely fit to the vehicle body (when glass without a clip is used).
![]() |
Using suction cups, engage the 2 clips to install the moon roof glass assembly.
Lightly press the front surface of the moon roof glass assembly to ensure that the moon roof glass assembly is securely fit to the vehicle body.
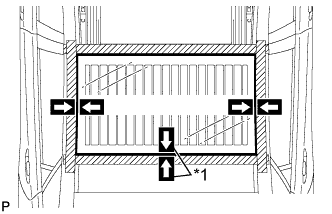
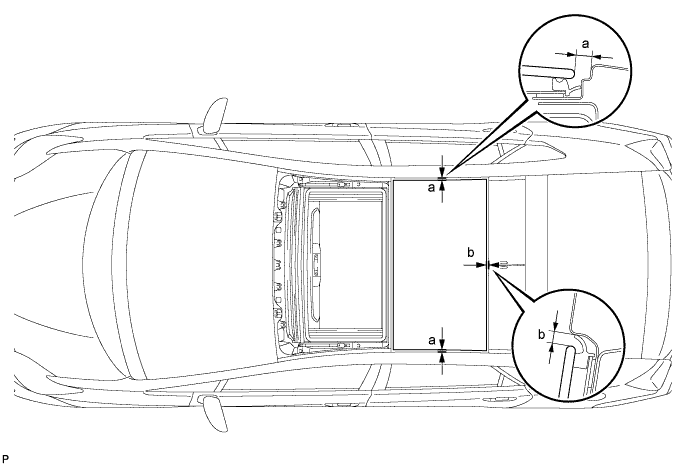
Inspect the position of the moon roof glass assembly so that the measurements are within the standard values shown in the illustration.

| Area | Measurement |
| a | 7.4 mm + 2.0 mm (0.291 in. + 0.0787 in.) 7.4 mm - 2.0 mm (0.291 in. - 0.0787 in.) |
| b | 5.0 mm + 2.0 mm (0.197 in. + 0.0787 in.) 5.0 mm - 2.0 mm (0.197 in. - 0.0787 in.) |
Hold the moon roof glass assembly using protective tape until applied adhesive becomes hard.
| Temperature | Minimum Time prior to Driving Vehicle |
| 35°C (95°F) | 1 hour and 30 minutes |
| 20°C (68°F) | 5 hours |
| 5°C (41°F) | 24 hours |
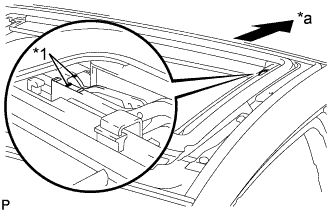
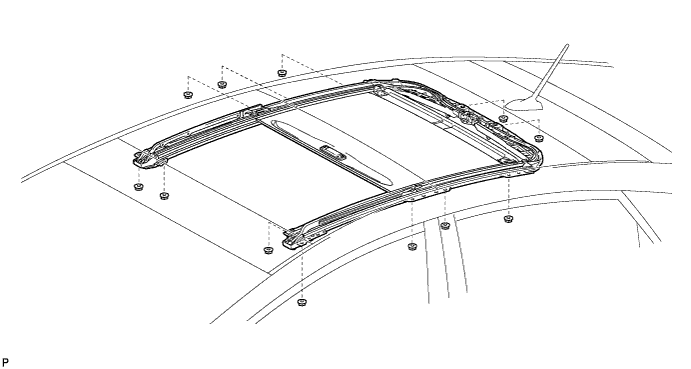
| 5. INSTALL SLIDING ROOF RAIL SUB-ASSEMBLY |
Install the sliding roof rail sub-assembly with the 12 nuts.

Engage the clamp.
Connect the connector.
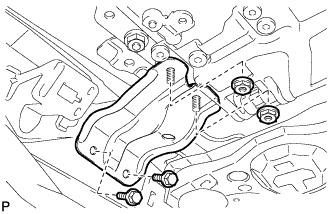
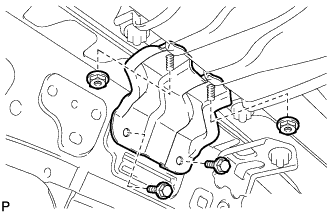
| 6. INSTALL CENTER SLIDING ROOF HOUSING MOUNTING BRACKET LH |
![]() |
Install the center sliding roof housing mounting bracket LH with the 2 bolts and 2 nuts.
| 7. INSTALL CENTER SLIDING ROOF HOUSING MOUNTING BRACKET RH |
| 8. INSTALL FRONT SLIDING ROOF HOUSING MOUNTING BRACKET LH |
![]() |
Install the front sliding roof housing mounting bracket LH with the 2 bolts and 2 nuts.
| 9. INSTALL FRONT SLIDING ROOF HOUSING MOUNTING BRACKET RH |
| 10. ADJUST FULLY CLOSED POSITION |
![]() |
Using a screwdriver, slide the sliding roof drive cable to align the matchmarks.
| *1 | Matchmark |
| *a | Rear Side |
| 11. INSTALL SLIDING ROOF DRIVE GEAR SUB-ASSEMBLY |
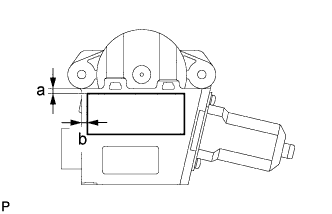
When replacing the sliding roof drive gear sub-assembly with a new ones:
![]() |
Install a new slide roof motor cushion as shown in the illustration.
| Area | Dimension |
| a | 1.0 mm (0.0394 in.) |
| b | 1.5 mm (0.0591 in.) |
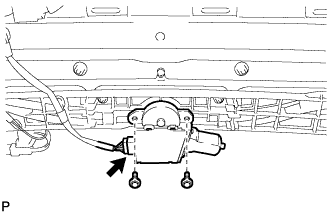
![]() |
Install the sliding roof drive gear sub-assembly with the 2 bolts.
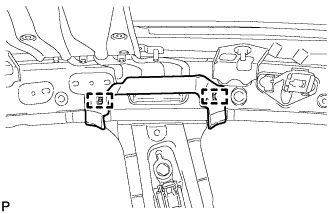
| 12. INSTALL REAR SIDE RAIL SPACER LH |
![]() |
Engage the 2 clamps and install the rear side rail spacer LH
| 13. INSTALL REAR SIDE RAIL SPACER RH |
| 14. INSTALL CURTAIN SHIELD AIRBAG ASSEMBLY LH |
Check that the power switch is off.
Check that the cable is disconnected from the negative (-) battery terminal.
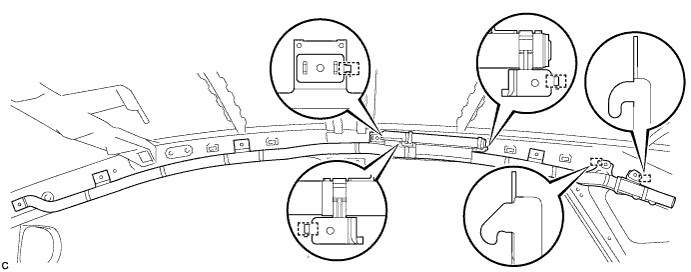
Temporarily install the curtain shield airbag assembly with the 5 hooks.

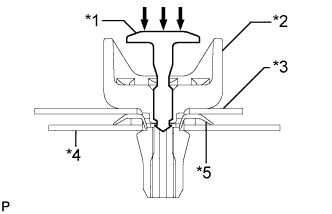
Install the curtain shield airbag assembly to the body panel with 4 new clips and 4 new spacers.

![]() |
Install 4 new pins as shown in the illustration.
| *1 | Pin |
| *2 | Clip |
| *3 | Airbag |
| *4 | Body |
| *5 | Spacer |
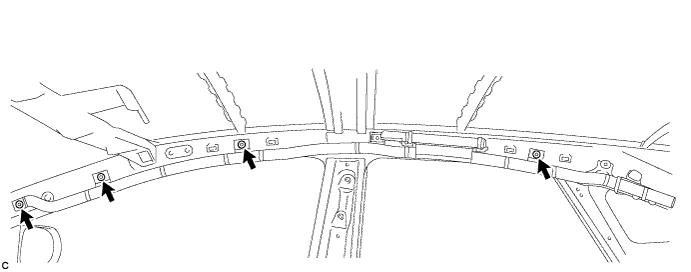
Install the 5 bolts.

![]() |
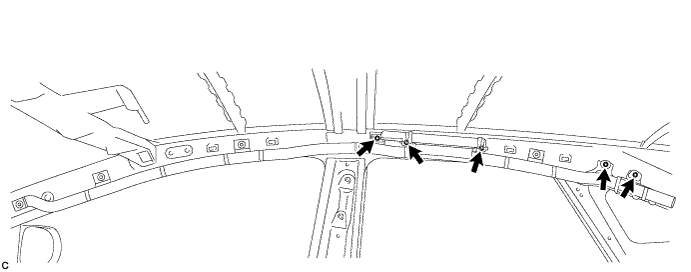
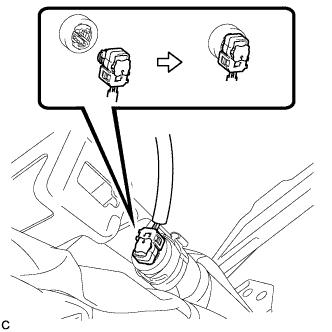
Connect the curtain shield airbag connector.
Push in the lock to install the airbag connector.
| 15. INSTALL CURTAIN SHIELD AIRBAG ASSEMBLY RH |
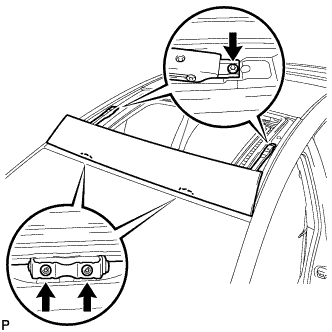
| 16. TEMPORARILY INSTALL TILT ROOF GLASS SUB-ASSEMBLY |
![]() |
Using a T20 "TORX" driver, install the tilt roof glass sub-assembly with the 6 screws.
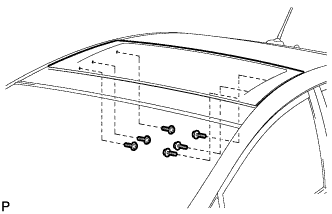
| 17. TEMPORARILY INSTALL SLIDING ROOF GLASS SUB-ASSEMBLY |
![]() |
Using a T25 "TORX" driver, install the 6 screws.
| 18. ADJUST SLIDING ROOF GLASS |
Adjust the sliding roof glass sub-assembly:

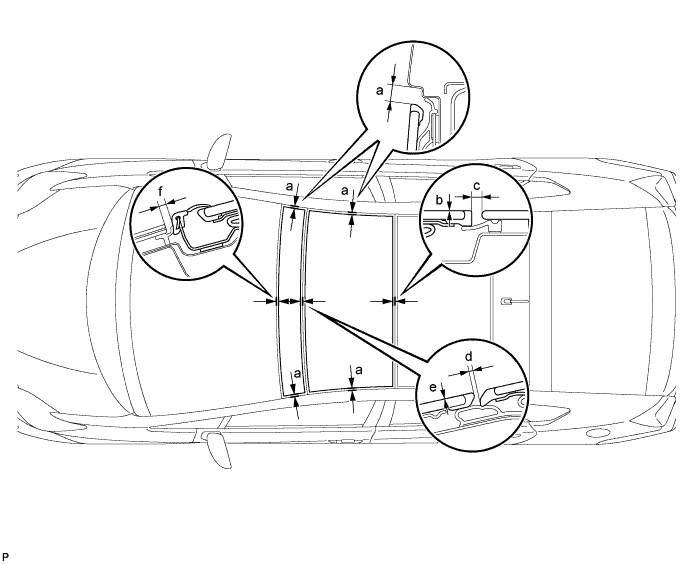
Adjust the position of the sliding roof glass sub-assembly so that the measurements are within the standard values shown in the illustration.
| Area | Measurement |
| a | 7.4 mm + 2.0 mm (0.291 in. + 0.0787 in.) 7.4 mm - 2.0 mm (0.291 in. - 0.0787 in.) |
| b | 0 + 2.0 mm (0 + 0.0787 in.) 0 - 1.0 mm (0 - 0.0394 in.) |
| c | 5.0 mm + 2.0 mm (0.197 in. + 0.0787 in.) 5.0 mm - 2.0 mm (0.197 in. - 0.0787 in.) |
| d | 1.9 mm + 1.0 mm (0.0748 in. + 0.0394 in.) 1.9 mm - 1.0 mm (0.0748 in. - 0.0394 in.) |
After adjusting the sliding roof glass sub-assembly, using a T25 "TORX" driver, fully tighten the 6 screws to install the sliding roof glass sub-assembly.
Adjust the tilt roof glass sub-assembly:
Adjust the position of the tilt roof glass sub-assembly so that the measurements are within the standard values shown in the illustration.
| Area | Measurement |
| a | 7.4 mm + 2.0 mm (0.291 in. + 0.0787 in.) 7.4 mm - 2.0 mm (0.291 in. - 0.0787 in.) |
| e | 0 + 2.0 mm (0 + 0.0787 in.) 0 - 1.0 mm (0 - 0.0394 in.) |
| f | 4.0 mm + 2.0 mm (0.158 in. + 0.0787 in.) 4.0 mm - 2.0 mm (0.158 in. - 0.0787 in.) |
After adjusting the tilt roof glass sub-assembly, using a T20 "TORX" driver, fully tighten the 6 screws to install the tilt roof glass sub-assembly.
| 19. INSPECT FOR WATER LEAKS |
After adjusting the roof glass sub-assembly, inspect for water leaks.
If there are any leaks, readjust the roof glass sub-assembly.
| 20. INSTALL ROOF HEADLINING ASSEMBLY |
| 21. INSTALL SLIDING ROOF SIDE GARNISH LH |
![]() |
Install the sliding roof side garnish LH.
| 22. INSTALL SLIDING ROOF SIDE GARNISH RH |
| 23. RESET SLIDING ROOF DRIVE GEAR SUB-ASSEMBLY |
| 24. INSPECT SLIDING ROOF SYSTEM |