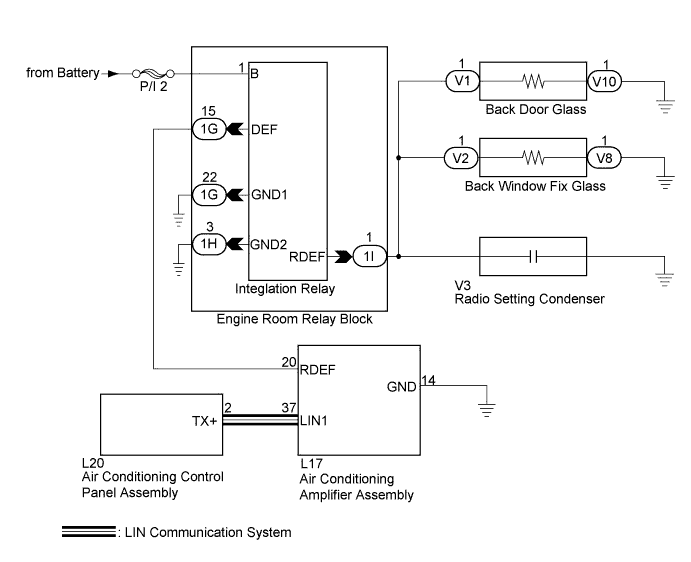
WINDOW DEFOGGER SYSTEM > Rear Window Defogger System does not Operate |
| 1.CHECK REAR WINDOW DEFOGGER SYSTEM |
Activate the rear defogger system and check the symptoms.
| Result | Proceed to |
| Both back window defoggers do not warm up. | A |
| The back door glass defogger does not warm up. | B |
| The back window fix glass defogger does not warm up. | C |
|
| ||||
|
| ||||
| A | |
 |
| 2.CHECK POWER STEERING SYSTEM (Battery Voltage Lo Record) |
Connect the intelligent tester to the DLC3.
Turn the power switch on (IG).
Turn the intelligent tester on.
Enter the following menus: Chassis / EMPS / Data List.
Read the Data List according to the display on the intelligent tester.
| Tester Display | Measurement item/Range | Normal Condition | Diagnostic Note |
| Battery Voltage Lo Record | Battery voltage reduction history/ Min.: 0 times, Max.: 65535 times | 0 to 65535 | - |
| Result | Proceed to |
| No control history is stored. | A |
| Control history is stored. | B |
|
| ||||
| A | |
|
| 3.PERFORM ACTIVE TEST USING INTELLIGENT TESTER (DEFOGGER RELAY) |
Enter the following menus: Body / Air Conditioner / Active Test.
Perform the Active Test according to the display on the intelligent tester.
| Tester Display | Test Part | Control Range | Diagnostic Note |
| Defogger Relay (Rear) | Rear window defogger | ON/OFF | - |
|
| ||||
| OK | ||
 | ||
| ||
| 4.CHECK HARNESS AND CONNECTOR (AIR CONDITIONING AMPLIFIER ASSEMBLY - INTEGRATION RELAY) |
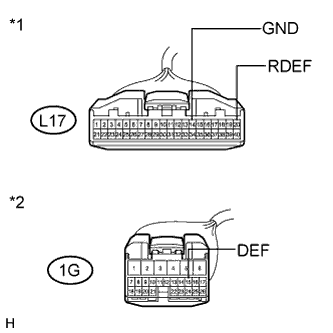 |
Disconnect the 1G integration relay connector.
Disconnect the L17 air conditioning amplifier assembly connector.
Measure the resistance according to the value(s) in the table below.
| Tester Connection | Condition | Specified Condition |
| L17-20 (RDEF) - 1G-15 (DEF) | Always | Below 1 Ω |
| 1G-15 (DEF) - Body ground | Always | 10 kΩ or higher |
| L17-14 (GND) - Body ground | Always | Below 1 Ω |
| *1 | Front view of wire harness connector (to Air Conditioning Amplifier Assembly) |
| *2 | Front view of wire harness connector (to Integration Relay) |
|
| ||||
| OK | |
|
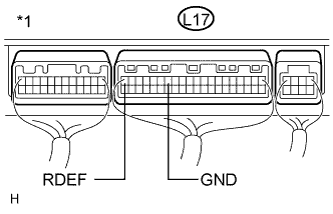
| 5.CHECK AIR CONDITIONING AMPLIFIER ASSEMBLY |
 |
Turn the power switch on (READY).
Measure the voltage according to the value(s) in the table below.
| Tester Connection | Condition | Specified Condition |
| L17-20 (RDEF) - L17-14 (GND) | Rear defogger switch off | 11 to 14 V |
| L17-20 (RDEF) - L17-14 (GND) | Rear defogger switch on | Below 1 V |
| *1 | Rear view of wire harness connector (to Air Conditioning Amplifier Assembly) |
|
| ||||
| OK | |
|
| 6.INSPECT RADIO SETTING CONDENSER |
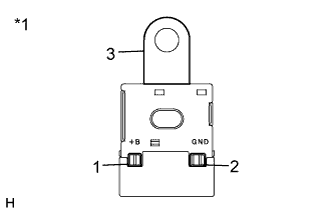 |
Remove the radio setting condenser.
Measure the resistance according to the value(s) in the table below.
| Tester Connection | Condition | Specified Condition |
| 1 - 2 | Always | 10 kΩ or higher |
| 2 - 3 | Always | Below 1 Ω |
| *1 | Radio Setting Condenser |
|
| ||||
| OK | |
|
| 7.CHECK HARNESS AND CONNECTOR (INTEGRATION RELAY - BODY GROUND) |
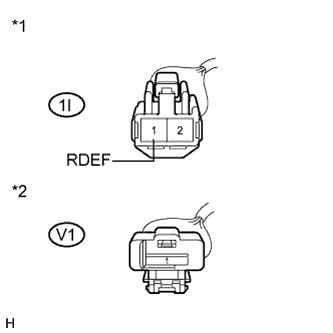 |
Disconnect the V1 back door glass battery side connector.
Disconnect the V2 back window fix glass battery side connector.
Disconnect the 1I integration relay connector.
Measure the resistance according to the value(s) in the table below.
| Tester Connection | Condition | Specified Condition |
| 1I-1 (RDEF) - Body ground | Always | 10 kΩ or higher |
| 1I-1 (RDEF) - V1-1 | Always | Below 1 Ω |
| *1 | Front view of wire harness connector (to Integration Relay) |
| *2 | Front view of wire harness connector (to Back Door Glass) |
|
| ||||
| OK | ||
| ||
| ||
| 8.CHECK HARNESS AND CONNECTOR (INTEGRATION RELAY - BACK DOOR GLASS) |
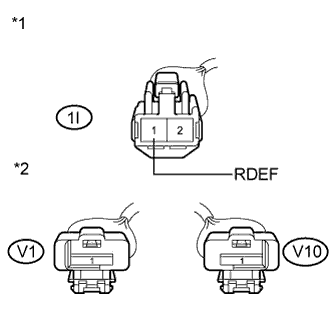 |
Disconnect the V1 back door glass battery side connector.
Disconnect the V10 back door glass body ground side connector.
Measure the resistance according to the value(s) in the table below.
| Tester Connection | Condition | Specified Condition |
| 1I-1 (RDEF) - V1-1 | Always | Below 1 Ω |
| V10-1 - Body ground | Always | Below 1 Ω |
| 1I-1 (RDEF) - Body ground | Always | 10 kΩ or higher |
| V1-1 - Body ground | Always | 10 kΩ or higher |
| *1 | Front view of wire harness connector (to Integration Relay) |
| *2 | Front view of wire harness connector (to Back Door Glass) |
|
| ||||
| OK | ||
| ||
| ||
| 9.CHECK HARNESS AND CONNECTOR (INTEGRATION RELAY - BACK WINDOW FIX GLASS) |
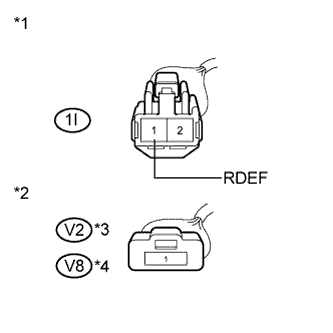 |
Disconnect the V2 back window fix glass battery side connector.
Disconnect the V8 back window fix glass body ground side connector.
Measure the resistance according to the value(s) in the table below.
| Tester Connection | Condition | Specified Condition |
| 1I-1 (RDEF) - V2-1 | Always | Below 1 Ω |
| V8-1 - Body ground | Always | Below 1 Ω |
| 1I-1 (RDEF) - Body ground | Always | 10 kΩ or higher |
| V2-1 - Body ground | Always | 10 kΩ or higher |
| *1 | Front view of wire harness connector (to Integration Relay) |
| *2 | Front view of wire harness connector (to Back Window Fix Glass) |
| *3 | Back Window Fix Glass Battery Side |
| *4 | Back Window Fix Glass Body Ground Side |
|
| ||||
| OK | ||
| ||
| ||

