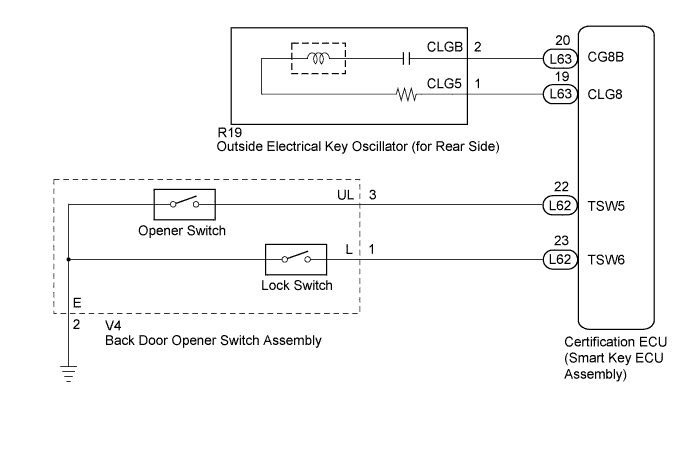
ENTRY AND START SYSTEM (for Entry Function) > Back Door Entry Lock and Unlock Functions do not Operate |
| 1.CHECK POWER DOOR LOCK OPERATION |
When the door control switch on the master switch assembly is operated, check that the doors unlock and lock according to switch operation (Click here).
|
| ||||
| OK | |
 |
| 2.READ VALUE USING INTELLIGENT TESTER (BACK DOOR OPENER SWITCH) |
Connect the intelligent tester to the DLC3.
Turn the power switch on (IG).
Turn the intelligent tester on.
Enter the following menus: Entry & Start / Data List.
Read the Data List according to the display on the intelligent tester.
| Tester Display | Measurement Item/Display | Normal Condition | Diagnostic Note |
| Tr/B-Door Lock SW | Back door opener switch assembly (lock switch) / ON or OFF | ON: Back door opener switch assembly (lock switch) pushed OFF: Back door opener switch assembly (lock switch) not pushed | - |
| Tr/B-Door Unlock SW | Back door opener switch assembly (opener switch) / ON or OFF | ON: Back door opener switch assembly (opener switch) pushed OFF: Back door opener switch assembly (opener switch) not pushed | - |
|
| ||||
| OK | |
|
| 3.CHECK WAVE ENVIRONMENT |
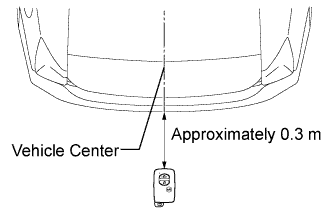 |
Bring the key near the outside electrical key oscillator (for rear side), and perform an entry back door open and entry lock functions check.
|
| ||||
| OK | ||
 | ||
| ||
| 4.PERFORM KEY DIAGNOSTIC MODE INSPECTION |
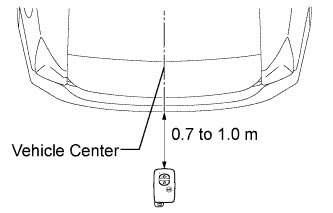 |
Diagnostic mode inspection (outside electrical key oscillator (for rear side))
Connect the intelligent tester to the DLC3.
Turn the power switch on (IG).
Turn the intelligent tester on.
Enter the following menus: Entry & Start / Utility / Key Communication Check / Overhead + Back Door.
When the electrical key transmitter is in the position shown in the illustration, check that the wireless door lock buzzer sounds.
|
| ||||
| OK | ||
| ||
| ||
| 5.CHECK HARNESS AND CONNECTOR (CERTIFICATION ECU - OUTSIDE ELECTRICAL KEY OSCILLATOR) |
Disconnect the certification ECU (smart key ECU assembly) connector.
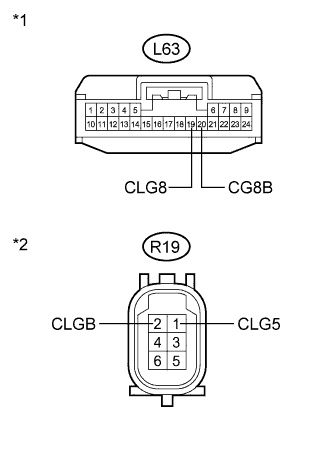 |
Disconnect the outside electrical key oscillator (for rear side) connector.
Measure the resistance according to the value(s) in the table below.
| Tester Connection | Condition | Specified Condition |
| L63-19 (CLG8) - R19-1 (CLG5) | Always | Below 1 Ω |
| L63-20 (CG8B) - R19-2 (CLGB) | Always | Below 1 Ω |
| L63-19 (CLG8) - Body ground | Always | 10 kΩ or higher |
| L63-20 (CG8B) - Body ground | Always | 10 kΩ or higher |
| R19-1 (CLG5) - Body ground | Always | 10 kΩ or higher |
| R19-2 (CLGB) - Body ground | Always | 10 kΩ or higher |
| *1 | Front view of wire harness connector (to Certification ECU (Smart Key ECU Assembly)) |
| *2 | Front view of wire harness connector (to Outside Electrical Key Oscillator (for Rear Side)) |
|
| ||||
| OK | |
|
| 6.INSPECT OUTSIDE ELECTRICAL KEY OSCILLATOR (for Rear Side) |
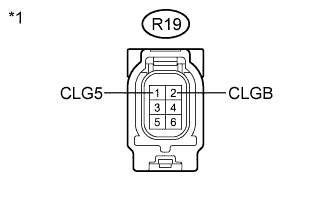 |
Measure the resistance according to the value(s) in the table below.
| Tester Connection | Condition | Specified Condition |
| R19-1 (CLG5) - R19-2 (CLGB) | Always | Below 1 Ω |
| *1 | Component without harness connected (Outside Electrical Key Oscillator (for Rear Side)) |
|
| ||||
| OK | ||
| ||
| ||
| 7.CHECK HARNESS AND CONNECTOR (BACK DOOR OPENER SWITCH - BODY GROUND) |
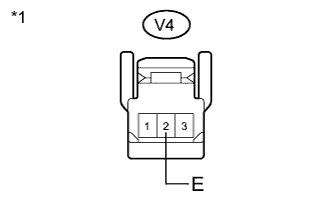 |
Disconnect the back door opener switch assembly connector.
Measure the resistance according to the value(s) in the table below.
| Tester Connection | Condition | Specified Condition |
| V4-2 (E) - Body ground | Always | Below 1 Ω |
| *1 | Front view of wire harness connector (to Back Door Opener Switch Assembly)) |
|
| ||||
| OK | ||
| ||
| ||

