Home › Suspension › REAR SUSPENSION › REAR SHOCK ABSORBER

REAR SHOCK ABSORBER > INSTALLATION

for Preparation Click here


HINT:
  1. Use the same procedure for the RH side and LH side.
  2. The procedure listed below is for the LH side.


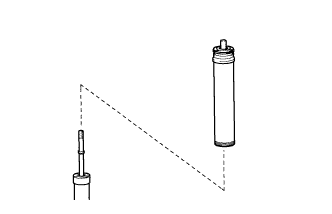
1. INSTALL REAR NO. 1 SPRING BUMPER


    C184836
  1. Install the rear No. 1 spring bumper to the rear shock absorber assembly.


2. TEMPORARILY TIGHTEN REAR SHOCK ABSORBER ASSEMBLY
  1. Insert the upper end of the rear shock absorber assembly with the rear No. 1 spring bumper to the vehicle body.
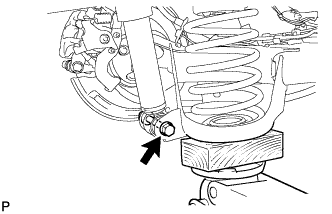


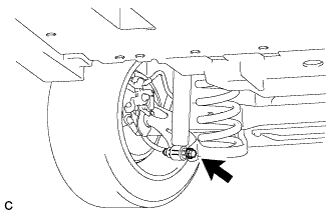
    C154939
  1. Temporarily tighten the rear shock absorber assembly to the rear axle beam assembly with the bolt and nut.

    NOTICE:
    Since the stopper nut is used, turn the bolt.

    HINT:
    Insert the bolt with the threaded end facing the outside of the vehicle.


3. INSTALL REAR SUSPENSION SUPPORT


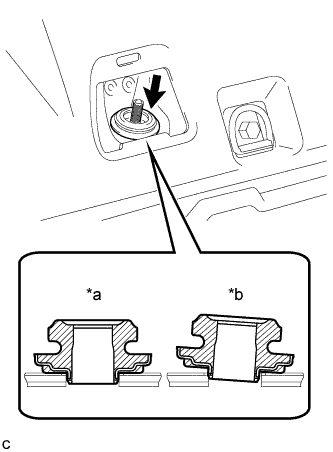
    C247007E02
  1. Install the rear suspension support.
    Text in Illustration 
    *a
    Correct
    *b
    Incorrect

    NOTICE:
    Make sure that the rear suspension support is correctly installed as shown in the illustration.


4. INSTALL REAR NO. 1 SHOCK ABSORBER CUSHION WASHER


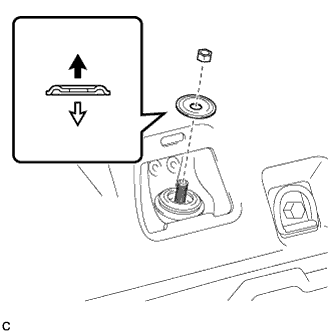
    C247008
  1. Apply a few drops of adhesive to the threads of a new nut.
    Text in Illustration 
    V100135
    Upper Side
    V100136
    Lower Side

    Adhesive:
    Toyota genuine adhesive 1324, three bond 1324 or equivalent

  1. Install the rear No. 1 shock absorber cushion washer.
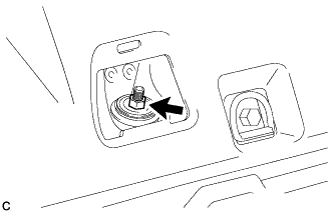
    NOTICE:
    Be sure to install the rear No. 1 shock absorber cushion washer in the correct direction.


    C247005
  1. Using a union nut wrench, fully tighten the lock nut while holding the rod of the rear shock absorber assembly with a hexagon wrench.

    Torque:
    25 N*m{ 255 kgf*cm , 18 ft.*lbf }

    NOTICE:
    1. Securely insert the hexagon wrench to the rear shock absorber rod to prevent damage to the rear shock absorber assembly when tightening the nut.
    2. Use the formula to calculate special torque values for situations where the union nut wrench is combined with a torque wrench (Click here).


5. INSTALL REAR HEIGHT CONTROL SENSOR SUB-ASSEMBLY RH (w/ Height Control Sensor)


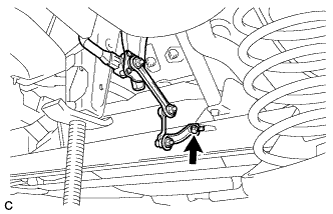
    C207241
  1. Install the rear height control sensor sub-assembly RH to the rear axle beam assembly with the bolt.

    Torque:
    8.0 N*m{ 82 kgf*cm , 71 in.*lbf }


6. INSTALL DECK TRIM SIDE SERVICE HOLE COVER
  1. Engage the 2 guides.

  1. Engage the claw to install the deck trim side service hole cover.


7. INSTALL REAR WHEEL

Torque:
103 N*m{ 1050 kgf*cm , 76 ft.*lbf }


8. STABILIZE SUSPENSION
  1. Lower the vehicle.

  1. Bounce the vehicle up and down several times to stabilize the suspension.


9. FULLY TIGHTEN REAR SHOCK ABSORBER ASSEMBLY


    C207246
  1. Fully tighten the bolt.

    Torque:
    90 N*m{ 918 kgf*cm , 66 ft.*lbf }

    NOTICE:
    1. Since the stopper nut is used, turn the bolt.
    2. The final torque must be applied under the standard vehicle height conditions.


10. PERFORM INITIALIZATION (w/ Height Control Sensor)

NOTICE:
Some systems need to be initialized after the rear height control sensor sub-assembly RH is replaced (Click here).