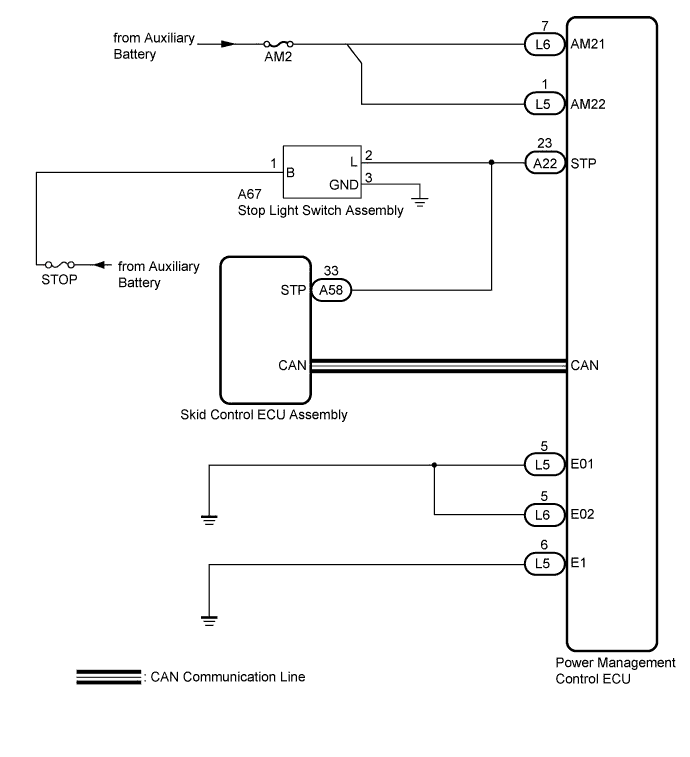
DTC B2284 Brake Signal Malfunction |
| DTC No. | DTC Detection Condition | Trouble Area |
| B2284 | Stop light switch assembly operation information received by the power management control ECU from the stop light switch assembly via a direct line and stop light switch assembly information from the skid control ECU assembly via CAN are inconsistent. |
|
| 1.CHECK HARNESS AND CONNECTOR (AUXILIARY BATTERY - POWER MANAGEMENT CONTROL ECU) |
Disconnect the L5 and L6 connectors from the power management control ECU.
Measure the voltage according to the value(s) in the table below.
| Tester Connection | Condition | Specified Condition |
| L5-1 (AM22) - Body ground | Always | 9.5 to 16 V |
| L6-7 (AM21) - Body ground | Always | 9.5 to 16 V |
|
| ||||
| OK | |
 |
| 2.CHECK HARNESS AND CONNECTOR (POWER MANAGEMENT CONTROL ECU - BODY GROUND) |
Measure the resistance according to the value(s) in the table below.
| Tester Connection | Condition | Specified Condition |
| L5-5 (E01) - Body ground | Always | Below 1 Ω |
| L5-6 (E1) - Body ground | Always | Below 1 Ω |
| L6-4 (E12) - Body ground | Always | Below 1 Ω |
| L6-5 (E02) - Body ground | Always | Below 1 Ω |
|
| ||||
| OK | |
|
| 3.CHECK HARNESS AND CONNECTOR (STOP LIGHT SWITCH ASSEMBLY - POWER SOURCE AND BODY GROUND) |
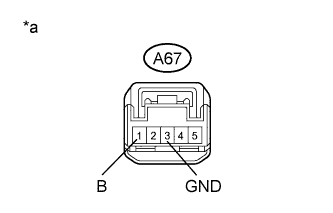 |
Disconnect the A67 connector from the stop light switch assembly.
Measure the voltage and resistance according to the value(s) in the table below.
| Tester Connection | Condition | Specified Condition |
| A67-1 (B) - A67-3 (GND) | Always | 11 to 14 V |
| Tester Connection | Condition | Specified Condition |
| A67-3 (GND) - Body ground | Always | Below 1 Ω |
| *a | Front view of wire harness connector (to Stop Light Switch Assembly) |
|
| ||||
| OK | |
|
| 4.CHECK STOP LIGHT SWITCH ASSEMBLY |
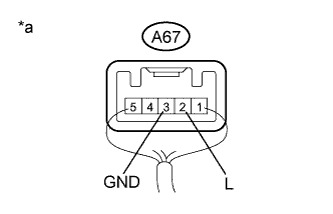 |
Reconnect the A67 connector to the stop light switch assembly.
Measure the voltage according to the value(s) in the table below.
| Tester Connection | Condition | Specified Condition |
| A67-2 (L) - A67-3 (GND) | Power switch off, brake pedal not depressed | Below 1 V |
| A67-2 (L) - A67-3 (GND) | Power switch off, brake pedal depressed | 11 to 14 V |
| *a | Component with harness connected (Stop Light Switch Assembly) |
|
| ||||
| OK | |
|
| 5.CHECK HARNESS AND CONNECTOR (STOP LIGHT SWITCH ASSEMBLY - POWER MANAGEMENT CONTROL ECU) |
Disconnect the A22 connector from the power management control ECU.
Measure the resistance according to the value(s) in the table below.
| Tester Connection | Condition | Specified Condition |
| A22-23 (STP) - A67-2 (L) | Always | Below 1 Ω |
| A22-23 (STP) - Body ground | Always | 10 kΩ or higher |
|
| ||||
| OK | |
|
| 6.READ VALUE USING TECHSTREAM (STOP LIGHT SWITCH ASSEMBLY) |
Connect the Techstream to the DLC3.
Turn the power switch on (IG).
Turn the Techstream on.
Enter the following menus: Body Electrical / Power Source Control / Data List.
Read the Data List according to the display on the Techstream.
| Tester Display | Measurement Item/Range | Normal Condition | Specified Condition |
| Stop Light Switch1 | Stop light switch1/ON or OFF | ON: Brake pedal depressed OFF: Brake pedal released | - |
|
| ||||
| OK | ||
 | ||
| ||
