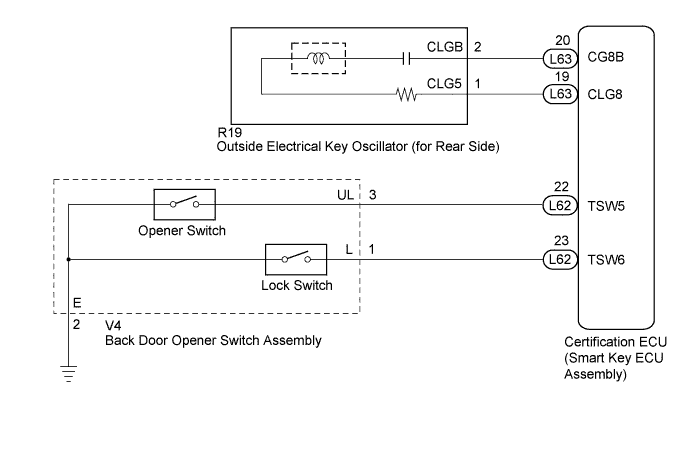
SMART KEY SYSTEM (for Entry Function) > Back Door Entry Lock and Unlock Functions do not Operate |
| 1.CHECK POWER DOOR LOCK OPERATION |
When the door control switch on the master switch assembly is operated, check that the doors unlock and lock according to switch operation (Click here).
|
| ||||
| OK | |
 |
| 2.READ VALUE USING TECHSTREAM (BACK DOOR OPENER SWITCH) |
Connect the Techstream to the DLC3.
Turn the power switch on (IG).
Turn the Techstream on.
Enter the following menus: Body Electrical / Smart Key / Data List.
Read the Data List according to the display on the Techstream.
| Tester Display | Measurement Item/Display | Normal Condition | Diagnostic Note |
| Tr/B-Door Lock SW | Back door opener switch assembly (lock switch) / ON or OFF | ON: Back door opener switch assembly (lock switch) pushed OFF: Back door opener switch assembly (lock switch) not pushed | - |
| Tr/B-Door Unlock SW | Back door opener switch assembly (opener switch) / ON or OFF | ON: Back door opener switch assembly (opener switch) pushed OFF: Back door opener switch assembly (opener switch) not pushed | - |
|
| ||||
| OK | |
|
| 3.CHECK WAVE ENVIRONMENT |
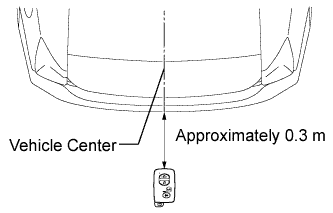 |
Bring the key near the outside electrical key oscillator (for rear side), and perform an entry back door open and entry lock functions check.
|
| ||||
| OK | ||
 | ||
| ||
| 4.PERFORM KEY DIAGNOSTIC MODE INSPECTION |
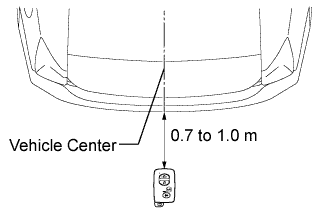 |
Diagnostic mode inspection (outside electrical key oscillator (for rear side))
Connect the Techstream to the DLC3.
Turn the power switch on (IG).
Turn the Techstream on.
Enter the following menus: Body Electrical / Smart Key / Utility / Key Communication Check / Overhead + Back Door.
When the electrical key transmitter is in the position shown in the illustration, check that the wireless door lock buzzer sounds.
|
| ||||
| OK | ||
| ||
| ||
| 5.CHECK HARNESS AND CONNECTOR (CERTIFICATION ECU - OUTSIDE ELECTRICAL KEY OSCILLATOR) |
Disconnect the certification ECU (smart key ECU assembly) connector.
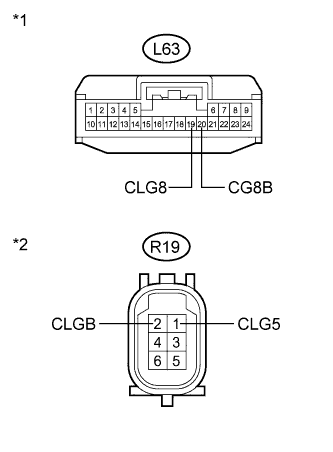 |
Disconnect the outside electrical key oscillator (for rear side) connector.
Measure the resistance according to the value(s) in the table below.
| Tester Connection | Condition | Specified Condition |
| L63-19 (CLG8) - R19-1 (CLG5) | Always | Below 1 Ω |
| L63-20 (CG8B) - R19-2 (CLGB) | Always | Below 1 Ω |
| L63-19 (CLG8) - Body ground | Always | 10 kΩ or higher |
| L63-20 (CG8B) - Body ground | Always | 10 kΩ or higher |
| R19-1 (CLG5) - Body ground | Always | 10 kΩ or higher |
| R19-2 (CLGB) - Body ground | Always | 10 kΩ or higher |
| *1 | Front view of wire harness connector (to Certification ECU (Smart Key ECU Assembly)) |
| *2 | Front view of wire harness connector (to Outside Electrical Key Oscillator (for Rear Side)) |
|
| ||||
| OK | |
|
| 6.INSPECT OUTSIDE ELECTRICAL KEY OSCILLATOR (for Rear Side) |
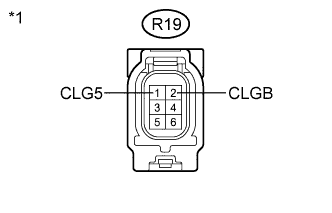 |
Measure the resistance according to the value(s) in the table below.
| Tester Connection | Condition | Specified Condition |
| R19-1 (CLG5) - R19-2 (CLGB) | Always | Below 1 Ω |
| *1 | Component without harness connected (Outside Electrical Key Oscillator (for Rear Side)) |
|
| ||||
| OK | ||
| ||
| ||
| 7.CHECK HARNESS AND CONNECTOR (BACK DOOR OPENER SWITCH - BODY GROUND) |
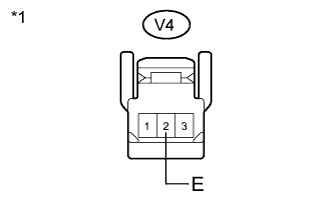 |
Disconnect the back door opener switch assembly connector.
Measure the resistance according to the value(s) in the table below.
| Tester Connection | Condition | Specified Condition |
| V4-2 (E) - Body ground | Always | Below 1 Ω |
| *1 | Front view of wire harness connector (to Back Door Opener Switch Assembly)) |
|
| ||||
| OK | ||
| ||
| ||

