Home › Drivetrain › P410 HYBRID TRANSMISSION / TRANSAXLE › HYBRID TRANSAXLE OIL SEAL

HYBRID TRANSAXLE OIL SEAL > REPLACEMENT

for Preparation Click here


HINT:
  1. Use the same procedure for the RH side and LH side.
  2. The procedure listed below is for the LH side.


1. REMOVE FRONT WHEEL


2. REMOVE NO. 1 ENGINE UNDER COVER


3. REMOVE REAR ENGINE UNDER COVER LH


4. REMOVE REAR ENGINE UNDER COVER RH


5. DRAIN HYBRID TRANSAXLE FLUID


    C210279E01
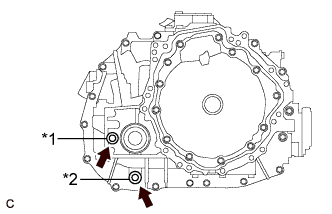
  1. Using a 10 mm hexagon socket wrench, remove the filler plug and gasket.
    Text in Illustration 
    *1
    Filler Plug
    *2
    Drain Plug

  1. Using a 10 mm hexagon socket wrench, remove the drain plug and gasket.

  1. Using a 10 mm hexagon socket wrench, install the drain plug and a new gasket.

    Torque:
    39 N*m{ 398 kgf*cm , 29 ft.*lbf }


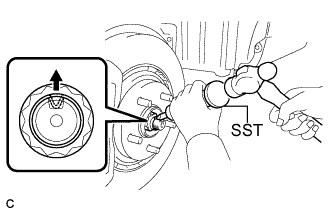
6. REMOVE FRONT AXLE SHAFT NUT


    C167528E01
  1. Using SST and a hammer, release the staked part of the front axle shaft nut.

    SST
    09930-00010  

    NOTICE:
    Loosen the staked part of the nut completely, otherwise the threads of the drive shaft may be damaged.

  1. While applying the brakes, remove the front axle shaft nut.


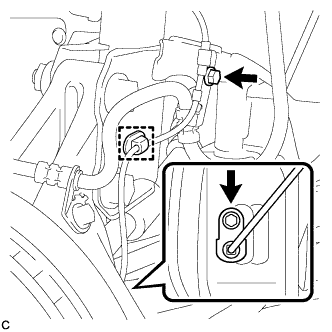
7. SEPARATE FRONT SPEED SENSOR


    C205576
  1. Remove the 2 bolts and clamp, and separate the front speed sensor.

    NOTICE:
    1. Be sure to separate the front speed sensor from the front shock absorber with coil spring completely.
    2. Prevent foreign matter from attaching to the sensor tip.
    3. Be careful not to damage the front speed sensor.
    4. Clean the speed sensor installation hole and the contact surfaces every time the speed sensor is removed.


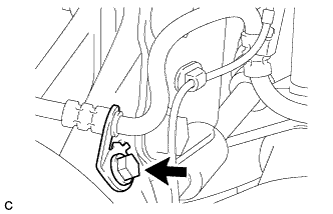
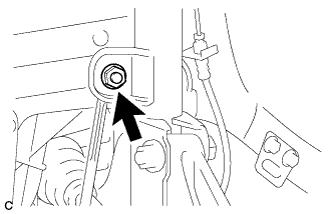
8. SEPARATE FRONT FLEXIBLE HOSE


    C205577
  1. Remove the bolt and separate the front flexible hose from the steering knuckle.


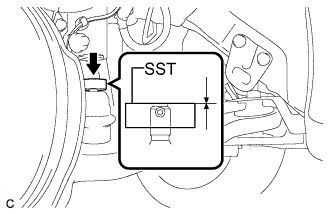
9. SEPARATE TIE ROD END SUB-ASSEMBLY
  1. Remove the clip and nut.


    C157110E03
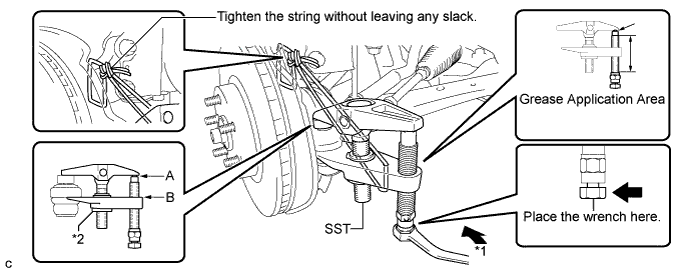
  1. Install SST to the tie rod end.

    SST
    09960-20010   (09961-02060)

    NOTICE:
    Make sure that the upper ends of the tie rod end and SST are aligned.


  1. Using SST, separate the tie rod end from the steering knuckle.

    C177185E08


    Text in Illustration 
    *1
    Turn
    *2
    Nut
    SST
    09960-20010   (09961-02010)

    CAUTION:
    Apply grease to the bolt threads and the tip of SST.

    NOTICE:
    1. Be sure to tighten the string firmly to secure SST to the steering knuckle to prevent SST from falling off.
    2. Install SST with the center nut so that A and B shown in the illustration are parallel. Otherwise, the dust cover may be damaged.
    3. Be sure to place the wrench on the part indicated in the illustration.
    4. Do not damage the front disc brake dust cover.
    5. Do not damage the ball joint dust cover.
    6. Do not damage the steering knuckle.


10. SEPARATE FRONT STABILIZER LINK ASSEMBLY


    C205585
  1. Remove the nut and separate the stabilizer link assembly from the front shock absorber with coil spring.

    HINT:
    If the ball joint turns together with the nut, use a hexagon wrench (6 mm) to hold the stud bolt.


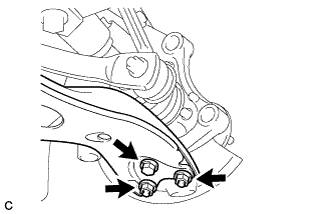
11. SEPARATE FRONT NO. 1 LOWER SUSPENSION ARM SUB-ASSEMBLY


    C205578
  1. Remove the bolt and 2 nuts, and separate the front No. 1 lower suspension arm sub-assembly from the front lower ball joint.


12. SEPARATE FRONT DRIVE SHAFT ASSEMBLY


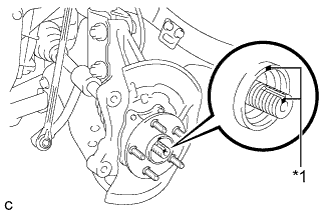
    C205579E01
  1. Put matchmarks on the front drive shaft assembly and front axle hub sub-assembly.
    Text in Illustration 
    *1
    Matchmark


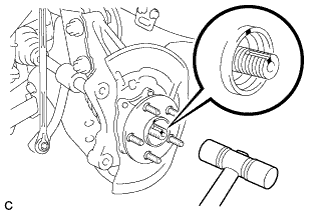
    C205580
  1. Using a plastic hammer, separate the front drive shaft assembly from the front axle assembly. If it is difficult to separate, tap the end of the front drive shaft assembly using a brass bar and a hammer.

    NOTICE:
    Be careful not to damage the drive shaft boot and speed sensor rotor.


13. REMOVE FRONT DRIVE SHAFT ASSEMBLY


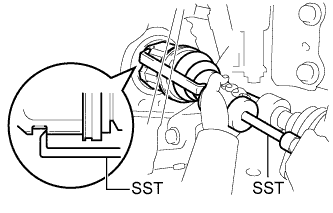
    C208485E01
  1. Using SST, remove the front drive shaft assembly.

    SST
    09520-00031  
    09520-01010  
    09521-00020  

    NOTICE:
    1. Do not damage the transaxle case oil seal.
    2. Do not damage the inboard joint boot.
    3. Do not drop the front drive shaft assembly.


14. REMOVE FRONT DRIVE SHAFT HOLE SNAP RING


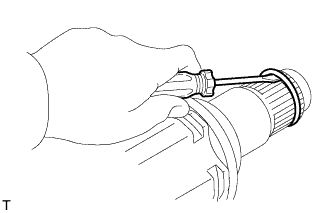
    C129495
  1. Using a screwdriver, remove the front drive shaft hole snap ring.


15. REMOVE HYBRID VEHICLE TRANSAXLE ASSEMBLY TYPE T OIL SEAL


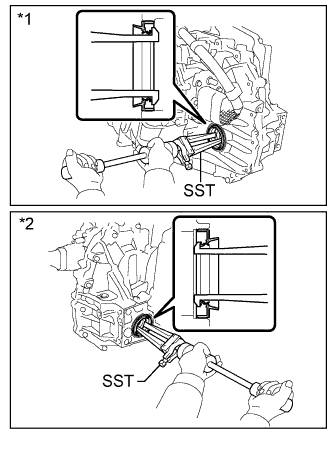
    C209798E01
  1. Using SST, tap out the 2 oil seals.

    SST
    09308-00010  
    Text in Illustration 
    *1
    LH Side
    *2
    RH Side


16. INSTALL HYBRID VEHICLE TRANSAXLE ASSEMBLY TYPE T OIL SEAL


  1. Install a new oil seal LH side.


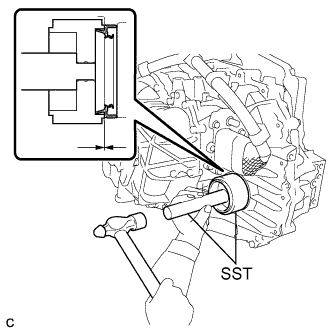
      C209800E01
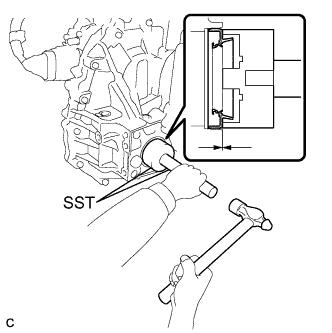
    1. Using SST and a hammer, tap in a new oil seal.

      SST
      09316-10010  
      09950-70010   (09951-07150)

      Oil seal driven in depth:
      -0.5 to 0.5 mm (-0.0197 to 0.0197 in.)

    2. Coat the lip of the oil seal with MP grease.


  1. Install a new oil seal RH side.


      C209801E01
    1. Using SST and a hammer, tap in a new oil seal.

      SST
      09726-36010  
      09950-70010   (09951-07150)

      Oil seal driven in depth:
      -0.5 to 0.5 mm (-0.0197 to 0.0197 in.)

    2. Coat the lip of the oil seal with MP grease.


17. INSTALL FRONT DRIVE SHAFT HOLE SNAP RING
  1. Install a new front drive shaft hole snap ring to the front drive inboard joint assembly.

    HINT:
    Face the end gap of the front drive inboard joint hole snap ring downward.


18. INSTALL FRONT DRIVE SHAFT ASSEMBLY


    C208486
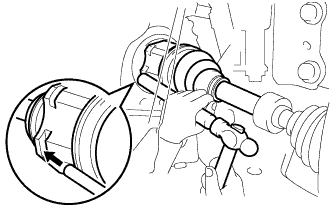
  1. Align the inboard joint splines, and using a brass bar and a hammer, install the front drive shaft assembly.
    NOTICE:
    1. Face the end gap of the front drive shaft hole snap ring downward.
    2. Do not damage the transaxle case oil seal.
    3. Do not damage the inboard joint boot.
    4. Make sure to center the front drive shaft assembly during installation to prevent damage to the front drive shaft hole snap ring.

    HINT:
    Confirm whether the drive shaft is securely driven in by checking the reaction force and sound.


    C208473E01
  1. Align the matchmarks and install the front drive shaft assembly to the front axle hub sub-assembly.
    Text in Illustration 
    *1
    Matchmark


19. CONNECT FRONT NO. 1 LOWER SUSPENSION ARM SUB-ASSEMBLY


    C205578
  1. Install the front No. 1 lower suspension arm sub-assembly to the front lower ball joint with the bolt and 2 nuts.

    Torque:
    89 N*m{ 908 kgf*cm , 66 ft.*lbf }


20. CONNECT FRONT STABILIZER LINK ASSEMBLY


    C205585
  1. Install the front stabilizer link assembly to the front shock absorber with coil spring with the nut.

    Torque:
    74 N*m{ 755 kgf*cm , 55 ft.*lbf }

    HINT:
    If the ball joint turns together with the nut, use a hexagon wrench (6 mm) to hold the stud bolt.


21. CONNECT TIE ROD END SUB-ASSEMBLY


    C151407
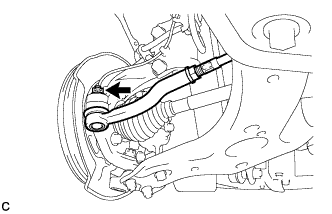
  1. Connect the tie rod end sub-assembly LH to the steering knuckle with the nut.

    Torque:
    49 N*m{ 500 kgf*cm , 36 ft.*lbf }

    NOTICE:
    Further tighten the nut up to 60° if the holes for the clip are not aligned.

  1. Install a new clip.


22. INSTALL FRONT FLEXIBLE HOSE


    C205577
  1. Install the front flexible hose to the steering knuckle with the bolt.

    Torque:
    19 N*m{ 192 kgf*cm , 14 ft.*lbf }


23. CONNECT FRONT SPEED SENSOR


    C208047
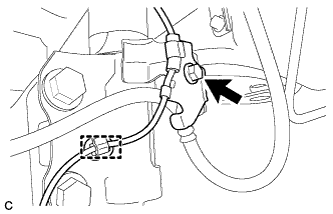
  1. Install the front speed sensor and front flexible hose to the front shock absorber with the bolt and clamp.
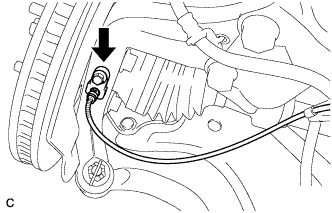
    Torque:
    19 N*m{ 192 kgf*cm , 14 ft.*lbf }

    NOTICE:
    Do not twist the front speed sensor when installing it.

    HINT:
    Install the font flexible hose first and then the speed sensor harness bracket.


    C130480
  1. Install the front speed sensor to the steering knuckle with the bolt.

    Torque:
    8.5 N*m{ 87 kgf*cm , 75 in.*lbf }

    NOTICE:
    Do not twist the front speed sensor when installing it.


24. INSTALL FRONT AXLE SHAFT NUT
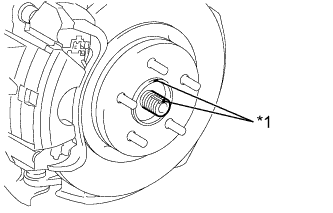
  1. Clean the threaded parts on the drive shaft and a new axle shaft nut using a non-residue solvent.
    HINT:
    1. Be sure to perform this work even when using a new drive shaft.
    2. Keep the threaded parts free of oil and foreign matter.


    C210914
  1. Using a socket wrench (30 mm), install the axle shaft nut.

    Torque:
    216 N*m{ 2203 kgf*cm , 159 ft.*lbf }

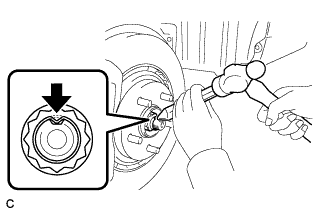
  1. Using a chisel and hammer, stake the front axle shaft nut.


25. ADD HYBRID TRANSAXLE FLUID


    C233704E01
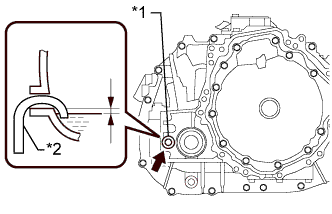
  1. Add transaxle fluid until the fluid level is between 0 to 10 mm (0 to 0.394 in.) from the bottom lip of the filler plug opening.
    Text in Illustration 
    *1
    Filler Plug
    *2
    Filler Nozzle

    NOTICE:
    1. Stop the vehicle on a level surface.
    2. Use Toyota Genuine ATF WS.
    3. Be sure to fully insert the filler nozzle into the filler plug opening.
    4. Be sure to add fluid slowly. If fluid is added quickly, the fluid may hit internal parts and bounce back, resulting in fluid coming out of the filler plug opening.
    5. Be sure to directly check that the transaxle fluid level is within the specified range.
    6. Insufficient or excessive amounts of transaxle fluid may damage the hybrid transaxle.

    Reference:
    3.4 liters (3.6 US qts, 3.0 lmp.qts)

  1. After adding fluid, leave it for 30 seconds so that the fluid surface can become still again, and then check that the fluid level is between 0 to 10 mm (0 to 0.394 in.) from the bottom lip of the filler plug opening. (If the fluid is insufficient, return to the Add Hybrid Transaxle Fluid procedure.)

  1. Using a 10 mm hexagon socket wrench, install the filler plug with a new gasket.

    Torque:
    39 N*m{ 398 kgf*cm , 29 ft.*lbf }


26. INSPECT HYBRID TRANSAXLE FLUID


    C209290E01
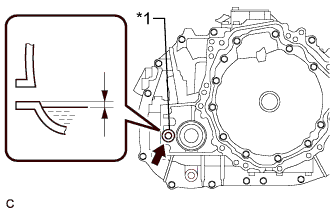
  1. Using a 10 mm hexagon socket wrench, remove the filler plug and gasket.
    Text in Illustration 
    *1
    Filler Plug

  1. Check that the fluid level is between 0 to 10 mm (0 to 0.394 in.) from the bottom lip of the filler plug opening. (If the fluid is insufficient, return to the Add Hybrid Transaxle Fluid procedure.)

    NOTICE:
    1. Stop the vehicle on a level surface.
    2. Be sure to directly check that the transaxle fluid level is within the specified range.
    3. Insufficient or excessive amounts of transaxle fluid may damage the hybrid transaxle.
    4. Recheck the transaxle fluid level after driving following fluid replacement.

  1. Check for leaks if the quantity of transaxle fluid is low.

  1. Using a 10 mm hexagon socket wrench, install the filler plug with a new gasket.

    Torque:
    39 N*m{ 398 kgf*cm , 29 ft.*lbf }


27. INSTALL FRONT WHEEL

Torque:
103 N*m{ 1050 kgf*cm , 76 ft.*lbf }


28. INSPECT AND ADJUST FRONT WHEEL ALIGNMENT

HINT:
(Click here)


29. INSTALL REAR ENGINE UNDER COVER LH


30. INSTALL REAR ENGINE UNDER COVER RH


31. INSTALL NO. 1 ENGINE UNDER COVER


32. INSPECT SPEED SENSOR SIGNAL

HINT:
(Click here)