| B |  |
| GO TO DTC CHART (HYBRID CONTROL SYSTEM) (Click here) |
DTC P3004-132 High Voltage Power Resource |
| DTC No. | INF Code | DTC Detection Condition | Trouble Area |
| P3004 | 132 | Although an SMR on request was sent when the power switch is operated, the voltage did not increase after boosting. High-voltage circuit malfunctions between the HV battery and inverter with converter assembly. The EV electric battery fuse is blown, the service plug grip is removed, the system main resistor is blown, SMRG is turned off, SMRP or SMRB remains open, or the high-voltage cable has an open circuit. (1 trip detection logic) |
|
| DTC No. | Data List |
| P3004-132 |
|
| 1.CHECK DTC OUTPUT (HV) |
Connect the Techstream to the DLC3.
Turn the power switch on (IG).
Enter the following menus: Powertrain / Hybrid Control / Trouble Codes.
Check if DTCs are output.
| Result | Proceed to |
| P3004-132 only is output. | A |
| Any of the following DTCs including pending DTCs are also output. | B |
| DTC No. | Relevant Diagnosis |
| P0A1A-151, 155, 156, 658, 659 | Generator Control Module |
| P0A1B-164, 193, 512, 661, 786 | Drive Motor "A" Control Module |
| P0A1D-148 | Hybrid Powertrain Control Module |
| P0A78-266, 267, 586 | Drive Motor "A" Inverter Performance |
| P0A94-442 | DC / DC Converter Performance |
| P0ADB-227 | Hybrid Battery Positive Contactor Control Circuit Low |
| P0ADC-226 | Hybrid Battery Positive Contactor Control Circuit High |
| P0ADF-229 | Hybrid Battery Negative Contactor Control Circuit Low |
| P0AE0-228 | Hybrid Battery Negative Contactor Control Circuit High |
| P0AE6-225 | Hybrid Battery Precharge Contactor Control Circuit Low |
| P0AE7-224 | Hybrid Battery Precharge Contactor Control Circuit High |
| P0C76-523 | Hybrid Battery System Discharge Time Too Long |
| P2511-149 | HV CPU Power Relay Sense Circuit Intermittent No Continuity |
| P3004-131, 800, 801 | High Voltage Power Resource |
| P324E-788 | MG-ECU Power Relay Intermittent Circuit |
| U0110 (all INF codes)*1 | Lost Communication with Drive Motor Control Module "A" |
Turn the power switch off.
|
| ||||
| A | |
 |
| 2.CHECK DTC OUTPUT (HV) |
Connect the Techstream to the DLC3.
Turn the power switch on (IG).
Enter the following menus: Powertrain / Hybrid Control / Trouble Codes.
Check if DTCs are output.
| Result | Proceed to |
| P3004-132 only is output. | A |
| Any of the following DTCs including pending DTCs are also output. | B |
| DTC No. | Relevant Diagnosis |
| P0A95-123 | High Voltage Fuse |
| P0ABF-123 | Hybrid Battery Pack Current Sensor Circuit |
| P0AC0-123 | Hybrid Battery Pack Current Sensor Circuit Range / Performance |
| P0AC1-123 | Hybrid Battery Pack Current Sensor Circuit Low |
| P0AC2-123 | Hybrid Battery Pack Current Sensor Circuit High |
| P0AFC-123 | Hybrid Battery Pack Sensor Module |
| P0B3D-123 | Hybrid Battery Voltage Sensor "A" Circuit Low |
| P0B42-123 | Hybrid Battery Voltage Sensor "B" Circuit Low |
| P0B47-123 | Hybrid Battery Voltage Sensor "C" Circuit Low |
| P0B4C-123 | Hybrid Battery Voltage Sensor "D" Circuit Low |
| P0B51-123 | Hybrid Battery Voltage Sensor "E" Circuit Low |
| P0B56-123 | Hybrid Battery Voltage Sensor "F" Circuit Low |
| P0B5B-123 | Hybrid Battery Voltage Sensor "G" Circuit Low |
| P0B60-123 | Hybrid Battery Voltage Sensor "H" Circuit Low |
| P0B65-123 | Hybrid Battery Voltage Sensor "I" Circuit Low |
| P0B6A-123 | Hybrid Battery Voltage Sensor "J" Circuit Low |
| P0B6F-123 | Hybrid Battery Voltage Sensor "K" Circuit Low |
| P0B74-123 | Hybrid Battery Voltage Sensor "L" Circuit Low |
| P0B79-123 | Hybrid Battery Voltage Sensor "M" Circuit Low |
| P0B7E-123 | Hybrid Battery Voltage Sensor "N" Circuit Low |
| P0B83-123 | Hybrid Battery Voltage Sensor "O" Circuit Low |
| P308A-123 | Hybrid Battery Voltage Sensor All Circuits Low |
| U029A-123 | Lost Communication with Hybrid Battery Pack Sensor Module |
Turn the power switch off.
|
| ||||
| A | |
|
| 3.CHECK FREEZE FRAME DATA |
Connect the Techstream to the DLC3.
Turn the power switch on (IG).
Enter the following menus: Powertrain / Hybrid Control / Trouble Codes.
Read the freeze frame data of DTC P3004-132.
| Result | Proceed to |
All of the following conditions are met:
| A |
| In addition to the above conditions, HV battery current (Batt Pack Current Val) is 3 A or more. | B |
| Other than above | C |
Turn the power switch off.
|
| ||||
|
| ||||
| A | ||
 | ||
| ||
| 4.CHECK CONNECTOR CONNECTION CONDITION (POWER MANAGEMENT CONTROL ECU CONNECTOR) |
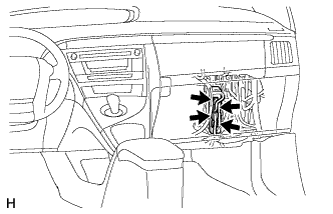 |
Check the connections of the power management control ECU connectors.
|
| ||||
| OK | |
|
| 5.CHECK FRAME WIRE (INVERTER WITH CONVERTER ASSEMBLY SIDE) |
Check that the service plug grip is not installed.
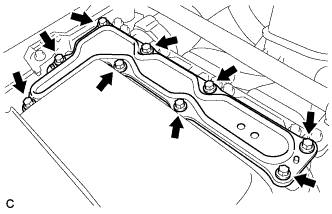 |
Remove the inverter terminal cover from the inverter with converter assembly.
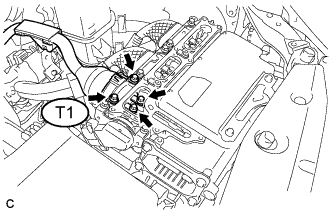 |
Check the connection between the frame wire T1 and the inverter with converter assembly.
Install the inverter terminal cover to the inverter with converter assembly.
|
| ||||
| OK | |
|
| 6.CHECK FRAME WIRE (HYBRID BATTERY JUNCTION BLOCK ASSEMBLY SIDE) |
Check that the service plug grip is not installed.
Remove the upper hybrid battery cover sub-assembly (Click here).
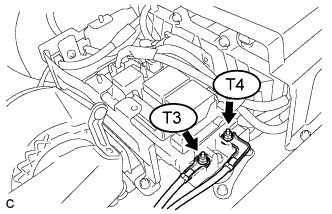 |
Check the connection between the frame wire T4, T3 and the hybrid battery junction block assembly.
Check for arc marks on the terminals of the frame wire.
| Result | Proceed to | |
| The terminals are connected securely and there are no contact problems. | There are no arc marks. | A |
| The terminals are not connected securely and there is a contact problem. | There are arc marks. | B |
| The terminals are not connected securely and there is a contact problem. | There are no arc marks. | C |
| The terminals are connected securely and there are no contact problems. | There are arc marks. | B |
Install the upper hybrid battery cover sub-assembly (Click here).
|
| ||||
|
| ||||
| A | |
|
| 7.CHECK FRAME WIRE (INVERTER WITH CONVERTER - HYBRID BATTERY JUNCTION BLOCK ASSEMBLY) |
Check that the service plug grip is not installed.
|
Remove the inverter terminal cover from the inverter with converter assembly.
Remove the upper hybrid battery cover sub-assembly (Click here).
|
Disconnect the frame wire T1 from the inverter with converter assembly.
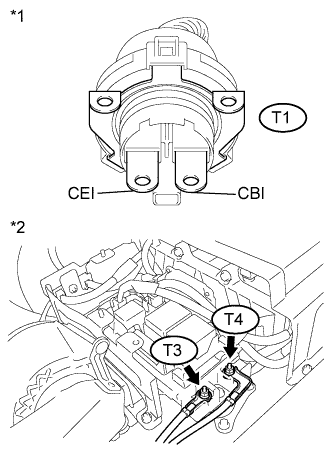 |
Measure the resistance according to the value(s) in the table below.
| Tester Connection | Switch Condition | Specified Condition |
| T4-1 (CBI) - T1-2 (CBI) | Power switch off | Below 1 Ω |
| T3-1 (CEI) - T1-1 (CEI) | Power switch off | Below 1 Ω |
| *1 | Frame Wire (Inverter with Converter Assembly Side) |
| *2 | Frame Wire (Hybrid Battery Junction Block Assembly Side) |
Connect the frame wire from the inverter with converter assembly.
Install the upper hybrid battery cover sub-assembly (Click here).
Install the inverter terminal cover to the inverter with converter assembly.
|
| ||||
| OK | |
|
| 8.CHECK CONDITION OF MAIN BATTERY CABLE CONNECTION(S) |
Check that the service plug grip is not installed.
Remove the upper hybrid battery cover sub-assembly (Click here).
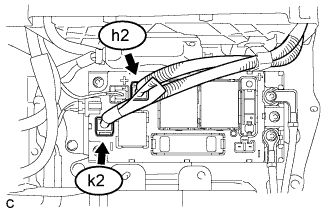 |
Check the connections between the main battery cables h2, k2 and the hybrid battery junction block assembly.
Check for arc marks on the terminals of the main battery cable connectors.
| Result | Proceed to | |
| The terminals are connected securely and there are no contact problems. | There are no arc marks. | A |
| The terminals are not connected securely and there is a contact problem. | There are arc marks. | B |
| The terminals are not connected securely and there is a contact problem. | There are no arc marks. | C |
| The terminals are connected securely and there are no contact problems. | There are arc marks. | B |
Install the upper hybrid battery cover sub-assembly (Click here).
|
| ||||
|
| ||||
| A | |
|
| 9.CHECK HV BATTERY |
Check that the service plug grip is not installed.
Remove the upper hybrid battery cover sub-assembly (Click here).
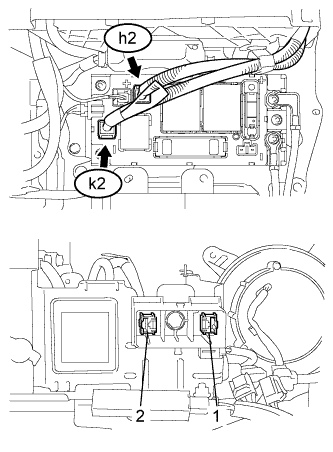 |
Measure the voltage according to the value(s) in the table below.
| Tester Connection | Switch Condition | Specified Condition |
| h2-1 (+) - 2 | Power switch off | 114 to 190 V |
| k2-1 (-) - 1 | Power switch off | 54 to 90 V |
Install the upper hybrid battery cover sub-assembly (Click here).
|
| ||||
| OK | |
|
| 10.CHECK HARNESS AND CONNECTOR (POWER MANAGEMENT CONTROL ECU - HYBRID BATTERY JUNCTION BLOCK ASSEMBLY) |
Check that the service plug grip is not installed.
Disconnect connector L5 from the power management control ECU.
Remove the upper hybrid battery cover sub-assembly (Click here).
Disconnect the connector c3 that drives the relay of the hybrid battery junction block assembly.
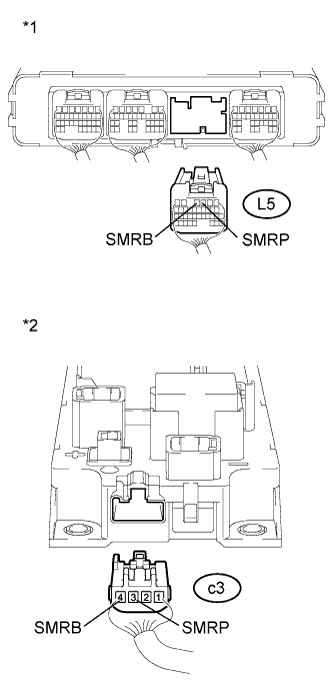 |
Measure the resistance according to the value(s) in the table below.
| Tester Connection | Switch Condition | Specified Condition |
| L5-4 (SMRB) - c3-4 (SMRB) | Power switch off | Below 1 Ω |
| L5-3 (SMRP) - c3-3 (SMRP) | Power switch off | Below 1 Ω |
| *1 | Rear view of wire harness connector (to Power Management Control ECU) |
| *2 | Rear view of wire harness connector (to Hybrid Battery Junction Block Assembly) |
Connect the hybrid battery junction block assembly connector.
Install the upper hybrid battery cover sub-assembly (Click here).
Connect the power management control ECU connector.
|
| ||||
| OK | |
|
| 11.INSPECT HYBRID BATTERY JUNCTION BLOCK ASSEMBLY (SMRB) |
Check that the service plug grip is not installed.
Remove the hybrid battery junction block assembly (Click here).
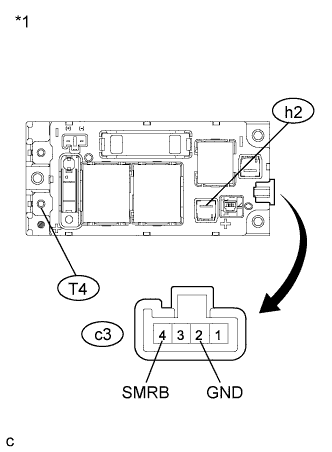 |
Measure the resistance according to the value(s) in the table below.
| Tester Connection | Switch Condition | Specified Condition |
| h2-1 (+) - T4-1 (CBI) | Auxiliary battery voltage is applied between terminals c3-4 (SMRB) and c3-2 (GND). | Below 1 Ω |
| *1 | Hybrid Battery Junction Block Assembly |
Measure the resistance according to the value(s) in the table below.
| Tester Connection | Condition | Specified Condition |
| c3-4 (SMRB) - c3-2 (GND) | -40 to 176°F (-40 to 80°C) | 19.0 to 35.5 Ω |
Install the hybrid battery junction block assembly (Click here).
|
| ||||
| OK | |
|
| 12.INSPECT HYBRID BATTERY JUNCTION BLOCK ASSEMBLY (SMRP) |
Check that the service plug grip is not installed.
Remove the hybrid battery junction block assembly (Click here).
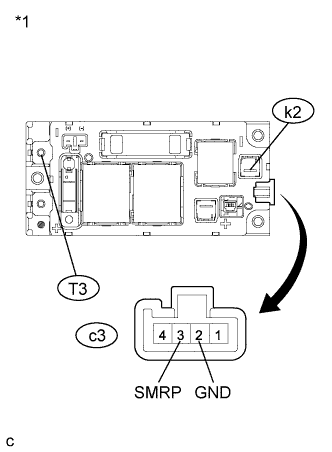 |
Measure the resistance according to the value(s) in the table below.
| Tester Connection | Switch Condition | Specified Condition |
| k2-1 (-) - T3-1 (CEI) | Auxiliary battery voltage is applied between terminals c3-3 (SMRP) and c3-2 (GND). | 28.5 to 31.5 Ω |
| *1 | Hybrid Battery Junction Block Assembly |
Measure the resistance according to the value(s) in the table below.
| Tester Connection | Condition | Specified Condition |
| c3-3 (SMRP) - c3-2 (GND) | -40 to 176°F (-40 to 80°C) | 112 to 274 Ω |
Install the hybrid battery junction block assembly (Click here).
|
| ||||
| OK | |
|
| 13.CHECK FOR INTERMITTENT PROBLEMS |
Check for intermittent problems (Click here).
| NEXT | |
|
| 14.CLEAR DTC |
Connect the Techstream to the DLC3.
Turn the power switch on (IG).
Enter the following menus: Powertrain / Hybrid Control / Trouble Codes.
Read and record the DTCs and freeze frame data.
Clear DTCs and freeze frame data.
Turn the power switch off.
| NEXT | |
|
| 15.CHECK DTC OUTPUT (HV) |
Connect the Techstream to the DLC3.
Turn the power switch on (READY).
Enter the following menus: Powertrain / Hybrid Control / Trouble Codes.
Check if DTCs are output (including pending DTCs).
| Result | Proceed to |
| No DTCs are output. | A |
| DTC P3004-131 is output. | B |
| DTC P3004-132 is output. | C |
Turn the power switch off.
|
| ||||
|
| ||||
| A | ||
| ||
| ||
