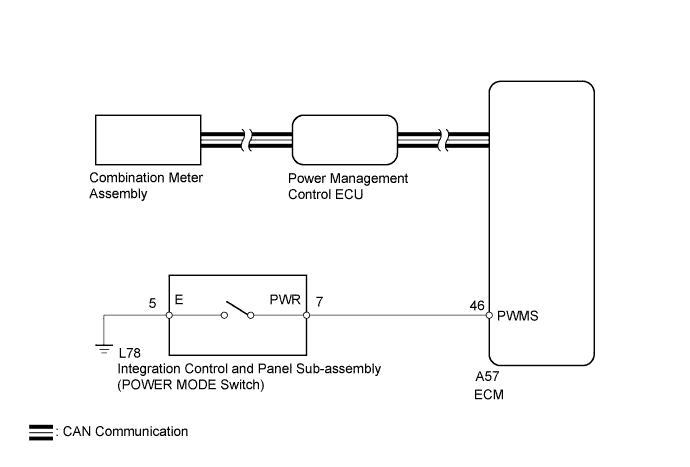
HYBRID CONTROL SYSTEM > Pattern Select Switch Power Mode Circuit |
| 1.READ VALUE USING TECHSTREAM (CAN BUS CHECK) |
Connect the Techstream to the DLC3.
Turn the power switch on (IG).
Enter the following menus: System Select / CAN Bus Check.
| Result | Proceed to |
| All of the ECUs and sensors that are currently connected to the CAN communication system are displayed. | A |
| None of the ECUs and sensors that are currently connected to the CAN communication system are displayed, or some of them are not displayed. | B |
Turn the power switch off.
|
| ||||
| A | |
 |
| 2.CHECK DTC OUTPUT (HEALTH CHECK) |
Connect the Techstream to the DLC3.
Turn the power switch on (IG).
Enter the following menus: System Select / Health Check.
Check DTCs.
| Result | Proceed to |
| No DTCs are output. | A |
| DTCs are output. | B |
Turn the power switch off.
|
| ||||
| A | |
|
| 3.PERFORM ACTIVE TEST USING TECHSTREAM (COMBINATION METER) |
Connect the Techstream to the DLC3.
Turn the power switch on (IG).
Enter the following menus: Body Electrical / Combination Meter / Active Test / Indicat. Lamp ECT PWR.
Perform the "Indicat. Lamp ECT PWR" Active Test.
| Tester Display | Description | Inspection Condition | Specified Condition |
| Indicat. Lamp ECT PWR | Pattern select indicator light (PWR) | POWER mode | Comes on |
| Result | Proceed to |
| The POWER mode indicator light comes on | A |
| The POWER mode indicator light does not come on | B |
|
| ||||
| A | |
|
| 4.READ VALUE USING TECHSTREAM (PATTERN SWITCH (PWR/M)) |
Connect the Techstream to the DLC3.
Turn the power switch on (IG).
Enter the following menus: Powertrain / Hybrid Control / Data List / Pattern Switch (PWR/M).
Read the value displayed on the Techstream.
| Tester Display | Measurement Item/Range | Normal Condition | Diagnostic Note |
| Pattern Switch (PWR/M) | POWER mode switch condition/ ON or OFF | POWER mode switch ON: ON POWER mode switch OFF: OFF | - |
| Result | Proceed to |
| The Techstream display changes according to the POWER mode switch operation. | A |
| The Techstream display does not changes according to the POWER mode switch operation. | B |
|
| ||||
| A | ||
 | ||
| ||
| 5.INSPECT INTEGRATION CONTROL AND PANEL SUB-ASSEMBLY (POWER MODE SWITCH) |
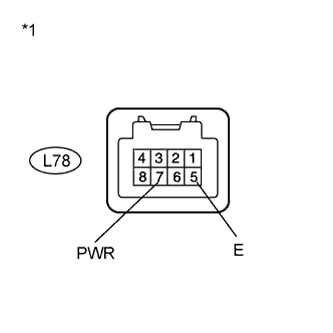 |
Remove the integration control and panel sub-assembly (POWER MODE switch).
Measure the resistance according to the value(s) in the table below.
| Tester Connection | Condition | Specified Condition |
| L78-7 (PWR) - L78-5 (E) | POWER MODE Switch ON | Below 1 Ω |
| L78-7 (PWR) - L78-5 (E) | POWER MODE Switch OFF | 10 kΩ or higher |
| *1 | Component without harness connected (Integration Control and Panel Sub-assembly (POWER MODE Switch)) |
Install the integration control and panel sub-assembly.
|
| ||||
| OK | |
|
| 6.CHECK HARNESS AND CONNECTOR (POWER MODE SWITCH - BODY GROUND) |
Disconnect connector L78 from the integration control and panel sub-assembly (POWER MODE switch).
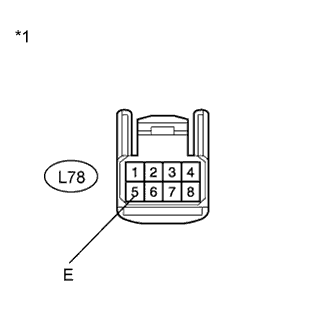 |
Measure the resistance according to the value(s) in the table below.
| Tester Connection | Condition | Specified Condition |
| L78-5 (E) - Body ground | Always | Below 1 Ω |
| *1 | Front view of wire harness connector (to Integration Control and Panel Sub-assembly (POWER MODE Switch)) |
Connect the integration control and panel sub-assembly connector.
|
| ||||
| OK | |
|
| 7.CHECK HARNESS AND CONNECTOR (POWER MODE SWITCH - ECM) |
Disconnect connector L78 from the integration control and panel sub-assembly (POWER MODE switch).
Disconnect connector A57 from the ECM.
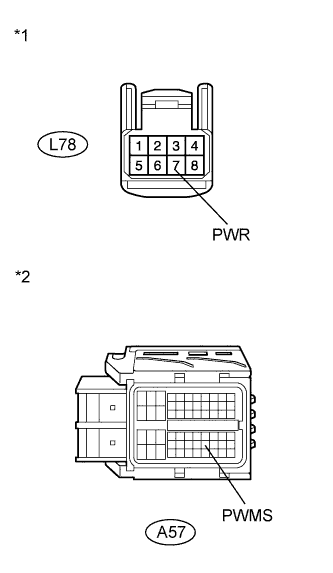 |
Measure the resistance according to the value(s) in the table below.
| Tester Connection | Condition | Specified Condition |
| L78-7 (PWR) - A57-46 (PWMS) | Always | Below 1 Ω |
| L78-7 (PWR) or A57-46 (PWMS) - Body ground | Always | 10 kΩ or higher |
| *1 | Front view of wire harness connector (to Integration Control and Panel Sub-assembly (POWER MODE Switch)) |
| *2 | Front view of wire harness connector (to ECM) |
Connect the integration control and panel sub-assembly connector.
Connect the ECM connector.
|
| ||||
| OK | ||
| ||
| ||

