Home › Engine / Hybrid System › HYBRID / BATTERY CONTROL › HYBRID CONTROL SYSTEM

DTC    P0C73-776    Motor Electronics Coolant Pump "A" Control Performance

for Preparation Click here


DESCRIPTION

The inverter water pump assembly transmits rotation speed information to the power management control ECU (HV CPU). The power management control ECU (HV CPU) monitors the rotation speed and detects malfunctions.

DTC No.
INF Code
DTC Detection Condition
Trouble Area
P0C73
776
The inverter water pump assembly revolution speed is abnormally high or low (or stop) for 1 minute or more.
Or the inverter water pump assembly stops intermittently after abnormal revolution speed is detected.
(1 trip detection logic)
  1. Inverter cooling system
  2. Wire harness or connector
  3. Inverter water pump assembly
  4. Power management control ECU

Related Data List 
DTC No.
Data List
P0C73-776
  1. Inverter W/P Revolution
  2. W/P Run Control Duty*1
  3. Ready Signal
The following items can be helpful when performing repairs:
Data List
  1. Inverter Coolant Water Temperature
  2. Ambient Temperature
  1. *1: This Data List item is related to the inverter water pump assembly.

Related Active Test 
DTC No.
Active Test
P0C73-776
Activate the Water Pump*2
  1. *2: This is an Active Test of the inverter water pump assembly.

MONITOR DESCRIPTION

The power management control ECU (HV CPU) monitors speed of the inverter water pump assembly. If there is an abnormality in speed, the power management control ECU (HV CPU) will illuminate the MIL and set a DTC.

MONITOR STRATEGY


Related DTCs
P0C73 (INF 776): Water pump malfunction
Required sensors / components
Inverter water pump assembly
Frequency of operation
Continuous
Duration
TMC's intellectual property
MIL operation
1 driving cycle
Sequence of operation
None

TYPICAL ENABLING CONDITIONS


The monitor will run whenever the following DTCs are not present
TMC's intellectual property
Other conditions belong to TMC's intellectual property
-

TYPICAL MALFUNCTION THRESHOLDS


TMC's intellectual property
-

COMPONENT OPERATING RANGE


Power management control ECU (HV CPU)
DTC P0C73 (INF 776) is not detected

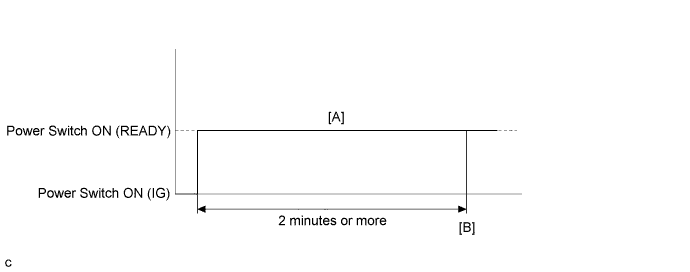
CONFIRMATION DRIVING PATTERN


A218443E03

  1. Connect the Techstream to the DLC3.
  2. Turn the power switch on (IG) and turn the Techstream on.
  3. Clear the DTCs (even if no DTCs are stored, perform the clear DTC procedure).
  4. Turn the power switch off and wait for 30 seconds or more.
  5. Turn the power switch on (IG) and turn the Techstream on.
  6. Turn the power switch on (READY). [A]
  7. Wait for 2 minutes or more.
  8. Enter the following menus: Powertrain / Hybrid Control / Trouble Codes. [B]
  9. Read the current DTCs.

    HINT:
    1. If a current DTC is output, the system is malfunctioning.
    2. If a current DTC is not output and want to confirm permanent DTC, perform the following procedure.

  10. Check that permanent DTCs are cleared.
  11. If the permanent DTCs are not cleared, perform a universal trip, and then check for permanent DTCs again.

WIRING DIAGRAM


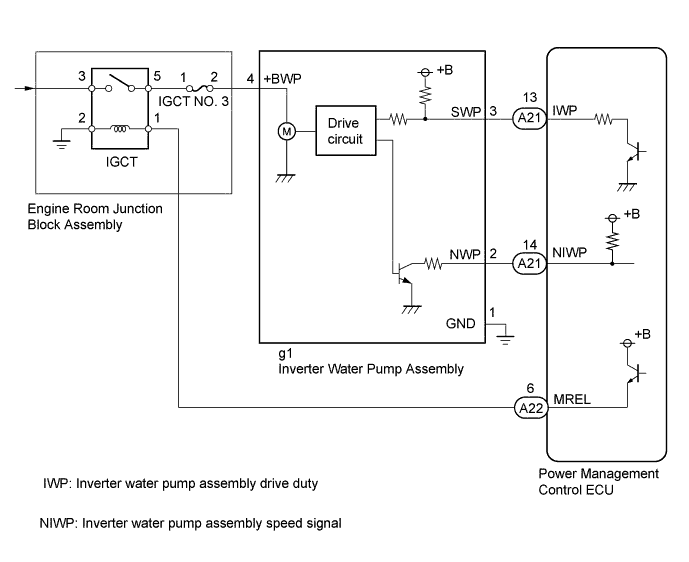
A308008E01


INSPECTION PROCEDURE

NOTICE:
If DTC P0A78-284, 286, P0A7A-322, 324, P0A94-553 or 557 is output, replace the inverter with converter assembly after this inspection.

HINT:
  1. After the repair, clear the DTCs and perform the following procedure to check that DTCs are not output.
    1. Turn the power switch on (READY) and wait for 2 minutes or more.
  2. If this vehicle is jump started, etc. and excessive voltage is applied to the auxiliary battery, the inverter water pump assembly may suspend control as a self-protection function and store DTC.
    (When the auxiliary battery voltage returns to normal, the inverter water pump assembly will resume normal operation. In this case it is not necessary to replace the inverter water pump assembly.)

1.CHECK QUANTITY OF HV COOLANT
  1. Check the coolant level in the inverter reserve tank.

  1. Check for coolant leaks.
    Result 
    Result
    Proceed to
    No leaks are found and coolant level in the inverter reserve tank assembly is above the low line.
    A
    No leaks are found and coolant level in the inverter reserve tank assembly is below the low line.
    B
    HV coolant leaks are evident.
    C

    HINT:
    1. After repairing the coolant leaks and adding coolant, perform the "Activate the Water Pump" Active Test (HV Active Test item) and the "Control the Electric Cooling Fan" Active Test (Engine Active Test item) and make sure that there are no malfunctions.
    2. The inverter water pump assembly will not malfunction due to coolant leaks.


B
ADD HV COOLANT

C
INSPECT FOR HV COOLANT LEAK AND ADD HV COOLANT
A


2.CHECK COOLANT HOSE
  1. Check if the hoses of the cooling system are kinked or clogged.


NG
CORRECT THE PROBLEM
OK


3.CHECK INVERTER WATER PUMP ASSEMBLY

NOTICE:
Be sure to perform the inspection with the auxiliary battery voltage at 11 V or more.

HINT:
  1. When the auxiliary battery voltage is low, the inverter water pump assembly may not operate.
  2. When the inverter water pump assembly serial communication line (SWP - IWP) is open or its connection is faulty, the inverter water pump assembly is operated forcibly.

  1. Connect the Techstream to the DLC3.

  1. Turn the power switch on (IG).

  1. Enter the following menus: Powertrain / Hybrid Control / Data List.

  1. Select Inverter W/P Revolution in the Data List.

  1. Read the Data List.

    OK:
    Inverter W/P Revolution is 625 rpm or less.

  1. Turn the power switch off.


NG
Go to step 7
OK


4.CLEAR DTC
  1. Connect the Techstream to the DLC3.

  1. Turn the power switch on (IG).

  1. Enter the following menus: Powertrain / Hybrid Control / Trouble Codes.

  1. Read and record the DTCs and freeze frame data.

  1. Clear DTCs and freeze frame data.

  1. Turn the power switch off.


NEXT


5.PERFORM ACTIVE TEST USING TECHSTREAM (ACTIVATE THE WATER PUMP)

NOTICE:
Be sure to perform the inspection with the auxiliary battery voltage at 11 V or more.

HINT:
When the auxiliary battery voltage is low, the inverter water pump assembly may not operate.

  1. Connect the Techstream to the DLC3.

  1. Turn the power switch on (IG).

  1. Enter the following menus: Powertrain / Hybrid Control / Active Test / Activate the Water Pump.

  1. Select Inverter W/P Revolution in the Data List.

  1. While performing the "Activate the Water Pump" Active Test, check Inverter W/P Revolution in the Data List.

    Result:
    Data List Item
    Specified Condition
    Inverter W/P Revolution
    2250 to 5625 rpm

    HINT:
    Perform the Active Test with the inverter coolant temperature between 5 to 149°F (-15 and 65°C).

  1. Turn the power switch off.


NG
Go to step 7
OK


6.CHECK HV COOLANT (CHECK FOR CONDITIONS THAT MAY HAVE CAUSED FREEZING)
  1. Connect the Techstream to the DLC3.

  1. Turn the power switch on (IG).

  1. Read the freeze frame data Ambient Temperature using the Techstream.

  1. Check if the freeze frame data Ambient Temperature is below freezing.

    Result:
    Result
    Proceed to
    Ambient Temperature value is above freezing temperature of the HV coolant
    A
    Ambient Temperature value is below freezing temperature of the HV coolant
    B

    HINT:
    1. HV coolant (SLLC) with a 30% concentration freezes at 5°F (-15 °C) and HV coolant (SLLC) with a 50% concentration freezes at -31°F (-35°C).
    2. If the HV coolant freezes in the HV radiator or HV water pump, the coolant temperature in the inverter with converter assembly rises because the HV coolant cannot circulate. As a result, a DTC may be set.
    3. A DTC is set when the water pump impeller cannot rotate due to freezing of the HV coolant.
    4. If a DTC is set due to freezing of HV coolant, the problem cannot be reproduced. Judge whether freezing of HV coolant occurred according to the freeze point of the HV coolant, HV coolant change history and ambient temperature when the DTC was set.

  1. Turn the power switch off.


B
REPLACE HV COOLANT (Click here)
A

REPLACE INVERTER WATER PUMP ASSEMBLY (Click here)  

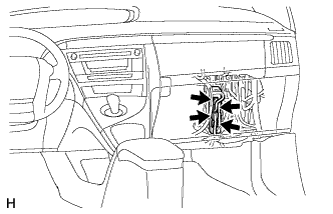
7.CHECK CONNECTOR CONNECTION CONDITION (POWER MANAGEMENT CONTROL ECU CONNECTOR)


    A216617
  1. Check the connections of the power management control ECU connectors.

    OK:
    The connectors are connected securely and there are no contact problems.


NG
CONNECT SECURELY
OK


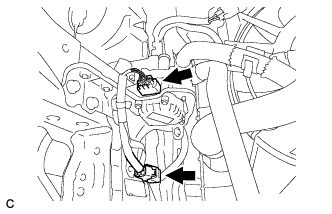
8.CHECK CONNECTOR CONNECTION CONDITION (INVERTER WATER PUMP ASSEMBLY CONNECTOR)


    A232962
  1. Check the connection of the inverter water pump assembly connector.

    OK:
    The connector is connected securely and there are no contact problems.


NG
CONNECT SECURELY
OK


9.CHECK HARNESS AND CONNECTOR (POWER MANAGEMENT CONTROL ECU - INVERTER WATER PUMP ASSEMBLY)
  1. Disconnect connector A21 from the power management control ECU.

  1. Disconnect connector g1 from the inverter water pump assembly.


  1. Measure the resistance according to the value(s) in the table below.
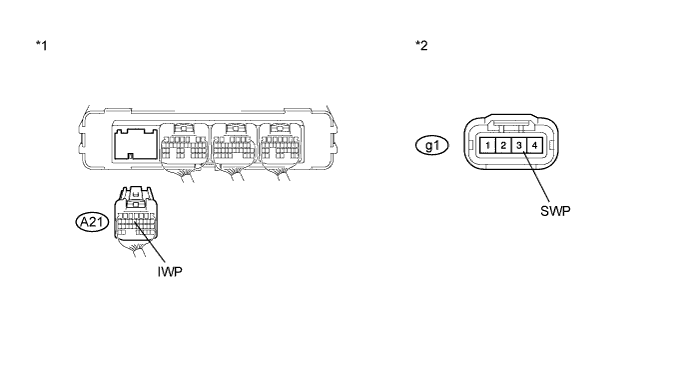

    A209031E06


    Text in Illustration 
    *1
    Rear view of wire harness connector
    (to Power Management Control ECU)
    *2
    Front view of wire harness connector
    (to Inverter Water Pump Assembly)

    Standard Resistance (Check for open):
    Tester Connection
    Switch Condition
    Specified Condition
    g1-3 (SWP) - A21-13 (IWP)
    Power switch off
    Below 1 Ω

    Standard Resistance (Check for short):
    Tester Connection
    Switch Condition
    Specified Condition
    g1-3 (SWP) or A21-13 (IWP) - Body ground and other terminals
    Power switch off
    10 kΩ or higher

  1. Connect the power management control ECU connector.

  1. Connect the inverter water pump assembly connector.


NG
REPAIR OR REPLACE HARNESS OR CONNECTOR
OK


10.READ VALUE USING TECHSTREAM (INVERTER W/P REVOLUTION)

NOTICE:
Be sure to perform the inspection with the auxiliary battery voltage at 11 V or more.

HINT:
When the auxiliary battery voltage is low, the inverter water pump assembly may not operate.

  1. Connect the Techstream to the DLC3.

  1. Disconnect connector g1 from the inverter water pump assembly.

  1. Turn the power switch on (IG).

  1. Enter the following menus: Powertrain / Hybrid Control / ECU Data List.

  1. Select Inverter W/P Revolution in the Data List.

  1. Read the Data List.

    OK:
    Inverter W/P Revolution is 125 rpm or less.

  1. Connect the inverter water pump assembly connector.

  1. Turn the power switch off.


NG
REPLACE POWER MANAGEMENT CONTROL ECU (Click here)
OK


11.CHECK HARNESS AND CONNECTOR (POWER MANAGEMENT CONTROL ECU - INVERTER WATER PUMP ASSEMBLY)
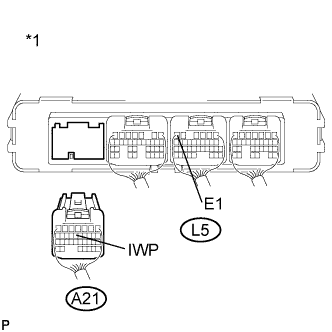
  1. Disconnect connector A21 from the power management control ECU.

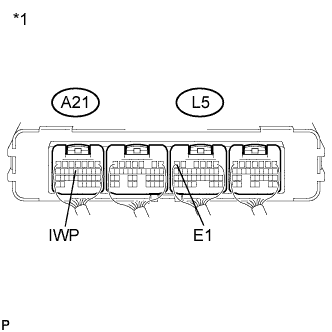
  1. Turn the power switch on (IG).


    A204443E50
  1. Measure the voltage according to the value(s) in the table below.

    Standard Voltage:
    Tester Connection
    Switch Condition
    Specified Condition
    A21-13 (IWP) - L5-6 (E1)
    Power switch on (IG)
    11 to 14 V

    Text in Illustration 
    *1
    Rear view of wire harness connector
    (to Power Management Control ECU)

    NOTICE:
    Turning the power switch on (IG) with the power management control ECU connector disconnected causes other DTCs to be stored. Clear the DTCs after performing this inspection.

  1. Turn the power switch off.

  1. Connect the power management control ECU connector.


NG
REPLACE INVERTER WATER PUMP ASSEMBLY (Click here)
OK


12.CHECK POWER MANAGEMENT CONTROL ECU
  1. Turn the power switch on (IG).


    A204441E37
  1. While turning the power switch on (IG), check the waveform between the power management control ECU terminals.
    Text in Illustration 
    *1
    Component with harness connected
    (Power Management Control ECU)

    OK:
    Waveform duty ratio is between 3% and 9%.

  1. Turn the power switch off.


NG
REPLACE POWER MANAGEMENT CONTROL ECU (Click here)
OK

REPLACE INVERTER WATER PUMP ASSEMBLY (Click here)