RADIO ANTENNA CORD > INSTALLATION |
| 1. INSTALL NO. 5 ANTENNA CORD SUB-ASSEMBLY (w/o Manual (SOS) Switch) |
Engage the 4 clamps.
Install the No. 5 antenna cord sub-assembly with the bolt.
Connect the connector.
| 2. INSTALL NO. 5 ANTENNA CORD SUB-ASSEMBLY (w/ Manual (SOS) Switch) |
Engage the 4 clamps.
Install the No. 5 antenna cord sub-assembly with the bolt.
Connect the 2 connectors.
| 3. INSTALL NO. 4 ANTENNA CORD SUB-ASSEMBLY |
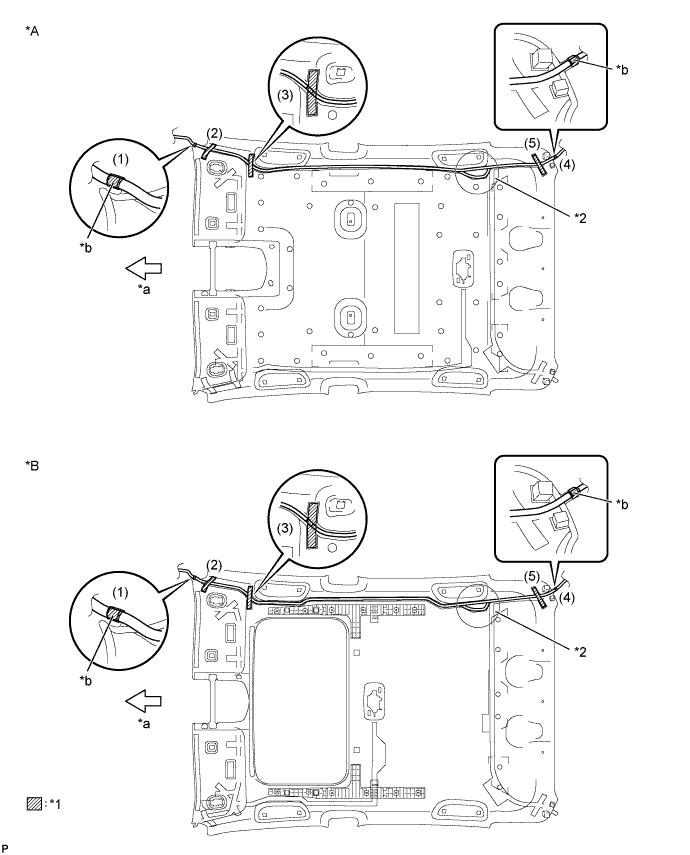
Peel off the release paper from one side of new double-sided tape and apply the new double-sided tape to the position indicated in the illustration. Be careful not to touch the adhesive surface.
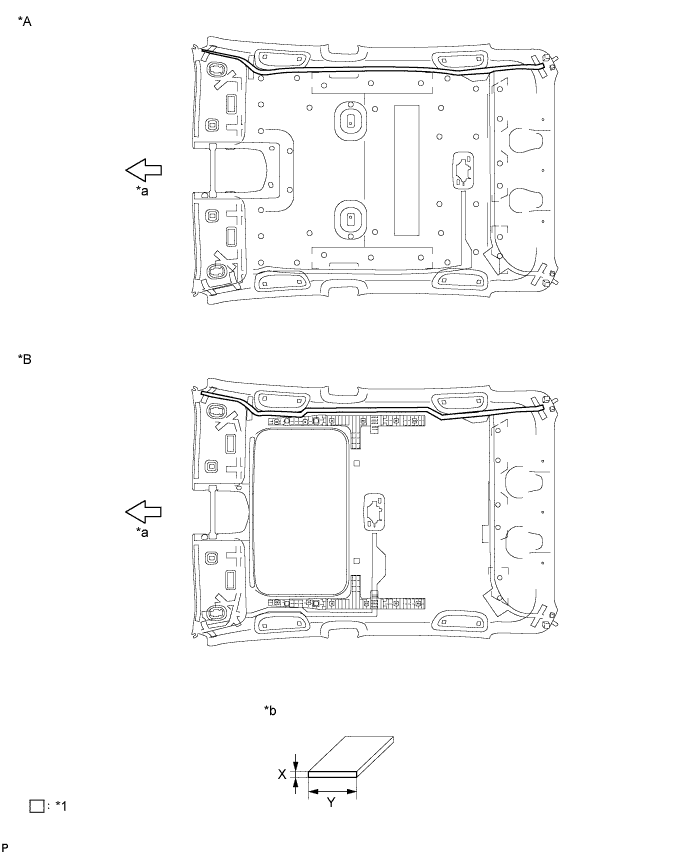
| *A | w/o Sliding Roof | *B | w/ Sliding Roof |
| *1 | Double-sided Tape | - | - |
| *a | Front | *b | Double-sided Tape Size |
| Area | Dimension |
| X | 1.0 mm (0.0394 in.) |
| Y | 10.0 mm (0.394 in.) |
Peel off the release paper from the double-sided tape. Be careful not to touch the adhesive surface.
Align the vehicle front side marking (pink) on the No. 4 antenna cord sub-assembly with the vehicle front side tab on the roof headlining, and wrap the tape over the antenna cord to install it. (1)

| *A | w/o Sliding Roof | *B | w/ Sliding Roof |
| *1 | Tape | *2 | Extra Cord Storage Area |
| *a | Front | *b | Pink |
Temporarily install the front part of the No. 4 antenna cord sub-assembly (2) with the adhesive tape.
Temporarily install the front part of the No. 4 antenna cord sub-assembly (3) with the adhesive tape.
Temporarily install the No. 4 antenna cord sub-assembly by placing it on the double-sided tape from the front of the vehicle to the point just before the extra cord storage area.
Align the vehicle rear marking (pink) on the No. 4 antenna cord sub-assembly with the tape attachment location (scribe line) of the roof headlining, and wrap the tape over the antenna cord to install it. (4)
Temporarily install the rear side of the No. 4 antenna cord sub-assembly (5) with the adhesive tape.
Temporarily install the No. 4 antenna cord sub-assembly by placing it on the double-sided tape from the rear of the vehicle to the point just before the extra cord storage area.
![]() |
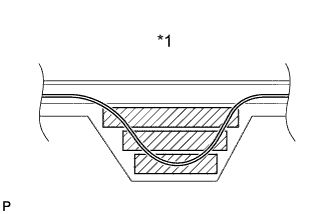
Using double-sided tape, place any excess No. 4 antenna cord sub-assembly in the extra cord storage area to finish installing the antenna cord.
| *1 | Extra Cord Storage Area |
| 4. INSTALL NO. 3 ROOF SILENCER PAD (w/o Sliding Roof) |
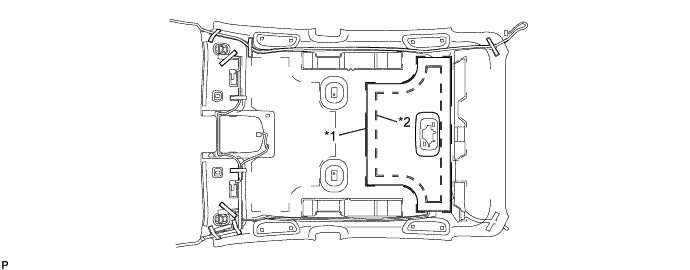
Align the markings on the roof headlining assembly with the No. 3 roof silencer pad and install the set plate using hot-melt glue as shown in the illustration.

| *1 | Roof Silencer Pad Marking | *2 | Hot-melt Glue Marking |
| 5. INSTALL NO. 2 ROOF SILENCER PAD (w/o Sliding Roof) |
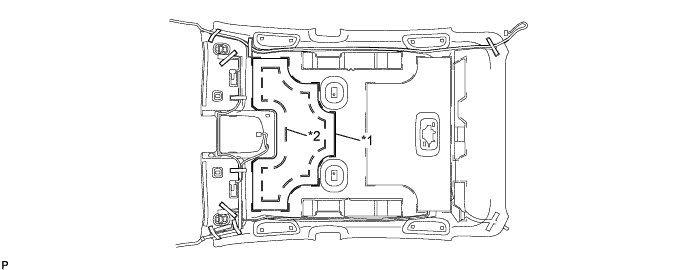
Align the markings on the roof headlining assembly with the No. 2 roof silencer pad and install the set plate using hot-melt glue as shown in the illustration.

| *1 | Roof Silencer Pad Marking | *2 | Hot-melt Glue Marking |
| 6. INSTALL ROOF HEADLINING ASSEMBLY |
| 7. INSTALL NO. 2 ANTENNA CORD SUB-ASSEMBLY (w/o Satellite Radio) |
for Plug Type Antenna Cord:
Engage the 4 clamps.
Install the No. 2 antenna cord sub-assembly with the bolt.
Connect the 2 connectors.
for Connector Type Antenna Cord:
Engage the 4 clamps.
Install the No. 2 antenna cord sub-assembly with the bolt.
Connect the connector.
| 8. INSTALL NO. 2 ANTENNA CORD SUB-ASSEMBLY (w/ Satellite Radio) |
w/o Manual (SOS) Switch:
Engage the 5 clamps.
Install the No. 2 antenna cord sub-assembly with the bolt.
Connect the 2 connectors.
w/ Manual (SOS) Switch:
Engage the 5 clamps.
Install the No. 2 antenna cord sub-assembly with the bolt.
Connect the 3 connectors.
| 9. INSTALL UPPER INSTRUMENT PANEL ASSEMBLY |