| B |  |
| GO TO ELECTRONICALLY CONTROLLED BRAKE SYSTEM (Click here) |
DTC C1A4B Stop Light Relay Circuit |
| DTC No. | DTC Detection Condition | Trouble Area |
| C1A4B | While the power switch is on (IG). When the brake booster with master cylinder (skid control ECU) detects a malfunction in the stop light control relay circuit, it sends a malfunction signal to the driving support ECU assembly via CAN communication and the driving support ECU assembly stores this DTC. |
|
| 1.CHECK FOR DTCs (ABS/VSC/TRAC) |
Connect the Techstream to the DLC3.
Turn the power switch on (IG).
Turn the Techstream on.
Enter the following menus: Chassis / ABS/VSC/TRAC / Trouble Codes.
Check for DTCs.
| Result | Proceed to |
| DTC is not output | A |
| DTC is output | B |
Turn the power switch off.
|
| ||||
| A | |
 |
| 2.CHECK STOP LIGHT OPERATION |
Check that the stop lights come on when the brake pedal is depressed, and go off when the brake pedal is released.
| Condition | Illumination Condition |
| Brake pedal depressed | ON |
| Brake pedal released | OFF |
|
| ||||
| OK | |
|
| 3.CHECK HARNESS AND CONNECTOR (STOP LIGHT CONTROL RELAY POWER SOURCE) |
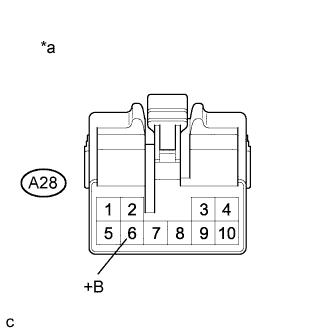 |
Disconnect the stop light control relay connector.
Measure the voltage according to the value(s) in the table below.
| Tester Connection | Condition | Specified Condition |
| A28-6 (+B) - Body ground | Always | 11 to 14 V |
| *a | Front view of wire harness connector (to Stop Light Control Relay) |
Reconnect the stop light control relay connector.
|
| ||||
| OK | |
|
| 4.CHECK HARNESS AND CONNECTOR (STOP LIGHT CONTROL RELAY - BODY GROUND) |
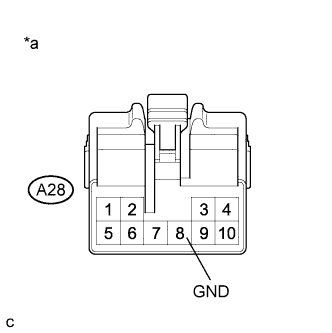 |
Disconnect the stop light control relay connector.
Measure the resistance according to the value(s) in the table below.
| Tester Connection | Condition | Specified Condition |
| A28-8 (GND) - Body ground | Always | Below 1 Ω |
| *a | Front view of wire harness connector (to Stop Light Control Relay) |
Reconnect the stop light control relay connector.
|
| ||||
| OK | |
|
| 5.CHECK HARNESS AND CONNECTOR (STOP LIGHT CONTROL RELAY - STOP LIGHT SWITCH ASSEMBLY) |
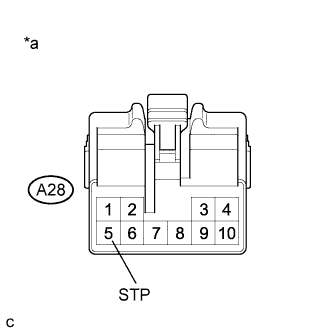 |
Turn the power switch off.
Disconnect the stop light control relay connector.
Measure the voltage according to the value(s) in the table below.
| Tester Connection | Switch Condition | Specified Condition |
| A28-5 (STP) - Body ground | Stop light switch ON (Brake pedal depressed) | 11 to 14 V |
| A28-5 (STP) - Body ground | Stop light switch OFF (Brake pedal released) | Below 2 V |
| *a | Front view of wire harness connector (to Stop Light Control Relay) |
Reconnect the stop light control relay connector.
|
| ||||
| OK | |
|
| 6.CHECK HARNESS AND CONNECTOR (STOP LIGHT SWITCH ASSEMBLY - SKID CONTROL ECU) |
Turn the power switch off.
Make sure that there is no looseness at the locking part and the connecting part of the connector.
Disconnect the brake booster with master cylinder (skid control ECU) connector.
Measure the voltage according to the value(s) in the table below.
| Tester Connection | Switch Condition | Specified Condition |
| A58-33 (STP) - Body ground | Stop light switch ON (Brake pedal depressed) | 11 to 14 V |
| A58-33 (STP) - Body ground | Stop light switch OFF (Brake pedal released) | Below 1.5 V |
| *a | Front view of wire harness connector (to Skid Control ECU) |
Reconnect the brake booster with master cylinder (skid control ECU) connector.
|
| ||||
| OK | |
|
| 7.PERFORM ACTIVE TEST USING TECHSTREAM (STOP LIGHT RELAY) |
Connect the Techstream to the DLC3.
Turn the power switch on (IG).
Turn the Techstream on.
Enter the following menus: Chassis / ABS/VSC/TRAC / Active Test.
Select the Active Test on the Techstream.
| Tester Display | Test Part | Control Range | Diagnostic Note |
| Stop Light Relay | Stop light control relay | Relay ON/OFF | Stop lights come on |
Select the Data List on the Techstream.
| Tester Display | Measurement Item/Range | Normal Condition | Diagnostic Note |
| Stop Light Relay Output | Stop light control relay output / ON or OFF | ON: Relay output on OFF: Relay output off | - |
Check stop light control relay operation and stop light operation on the Data List while performing the Active Test.
| Result | Proceed to |
| Data List content and stop light operation are abnormal or Data List content is normal but stop lights do not turn on or off. | A |
| Data List content and stop light operation are normal. | B |
Turn the power switch off.
|
| ||||
| A | |
|
| 8.CHECK HARNESS AND CONNECTOR (STOP LIGHT CONTROL RELAY - SKID CONTROL ECU) |
Disconnect the stop light control relay connector.
Disconnect the brake booster with master cylinder (skid control ECU) connectors.
Measure the resistance according to the value(s) in the table below.
| Tester Connection | Switch Condition | Specified Condition |
| A28-9 (ACC) - A58-3 (STP0) | Always | Below 1 Ω |
| Tester Connection | Switch Condition | Specified Condition |
| A28-9 (ACC) or A58-3 (STP0) - Body ground | Always | 10 kΩ or higher |
Reconnect the stop light control relay connector.
Reconnect the brake booster with master cylinder (skid control ECU) connectors.
|
| ||||
| OK | |
|
| 9.CHECK HARNESS AND CONNECTOR (STOP LIGHT CONTROL RELAY - SKID CONTROL ECU) |
Disconnect the stop light control relay connector.
Disconnect the brake booster with master cylinder (skid control ECU) connectors.
Measure the resistance according to the value(s) in the table below.
| Tester Connection | Switch Condition | Specified Condition |
| A28-1 (OUT) - A58-6 (STP2) | Always | Below 1 Ω |
Reconnect the stop light control relay connector.
Reconnect the brake booster with master cylinder (skid control ECU) connectors.
|
| ||||
| OK | |
|
| 10.INSPECT STOP LIGHT CONTROL RELAY |
Inspect the stop light control relay (Click here).
|
| ||||
| OK | |
|
| 11.CHECK HARNESS AND CONNECTOR (STOP LIGHT CONTROL RELAY - SKID CONTROL ECU) |
Turn the power switch off.
Disconnect the brake booster with master cylinder (skid control ECU) connectors.
Measure the voltage according to the value(s) in the table below.
| Tester Connection | Switch Condition | Specified Condition |
| A58-6 (STP2) - Body ground | Stop light switch ON (Brake pedal depressed) | 11 to 14 V |
| A58-6 (STP2) - Body ground | Stop light switch OFF (Brake pedal released) | Below 1.5 V |
| *a | Front view of wire harness connector (to Skid Control ECU) |
Reconnect the brake booster with master cylinder (skid control ECU) connectors.
|
| ||||
| OK | |
|
| 12.CHECK FOR DTCs (DTC C1A4B) |
Connect the Techstream to the DLC3.
Turn the power switch on (IG).
Clear the DTCs (Click here).
Turn the power switch on (IG).
Turn the Techstream on.
Enter the following menus: Chassis / ABS/VSC/TRAC / Active Test.
Select the Active Test on the Techstream.
| Tester Display | Test Part | Control Range | Diagnostic Note |
| Stop Light Relay | Stop light control relay | Relay ON/OFF | Stop lights come on |
Select the Data List on the Techstream.
| Tester Display | Measurement Item/Range | Normal Condition | Diagnostic Note |
| Stop Light Relay Output | Stop light control relay output / ON or OFF | ON: Relay output on OFF: Relay output off | - |
Check stop light control relay operation and stop light operation on the Data List while performing the Active Test.
Recheck for DTCs (Click here).
| Result | Proceed to |
| DTC is not output | A |
| DTC C104B is output | B |
|
| ||||
| A | ||
 | ||
| ||
