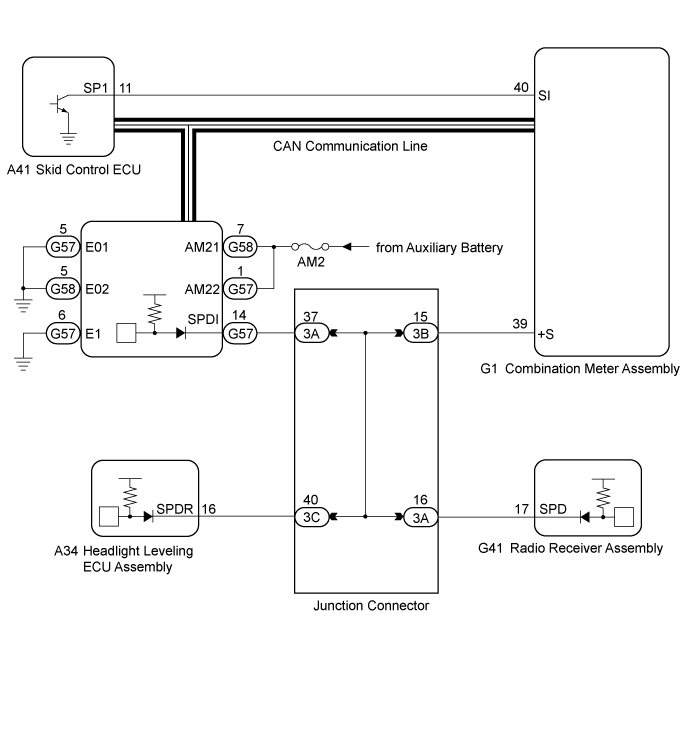
DTC B2282 Vehicle Speed Signal Malfunction |
DTC B2283 Vehicle Speed Sensor Malfunction |
| DTC Code | DTC Detection Condition | Trouble Area | DTC Output Confirmation Operation |
| B2282 | The vehicle speed signal sent by the combination meter assembly via direct line and the vehicle speed signal sent via CAN communication (1-trip detection logic*) do not match. |
| Drive the vehicle for 20 seconds at a vehicle speed of 25 km/h (16 mph) or more, and then drive the vehicle at a vehicle speed of less than 5 km/h (3 mph) for 20 seconds. |
| B2283 | Vehicle speed signal malfunction detection : Excessive deceleration is detected (1-trip detection logic*) |
| Drive the vehicle for 30 seconds or more at a vehicle speed of 50 km/h (31 mph) or more. |
| DTC Code | Vehicle Condition when Malfunction Detected | Fail-safe Function when Malfunction Detected |
| B2282 |
| - |
| B2283 |
| Steering lock operation is prohibited. |
| DTC | Data List Item | Active Test Item |
| B2282 B2283 | Power Source Control
Combination Meter
| - |
| 1.READ VALUE USING INTELLIGENT TESTER |
Connect the intelligent tester to the DLC3.
Turn the power switch on (IG).
Turn the intelligent tester on.
Enter the following menus: Body / Combination Meter / Data List.
Check the Data List for proper functioning of the vehicle speed signal.
| Tester Display | Measurement Item/Range | Normal Condition | Diagnostic Note |
| Vehicle Speed Meter | Vehicle speed/Min.: 0, Max.: 255 | Almost same as actual vehicle speed (Speedometer tester) | - |
|
| ||||
| OK | |
 |
| 2.READ VALUE USING INTELLIGENT TESTER |
Enter the following menus: Body / Power Source Control / Data List.
Read the Data List according to the display on the intelligent tester.
| Tester Display | Measurement Item/Range | Normal Condition | Diagnostic Note |
| Vehicle speed signal | Vehicle being driven or stopped/Stop or Run | Stop: Vehicle stopped Run: Vehicle being driven at 5 km/h (3 mph) or more | - |
|
| ||||
| OK | ||
 | ||
| ||
| 3.CHECK HARNESS AND CONNECTOR (POWER SOURCE) |
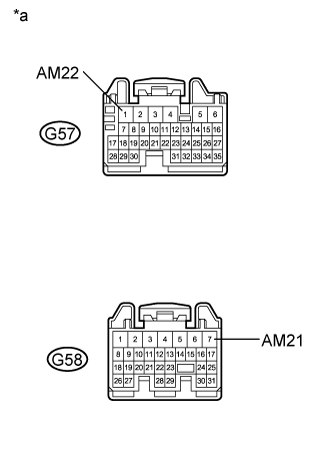 |
Disconnect the G57 and G58 connectors from the power management control ECU.
Measure the voltage according to the value(s) in the table below.
| Tester Connection | Condition | Specified Condition |
| G57-1 (AM22) - Body ground | Power switch off | 11 to 14 V |
| G58-7 (AM21) - Body ground | Power switch off | 11 to 14 V |
| *a | Front view of wire harness connector (to Power Management Control ECU) |
|
| ||||
| OK | |
|
| 4.CHECK HARNESS AND CONNECTOR (GROUND) |
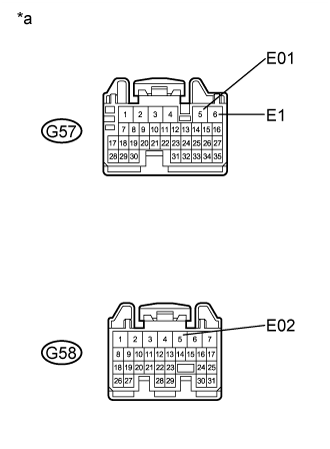 |
Measure the resistance according to the value(s) in the table below.
| Tester Connection | Condition | Specified Condition |
| G57-5 (E01) - Body ground | Always | Below 1 Ω |
| G57-6 (E1) - Body ground | Always | Below 1 Ω |
| G58-5 (E02) - Body ground | Always | Below 1 Ω |
| *a | Front view of wire harness connector (to Power Management Control ECU) |
|
| ||||
| OK | |
|
| 5.CHECK HARNESS AND CONNECTOR (POWER MANAGEMENT CONTROL ECU - COMBINATION METER ASSEMBLY) |
Disconnect the G57 connector from the power management control ECU.
Disconnect the G1 connector from the combination meter assembly.
Measure the resistance according to the value(s) in the table below.
| Tester Connection | Condition | Specified Condition |
| G57-14 (SPDI) - G1-39 (+S) | Always | Below 1 Ω |
| G57-14 (SPDI) or G1-39 (+S) - Body ground | Always | 10 kΩ or higher |
|
| ||||
| OK | |
|
| 6.CHECK POWER MANAGEMENT CONTROL ECU |
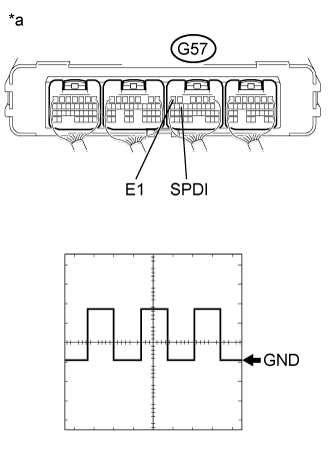 |
Reconnect the G57 power management control ECU connector.
Reconnect the G1 combination meter assembly connector.
Connect an oscilloscope to terminal G57-14 (SPDI) and G57-6 (E1).
Turn the power switch on (IG).
Check the signal waveform according to the condition(s) in the table below.
| Item | Condition |
| Tester Connection | G57-14 (SPDI) - G57-6 (E1) |
| Tool setting | 5 V/DIV., 20 ms./DIV. |
| Vehicle condition | Power switch on (IG), vehicle being driven at approx. 5 km/h (3 mph) |
| *a | Component with harness connected (Power Management Control ECU) |
|
| ||||
| OK | ||
| ||
| ||
| 7.CHECK HARNESS AND CONNECTOR (COMBINATION METER ASSEMBLY - JUNCTION CONNECTOR) |
Disconnect the 3B junction connector.
Measure the resistance according to the value(s) in the table below.
| Tester Connection | Condition | Specified Condition |
| G1-39 (+S) - 3B-15 | Always | Below 1 Ω |
| G1-39 (+S) or 3B-15 - Body ground | Always | 10 kΩ or higher |
|
| ||||
| OK | |
|
| 8.CHECK HARNESS AND CONNECTOR (POWER MANAGEMENT CONTROL ECU - JUNCTION CONNECTOR) |
Measure the resistance according to the value(s) in the table below.
| Tester Connection | Condition | Specified Condition |
| G57-14 (SPDI) - 3A-37 | Always | Below 1 Ω |
| G57-14 (SPDI) or 3A-37 - Body ground | Always | 10 kΩ or higher |
|
| ||||
| OK | ||
| ||
| ||

