Home › Drivetrain › DRIVE SHAFT / PROPELLER SHAFT › FRONT DRIVE SHAFT ASSEMBLY

FRONT DRIVE SHAFT ASSEMBLY > INSTALLATION

for Preparation Click here


HINT:
  1. Use the same procedure for the RH side and LH side.
  2. The procedure listed below is for the LH side.


1. INSTALL FRONT DRIVE SHAFT HOLE SNAP RING
  1. Install a new front drive shaft hole snap ring to the front drive inboard joint assembly.

    NOTICE:
    Face the end gap of the front drive inboard joint hole snap ring downward.


2. INSTALL FRONT DRIVE SHAFT ASSEMBLY
  1. Coat the lip of the hybrid vehicle transaxle assembly type T oil seal with MP grease.

  1. Coat the lip of the transaxle case oil seal with MP grease.


    C107969
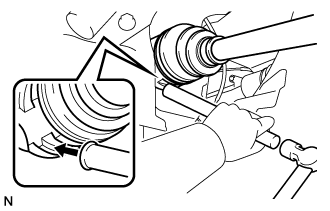
  1. Align the inboard joint splines, and using a brass bar and a hammer, install the front drive shaft assembly.

    NOTICE:
    1. Face the end gap of the front drive shaft hole snap ring downward.
    2. Do not damage the hybrid vehicle transaxle assembly type T oil seal.
    3. Do not damage the inboard joint boot.
    4. Make sure to center the front drive shaft assembly during installation to prevent damage to the front drive shaft hole snap ring.

    HINT:
    Confirm whether the drive shaft is securely driven in by checking the reaction force and sound.
  1. Align the matchmarks and install the front drive shaft assembly to the front axle hub sub-assembly.

    NOTICE:
    Be careful not to damage the front axle outboard joint boot.


3. CONNECT FRONT LOWER NO. 1 SUSPENSION ARM SUB-ASSEMBLY
  1. Install the front lower No. 1 suspension arm sub-assembly LH to the steering knuckle with a new nut.

    Torque:
    98 N*m{ 999 kgf*cm , 72 ft.*lbf }

    NOTICE:
    Prevent oil from adhering to the threaded and tapered parts.

  1. Install a new clip.

    NOTICE:
    Further tighten the nut up to 60° if the holes for the clip are not aligned.


4. INSTALL FRONT STABILIZER LINK ASSEMBLY
  1. Install the front stabilizer link assembly to the front shock absorber assembly with the nut.

    Torque:
    74 N*m{ 755 kgf*cm , 55 ft.*lbf }

    HINT:
    Use a hexagon socket wrench to hold the stud.


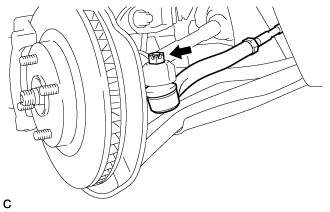
5. INSTALL TIE ROD END SUB-ASSEMBLY


    C249933
  1. Connect the tie rod end sub-assembly LH to the steering knuckle with a new nut.

    Torque:
    49 N*m{ 500 kgf*cm , 36 ft.*lbf }

    NOTICE:
    Further tighten the nut up to 60° if the holes for the cotter pin are not aligned.

  1. Install a new cotter pin.


6. INSTALL FRONT SPEED SENSOR
  1. Install the front speed sensor wire and front flexible hose to the front shock absorber assembly with the bolt.

    Torque:
    29 N*m{ 300 kgf*cm , 22 ft.*lbf }

    NOTICE:
    Do not twist the front speed sensor and front flexible hose when installing it.

  1. Install the front speed sensor to the steering knuckle with the bolt.

    Torque:
    8.5 N*m{ 87 kgf*cm , 75 in.*lbf }

    NOTICE:
    Do not twist the front speed sensor when installing it.


7. INSTALL FRONT AXLE SHAFT NUT
  1. Clean the threaded parts on the front drive shaft assembly and a new front axle shaft nut using a non-residue solvent.

    HINT:
    1. Be sure to perform this work even when using a new drive shaft.
    2. Keep the threaded parts free of oil and foreign matter.


    C235879
  1. Using a socket wrench (30 mm), install the axle shaft nut.

    Torque:
    216 N*m{ 2203 kgf*cm , 159 ft.*lbf }

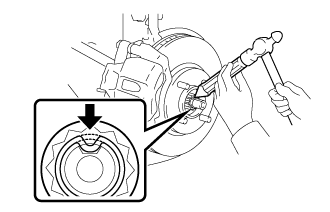
  1. Using a chisel and hammer, stake the front axle shaft nut.


8. ADD HYBRID TRANSAXLE FLUID


    C249713E01
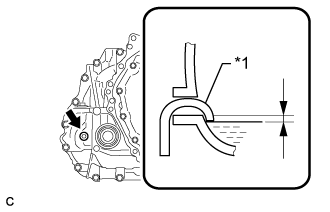
  1. Add transaxle fluid until the fluid level is between 0 to 8 mm (0 to 0.315 in.) from the bottom lip of the filler plug opening.
    Text in Illustration 
    *1
    Filler Nozzle

    NOTICE:
    1. Stop the vehicle on a level surface.
    2. Use Toyota Genuine ATF WS.
    3. Be sure to fully insert the filler nozzle into the filler plug opening.
    4. Be sure to add fluid slowly. If fluid is added quickly, the fluid may hit internal parts and bounce back, resulting in fluid coming out of the filler plug opening.
    5. Be sure to directly check that the transaxle fluid level is within the specified range.
    6. Insufficient or excessive amounts of transaxle fluid may damage the hybrid transaxle.

    Reference:
    3.3 liters (3.5 US qts, 2.9 Imp. qts)

  1. After adding fluid, leave it for 30 seconds so that the fluid surface can become still again, and then check that the fluid level is between 0 to 8 mm (0 to 0.315 in.) from the bottom lip of the filler plug opening. (If the fluid level is too low, return to the Add Hybrid Transaxle Fluid procedure.)

    NOTICE:
    After adding fluid, make sure to check the fluid level.

  1. Using a 10 mm hexagon socket wrench, temporarily install the filler plug and gasket.

    HINT:
    Because the filler plug will be removed again, the gasket can be reused at this time.


9. INSPECT HYBRID TRANSAXLE FLUID


    C249714
  1. Using a 10 mm hexagon socket wrench, remove the filler plug and gasket.

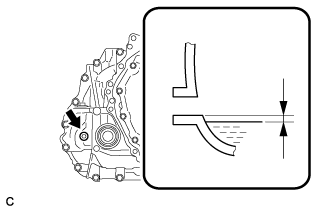
  1. Check that the fluid level is between 0 to 8 mm (0 to 0.315 in.) from the bottom lip of the filler plug opening. (If the fluid level is too low, return to the Add Hybrid Transaxle Fluid procedure.)

    NOTICE:
    1. Stop the vehicle on a level surface.
    2. Be sure to directly check that the transaxle fluid level is within the specified range.
    3. Insufficient or excessive amounts of transaxle fluid may damage the hybrid transaxle.
    4. If the fluid was replaced or fluid was added, make sure to recheck the fluid level after driving the vehicle.

  1. Check for leaks if the quantity of transaxle fluid is low. (If there are no fluid leaks but the amount of the fluid is insufficient, add fluid .

  1. Using a 10 mm hexagon socket wrench, install the filler plug with a new gasket.

    Torque:
    50 N*m{ 510 kgf*cm , 37 ft.*lbf }


10. INSTALL FRONT WHEELS

Torque:
103 N*m{ 1050 kgf*cm , 76 ft.*lbf }


11. INSPECT AND ADJUST FRONT WHEEL ALIGNMENT
(Click here)


12. INSTALL ENGINE UNDER COVER LH


13. INSTALL ENGINE UNDER COVER RH


14. CHECK FOR SPEED SENSOR SIGNAL
(Click here)