Home › Vehicle Interior › SEAT BELT › REAR SEAT OUTER BELT ASSEMBLY

REAR SEAT OUTER BELT ASSEMBLY > INSTALLATION

for Preparation Click here


1. INSPECT REAR SEAT 3 POINT TYPE OUTER BELT ASSEMBLY


    B108365E02
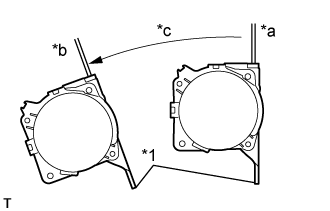
  1. Before installing the rear seat 3 point outer belt assembly, check the ELR function.

    NOTICE:
    Do not disassemble the retractor.


    1. When the inclination of the retractor is 15° or less, check that the belt can be pulled from the retractor. When the inclination of the retractor is over 45°, check that the belt locks.
      Text in Illustration 
      *1
      Retractor
      *a
      Unlocked
      *b
      Locked
      *c
      45°
      If the result is not as specified, replace the rear seat 3 point outer belt assembly.


2. INSTALL REAR SEAT 3 POINT TYPE OUTER BELT ASSEMBLY
  1. Engage the 2 guides to install the rear seat 3 point type outer belt assembly.

  1. Install the bolt.

    Torque:
    42 N*m{ 428 kgf*cm , 31 ft.*lbf }

  1. Connect the shoulder anchor of the front seat outer belt assembly with the bolt.

    Torque:
    42 N*m{ 428 kgf*cm , 31 ft.*lbf }


3. INSTALL ROOF SIDE INNER GARNISH LH (for LH Side)
  1. Pass the floor anchor of the rear seat 3 point type outer belt assembly LH through the roof side inner garnish LH.

  1. Engage the 5 clips to install the roof side inner garnish LH.


4. INSTALL ROOF SIDE INNER GARNISH RH (for RH Side)
  1. Pass the floor anchor of the rear seat 3 point type outer belt assembly RH through the roof side inner garnish RH.

  1. Engage the 5 clips to install the roof side inner garnish RH.


    B297734
  1. Engage the guide and 4 claws to connect the belt guide.


5. CONNECT REAR CENTER SEAT LAP TYPE BELT ASSEMBLY (for RH Side)
  1. Install the shoulder anchor of the rear center seat lap type belt assembly with the bolt.

    Torque:
    42 N*m{ 428 kgf*cm , 30 ft.*lbf }


    B300538
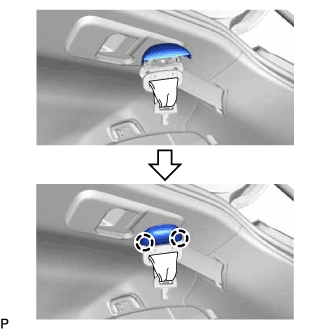
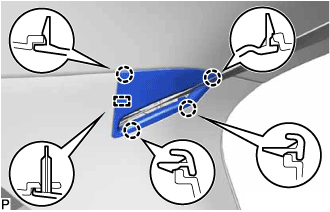
  1. Engage the 2 claws to close the cover as shown in the illustration.


6. INSTALL DECK TRIM SIDE PANEL ASSEMBLY


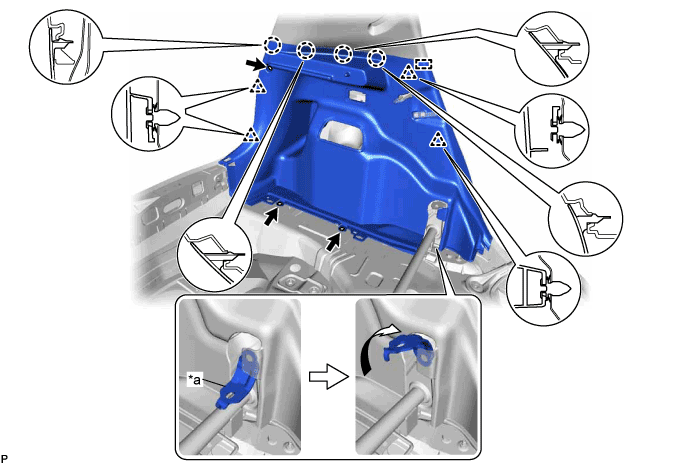
  1. Engage the guide, 4 claws and 4 clips.


    B300800E02


    Text in Illustration 
    *a
    Rear Seatback Hinge
    -
    -

  1. Install the deck trim side panel assembly LH with the bolt and 2 screws.

  1. Turn the rear seatback hinge as shown in the illustration.


7. INSTALL NO. 1 LUGGAGE COMPARTMENT LIGHT ASSEMBLY (for LH Side)
  1. Connect the connector.


    E288706
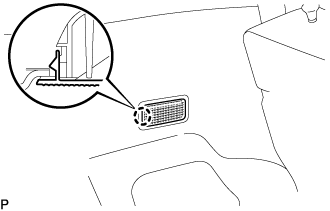
  1. Engage the claw to install the No. 1 luggage compartment light assembly.


8. INSTALL REAR ABSORBER CAP
  1. Engage the 2 guides and 2 claws to install the rear absorber cap LH.


9. CONNECT REAR SEAT 3 POINT TYPE OUTER BELT ASSEMBLY
  1. Engage the 2 claws.

  1. Install the floor anchor of the rear seat 3 point type outer belt assembly with the bolt.

    Torque:
    42 N*m{ 428 kgf*cm , 31 ft.*lbf }


10. INSTALL REAR DECK TRIM COVER
  1. Engage the 2 guides and 4 claws.

  1. Install the rear deck trim cover with the 2 clips.


11. INSTALL PACKAGE TRAY TRIM PANEL ASSEMBLY
  1. Install the package tray trim panel assembly.


12. INSTALL DECK FLOOR BOX RH

HINT:
Use the same procedure as for the LH side.


13. INSTALL DECK FLOOR BOX LH
  1. Install the deck floor box LH.


14. INSTALL DECK BOARD ASSEMBLY
  1. Install the deck board assembly.


15. INSTALL REAR DOOR OPENING TRIM WEATHERSTRIP
for LH Side:
for RH Side:


16. INSTALL REAR DOOR SCUFF PLATE
  1. Engage the guide and the 5 claws to install the rear door scuff plate.


17. INSTALL REAR SEAT ASSEMBLY (for Separate Type Seatback)
(Click here)


18. INSTALL REAR SEAT ASSEMBLY (for Bench Type Seatback)
(Click here)