Home › Drivetrain › AXLE AND DIFFERENTIAL › FRONT AXLE HUB

FRONT AXLE HUB > INSTALLATION

for Preparation Click here


HINT:
  1. Use the same procedure for the RH side and LH side.
  2. The procedure listed below is for the LH side.


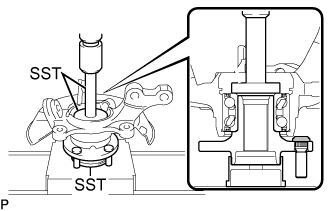
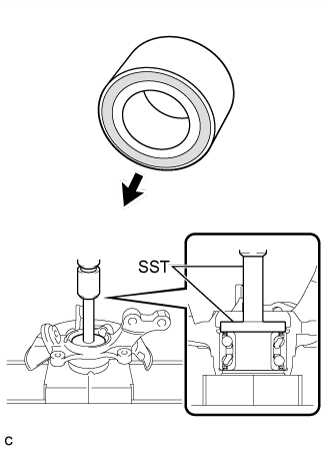
1. INSTALL FRONT AXLE HUB BEARING


    C249888E01
  1. Using SST and a press, insert a new front axle hub bearing, with its magnetic rotor side facing the inside of the vehicle, until it reaches the end of the steering knuckle.

    SST
    09950-60020   (09951-00720)
    09950-70010   (09951-07100)
    Text in Illustration 
    V100135
    Inside of the Vehicle
    V100145
    Magnetic Rotor Side

    NOTICE:
    1. Do not remove the inner race because the hub bearing is built into the oil seal.
    2. Do not use bearings that have been removed.
    3. Do not wipe off any grease that has been applied to new bearings.
    4. Do not bring magnets close to the magnetic rotor surface of the bearing.
    5. Keep the magnetic rotor surface of the bearing free of foreign matter.


2. INSTALL FRONT AXLE HUB SUB-ASSEMBLY


    C107983E01
  1. Using SST and a press, press the axle hub into the steering knuckle.

    SST
    09608-32010  
    09950-60010   (09951-00530)
    09950-70010   (09951-07100)


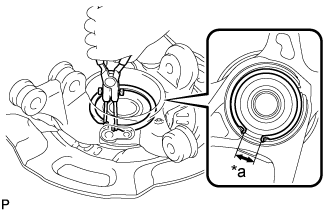
3. INSTALL FRONT AXLE HUB HOLE SNAP RING


    C202605E03
  1. Using snap ring pliers, install a new front axle hub hole snap ring, as shown in the illustration.
    Text in Illustration 
    *a
    Speed Sensor Installation Gap

    NOTICE:
    1. Do not overlap the end of the snap ring and the installation hole in the front speed sensor on the steering knuckle side.
    2. Do not damage the magnetic rotor surface of the bearing when installing the snap ring.


4. INSTALL FRONT AXLE ASSEMBLY
  1. Install the front axle assembly to the front shock absorber assembly with the 2 bolts and 2 nuts.

    Torque:
    164 N*m{ 1672 kgf*cm , 121 ft.*lbf }

    NOTICE:
    When installing the nuts, keep the bolts from rotating.

    HINT:
    The bolt can be inserted in either direction, however, make sure that they are installed in the same direction.


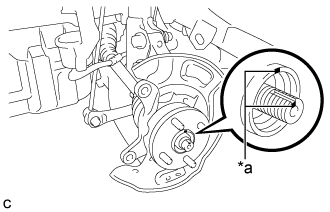
5. INSTALL FRONT DRIVE SHAFT ASSEMBLY


    C249882E01
  1. Align the matchmarks on the front drive shaft assembly and front axle hub sub-assembly, and install the front drive shaft assembly to the front axle hub sub-assembly.
    Text in Illustration 
    *a
    Matchmark

    NOTICE:
    Be careful not to damage the drive shaft boot or speed sensor rotor.


6. CONNECT FRONT LOWER NO. 1 SUSPENSION ARM SUB-ASSEMBLY
  1. Install the front lower No. 1 suspension arm sub-assembly LH to the steering knuckle with a new nut.

    Torque:
    98 N*m{ 999 kgf*cm , 72 ft.*lbf }

    NOTICE:
    Prevent oil from adhering to the threaded and tapered parts.

  1. Install a new clip.

    NOTICE:
    Further tighten the nut up to 60° if the holes for the clip are not aligned.


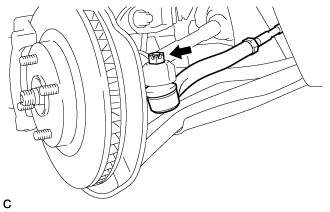
7. CONNECT TIE ROD END SUB-ASSEMBLY


    C249933
  1. Connect the tie rod end sub-assembly LH to the steering knuckle with a new nut.

    Torque:
    49 N*m{ 500 kgf*cm , 36 ft.*lbf }

    NOTICE:
    Further tighten the nut up to 60° if the holes for the cotter pin are not aligned.

  1. Install a new cotter pin.


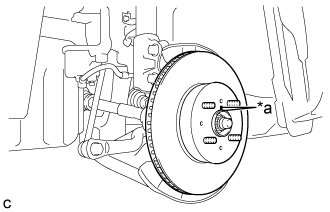
8. INSTALL FRONT DISC


    C249590E01
  1. Align the matchmarks of the disc and axle hub, and install the front disc.
    Text in Illustration 
    *a
    Matchmark

    NOTICE:
    When replacing the disc with a new one, select the installation position where the front disc has minimal runout.


9. INSTALL FRONT DISC BRAKE CALIPER ASSEMBLY
  1. Install the front disc brake caliper assembly to the steering knuckle with the 2 bolts.

    Torque:
    107 N*m{ 1089 kgf*cm , 79 ft.*lbf }

    NOTICE:
    Do not twist the front flexible hose when installing the front disc brake caliper assembly.


10. TEMPORARILY INSTALL FRONT AXLE SHAFT NUT
  1. Clean the threaded parts on the front drive shaft assembly and a new front axle shaft nut using a non-residue solvent.

    NOTICE:
    1. Be sure to perform this work even when using a new drive shaft.
    2. Keep the threaded parts free of oil and foreign matter.

  1. Using a socket wrench (30 mm), while applying the brakes, temporarily install the front axle shaft nut.

    Torque:
    216 N*m{ 2203 kgf*cm , 159 ft.*lbf }

    NOTICE:
    Stake the front axle shaft nut after inspecting for looseness and runout in the following steps.

    HINT:
    Keep depressing the brake pedal to prevent the drive shaft from rotating.


11. SEPARATE FRONT DISC BRAKE CALIPER ASSEMBLY
  1. Remove the 2 bolts and separate the front disc brake caliper assembly from the steering knuckle.

    NOTICE:
    Use wire or an equivalent tool to keep the front disc brake caliper assembly from hanging down by the front flexible hose.


12. REMOVE FRONT DISC


    C249590E01
  1. Remove the front disc.
    Text in Illustration 
    *a
    Matchmark

    HINT:
    Put matchmarks on the disc and the axle hub.


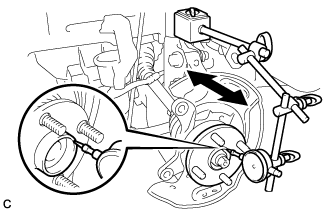
13. INSPECT FRONT AXLE HUB BEARING LOOSENESS


    C249874
  1. Using a dial indicator, check for looseness near the center of the front axle hub sub-assembly.

    Maximum looseness:
    0.05 mm (0.00196 in.)

    NOTICE:
    1. Ensure that the dial indicator is set perpendicular to the measurement surface.
    2. Keep the magnet of the dial indicator away from the front speed sensor.

    If the looseness exceeds the maximum, replace the front axle hub bearing.


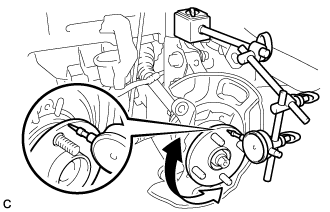
14. INSPECT FRONT AXLE HUB RUNOUT


    C249875
  1. Using a dial indicator, check for runout on the surface of the front axle hub sub-assembly outside the front axle hub bolts.

    Maximum runout:
    0.05 mm (0.00196 in.)

    NOTICE:
    1. Ensure that the dial indicator is set perpendicular to the measurement surface.
    2. Make sure to set the tip of the dial indicator towards the outside of the front axle hub bolts.
    3. Keep the magnet of the dial indicator away from the front speed sensor.

    If the runout exceeds the maximum, replace the front axle hub sub-assembly and front axle hub bearing.


15. INSTALL FRONT DISC


    C249590E01
  1. Align the matchmarks of the disc and axle hub, and install the front disc.
    Text in Illustration 
    *a
    Matchmark

    NOTICE:
    When replacing the disc with a new one, select the installation position where the front disc has minimal runout.


16. INSTALL FRONT DISC BRAKE CALIPER ASSEMBLY
  1. Install the front disc brake caliper assembly to the steering knuckle with the 2 bolts.

    Torque:
    107 N*m{ 1089 kgf*cm , 79 ft.*lbf }

    NOTICE:
    Do not twist the front flexible hose when installing the front disc brake caliper assembly.


17. INSTALL FRONT SPEED SENSOR
  1. Install the front speed sensor wire and front flexible hose to the front shock absorber assembly with the bolt.

    Torque:
    29 N*m{ 300 kgf*cm , 22 ft.*lbf }

    NOTICE:
    Do not twist the front speed sensor and front flexible hose when installing it.

  1. Install the front speed sensor to the steering knuckle with the bolt.

    Torque:
    8.5 N*m{ 87 kgf*cm , 75 in.*lbf }

    NOTICE:
    Do not twist the front speed sensor when installing it.


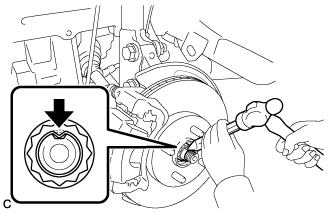
18. INSTALL FRONT AXLE SHAFT NUT


    C249883
  1. Using a chisel and hammer, stake the front axle shaft nut.


19. INSTALL FRONT WHEEL

Torque:
103 N*m{ 1050 kgf*cm , 76 ft.*lbf }


20. CONNECT CABLE TO NEGATIVE AUXILIARY BATTERY TERMINAL
  1. Connect the cable to the negative (-) auxiliary battery terminal .

  1. Connect the reservoir level switch connector.

  1. Clear the DTCs (Click here).


21. INSPECT AND ADJUST FRONT WHEEL ALIGNMENT
(Click here)


22. CHECK FOR SPEED SENSOR SIGNAL
(Click here)