HEATING / AIR CONDITIONING AIR CONDITIONING SYSTEM B1423/23 Pressure Sensor Circuit
DESCRIPTION
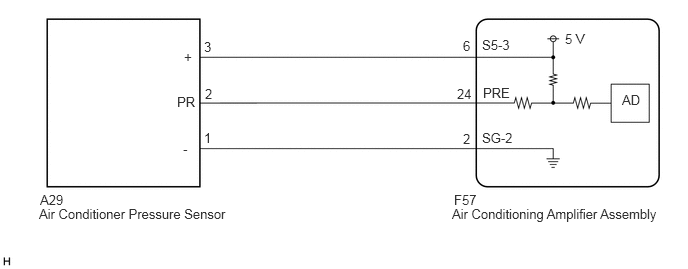
This DTC is stored if refrigerant pressure on the high pressure side is extremely low (176 kPa (1.8 kgf/cm2, 26 psi) or less) or extremely high (3025 kPa (30.8 kgf/cm2, 439 psi) or more). The air conditioner pressure sensor, which is installed to the high pressure side pipe to detect refrigerant pressure, sends a refrigerant pressure signal to the air conditioning amplifier assembly. The air conditioning amplifier assembly converts this signal to a pressure value according to the sensor characteristics and uses it to control the compressor.
| DTC No. | Detection Item | DTC Detection Condition | Trouble Area | Memory |
|---|---|---|---|---|
| B1423/23 | Pressure Sensor Circuit | ·
Open or short in air conditioner pressure sensor circuit ·
Refrigerant pressure on high pressure side is extremely low (176 kPa (1.8 kgf/cm2, 26 psi) or less) or extremely high (3025 kPa (30.8 kgf/cm2, 439 psi) or more) |
·
Air conditioner pressure sensor ·
Harness or connector between air conditioner pressure sensor and air conditioning amplifier assembly ·
Air conditioning amplifier assembly ·
Cooler expansion valve (blocked, stuck) ·
Cooler condenser assembly (blocked, deterioration of cooling capacity due to dirt) ·
Cooler dryer (moisture in the refrigerant cycle cannot be absorbed) ·
Cooling fan system (cooler condenser assembly cannot be cooled down) ·
Air conditioning system (leaks, blocked) |
- |
WIRING DIAGRAM
CAUTION / NOTICE / HINT
- HINT:
-
If DTC B1423/23 and B14B8 are output at the same time, troubleshoot for DTC B14B8 first.
-
Click hereVehicle Interior>HEATING / AIR CONDITIONING>AIR CONDITIONING SYSTEM>B14B8
PROCEDURE
Check for DTCs.
Click hereVehicle Interior>HEATING / AIR CONDITIONING>AIR CONDITIONING SYSTEM>DTC CHECK / CLEAR
- Body Electrical > Air Conditioner > Trouble Codes
- 50001 121
- Result:
Result Proceed to DTC B14B8 is output A DTC B14B8 is not output B
A
B
Prepare the vehicle according to the table below.
| Item | Condition |
|---|---|
| A/C switch | On |
| Ambient temperature* | 0 to 49°C (32 to 120°F) |
| Blower speed | HI |
*: If the ambient temperature is not within the range shown, do not perform this check.
Connect the GTS to the DLC3.
Turn the power switch on (READY).
Turn the GTS on.
Enter the following menus: Body Electrical / Air Conditioner / Utility / Refrigerant Gas Volume Check.
- Body Electrical > Air Conditioner > Utility
-
Tester Display Refrigerant Gas Volume Check - 50005 121 3186
- Result:
Result Amount of Refrigerant Refrigerant shortage Insufficient or leakage Refrigerant correct Correct
- Result:
Result Proceed to Insufficient or leakage A Correct B
A
B
Identify the area where refrigerant leaks from.
for HFC-134a (R134a): Click hereVehicle Interior>HEATING / AIR CONDITIONING>REFRIGERANT(for HFC-134a(R134a))>REPLACEMENT
for HFO-1234yf (R1234yf): Click hereVehicle Interior>HEATING / AIR CONDITIONING>REFRIGERANT(for HFO-1234yf(R1234yf))>REPLACEMENT
Repair the identified area of the air conditioning system.
Evacuate the air conditioning system.
- Result:
Proceed to NEXT
NEXT
for HFC-134a (R134a): Click hereVehicle Interior>HEATING / AIR CONDITIONING>REFRIGERANT(for HFC-134a(R134a))>REPLACEMENT
for HFO-1234yf (R1234yf): Click hereVehicle Interior>HEATING / AIR CONDITIONING>REFRIGERANT(for HFO-1234yf(R1234yf))>REPLACEMENT
Connect the GTS to the DLC3.
Turn the power switch on (IG).
Turn the GTS on.
Enter the following menus: Body Electrical / Air Conditioner / Data List.
Read the Data List according to the display on the GTS.
- Body Electrical > Air Conditioner > Data List
-
Tester Display Measurement Item Range Normal Condition Diagnostic Note Regulator Pressure Sensor Air conditioner pressure sensor Min.: -456.6 kPaG
Max.: 3294.3 kPaGActual refrigerant pressure displayed -
- Body Electrical > Air Conditioner > Data List
-
Tester Display Regulator Pressure Sensor - 50003 121 52
Install a manifold gauge set.
for HFC-134a (R134a): Click hereVehicle Interior>HEATING / AIR CONDITIONING>REFRIGERANT(for HFC-134a(R134a))>ON-VEHICLE INSPECTION
for HFO-1234yf (R1234yf): Click hereVehicle Interior>HEATING / AIR CONDITIONING>REFRIGERANT(for HFO-1234yf(R1234yf))>ON-VEHICLE INSPECTION
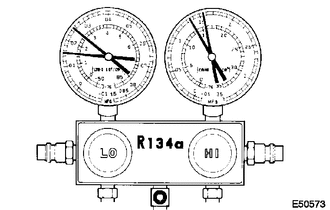
Read the manifold gauge pressure when the following conditions are met.
Prepare the vehicle according to the table below.
| Item | Condition |
|---|---|
| Vehicle doors | Fully open |
| Temperature setting | MAX COLD |
| Blower speed | HI |
| A/C switch | On |
| Recirculation/fresh switch | RECIRCULATION |
| Interior temperature | 25 to 35°C (77 to 95°F) |
- Standard Pressure:
- Low pressure side:
150 to 250 kPa (1.5 to 2.5 kgf/cm2, 22 to 36 psi)
- High pressure side:
1370 to 1570 kPa (14 to 16 kgf/cm2, 199 to 228 psi)
Compare the values displayed in the Data List and on the manifold gauge.
- OK:
The values displayed in the Data List and on the manifold gauge match.
- Result:
Proceed to OK NG
OK
for HFC-134a (R134a): Click hereVehicle Interior>HEATING / AIR CONDITIONING>REFRIGERANT(for HFC-134a(R134a))>ON-VEHICLE INSPECTION
for HFO-1234yf (R1234yf): Click hereVehicle Interior>HEATING / AIR CONDITIONING>REFRIGERANT(for HFO-1234yf(R1234yf))>ON-VEHICLE INSPECTION
NG
Disconnect the A29 air conditioner pressure sensor connector.
Measure the voltage according to the value(s) in the table below.
- Standard Voltage:
Tester Connection Condition Specified Condition A29-3 (+) - A29-1 (-) Power switch on (IG) 4.75 to 5.25 V
- Result:
Proceed to OK NG
OK
NG
Measure the resistance according to the value(s) in the table below.
- Standard Resistance:
Tester Connection Condition Specified Condition A29-1 (-) - Body ground Always Below 1 Ω
- Result:
Proceed to OK NG
OK
NG
Disconnect the F57 air conditioning amplifier assembly connector.
Measure the resistance according to the value(s) in the table below.
- Standard Resistance:
Tester Connection Condition Specified Condition A29-2 (PR) - F57-24 (PRE) Always Below 1 Ω A29-2 (PR) or F57-24 (PRE) - Body ground Always 10 kΩ or higher
- Result:
Proceed to OK NG
OK
NG
Measure the voltage when the following conditions are met.
| Item | Condition |
|---|---|
| Vehicle doors | Fully open |
| Temperature setting | MAX COLD |
| Blower speed | HI |
| A/C switch | On |
| Recirculation/fresh switch | RECIRCULATION |
| Interior temperature | 25 to 35°C (77 to 95°F) |
- NOTICE:
- ·
If refrigerant pressure on the high pressure side becomes extremely high during the inspection (if the voltage exceeds 4.61 V), the fail-safe function stops compressor operation. Therefore, measure the voltage before the fail-safe operation.
·It is necessary to measure the voltage for a certain amount of time (approximately 10 minutes) because the malfunction may recur after a while.
- HINT:
-
When the outside air temperature is low (below -1.5°C (29.3°F)), the compressor stops due to operation of the thermistor assembly and the No. 1 cooler thermistor to prevent the evaporator from freezing. In this case, perform the inspection in a warm indoor environment.
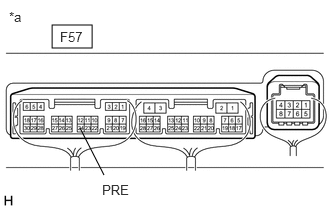
| *a | Component with harness connected
(Air Conditioning Amplifier Assembly) |
Measure the voltage according to the value(s) in the table below.
- Standard Voltage:
Tester Connection Condition Specified Condition F57-24 (PRE) - Body ground Power switch on (IG)
(A/C switch: On)0.74 to 4.61 V
Connect the GTS to the DLC3.
Turn the power switch on (IG).
Turn the GTS on.
Enter the following menus: Body Electrical / Air Conditioner / Data List.
Read the Data List according to the display on the GTS.
- Body Electrical > Air Conditioner > Data List
-
Tester Display Measurement Item Range Normal Condition Diagnostic Note Regulator Pressure Sensor Air conditioner pressure sensor Min.: -456.6 kPaG
Max.: 3294.3 kPaGActual refrigerant pressure displayed -
- Body Electrical > Air Conditioner > Data List
-
Tester Display Regulator Pressure Sensor - 50003 121 52
- OK:
The voltage and value displayed in the Data List change.
- Result:
Result Proceed to OK A NG (The voltage changes but the value displayed in the Data List does not change.) NG (The voltage does not change.) B
A
B
Disconnect the F57 air conditioning amplifier assembly connector.
Measure the resistance according to the value(s) in the table below.
- Standard Resistance:
Tester Connection Condition Specified Condition A29-1 (-) - F57-2 (SG-2) Always Below 1 Ω A29-1 (-) or F57-2 (SG-2) - Body ground Always 10 kΩ or higher
- Result:
Proceed to OK NG
OK
NG
Disconnect the F57 air conditioning amplifier assembly connector.
Measure the resistance according to the value(s) in the table below.
- Standard Resistance:
Tester Connection Condition Specified Condition A29-3 (+) - F57-6 (S5-3) Always Below 1 Ω A29-3 (+) or F57-6 (S5-3) - Body ground Always 10 kΩ or higher
- Result:
Proceed to OK NG
OK
NG