HYBRID / BATTERY CONTROL MOTOR GENERATOR CONTROL SYSTEM P1CB7A2 Motor Generator System Voltage Low
DTC SUMMARY
Malfunction Description
If the auxiliary battery is damaged, the back-up power supply supplies power for a certain time to discharge the high-voltage capacitor inside the inverter with converter assembly. If the back-up power supply function cannot operate for a certain amount of time, this will be judged as a malfunction and the master warning light will be illuminated.
Even if this DTC is stored, the vehicle can still be driven normally. Although the master warning light will be illuminated, a fail-safe function will not operate.
DESCRIPTION
| DTC No. | Detection Item | DTC Detection Condition | Trouble Area | MIL | Warning Indicate |
|---|---|---|---|---|---|
| P1CB7A2 | Motor Generator System Voltage Low | After the power supply to the IGCT relay is cut (the MG ECU is not operating), both of the following conditions are met for less than 3.5 seconds:
·
The terminal IGCT voltage is less than 1.4 V. ·
+B power supply voltage is more than 6.3 V (2 trip detection logic) |
·
Wire harness or connector ·
PCU BUB/PCU RR fuse ·
IGCT relay ·
Inverter battery ·
Inverter with converter assembly |
Does not come on | Master Warning Light:
Comes on |
| DTC No. | Data List |
|---|---|
| P1CB7A2 | ·
Battery Voltage ·
IGCT Voltage |
CONFIRMATION DRIVING PATTERN
- HINT:
-
After repair has been completed, clear the DTC and then check that the vehicle has returned to normal by performing the following All Readiness check procedure.
-
Click hereEngine / Hybrid System>HYBRID / BATTERY CONTROL>MOTOR GENERATOR CONTROL SYSTEM>UTILITY
Connect the GTS to the DLC3.
Turn the power switch on (IG) and turn the GTS on.
Clear the DTCs (even if no DTCs are stored, perform the clear DTC procedure).
Turn the power switch off and wait for2 minutes or more.
Turn the power switch on (IG) and turn the GTS on.
Turn the power switch on (READY) and wait for 2 minutes or more.
Turn the power switch off and wait for 2 minutes or more.
Turn the power switch on (READY) and wait for 2 minutes or more.
Turn the power switch off and wait for 2 minutes or more.
Turn the power switch on (READY) and wait for 2 minutes or more.
Enter the following menus: Powertrain / Motor Generator / Utility / All Readiness.
Check the DTC judgment result.
- HINT:
- ·
If the judgment result shows NORMAL, the system is normal.
·If the judgment result shows ABNORMAL, the system has a malfunction.
·If the judgment result shows INCOMPLETE or N/A, perform driving pattern again.
WIRING DIAGRAM
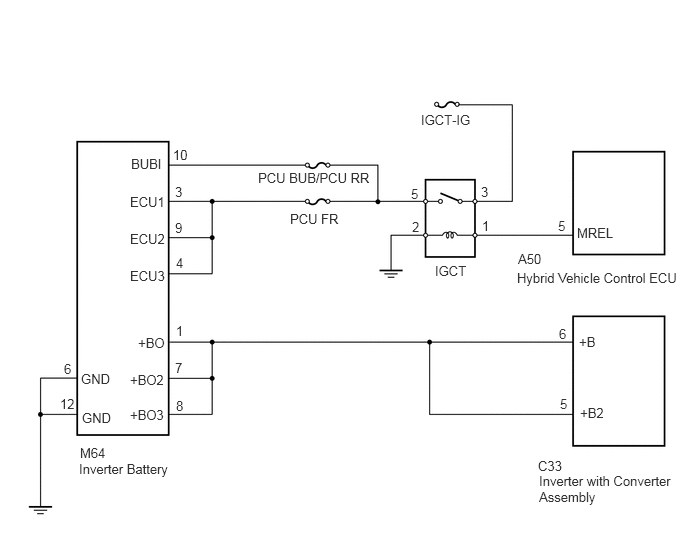
CAUTION / NOTICE / HINT
- HINT:
-
After the power switch is turned off, even if the cable is disconnected from the negative (-) auxiliary battery terminal, voltage will continue to be supplied to terminal +B and terminal +B2 of the inverter with converter assembly by the inverter battery (backup power supply) for approximately 2 minutes.
PROCEDURE
Connect the GTS to the DLC3.
Turn the power switch on (IG).
Enter the following menus: Powertrain / Hybrid Control and Motor Generator / Trouble Codes.
Check for DTCs.
- Powertrain > Hybrid Control > Trouble Codes
- 50001 397
- Powertrain > Motor Generator > Trouble Codes
- 50001 395
- Result:
Result Proceed to P1CB7A2 only is output, or DTCs except the ones in the table below are also output. A DTCs of hybrid control system in the table below are output. B DTCs of motor generator control system in the table below are output. C
| Malfunction Content | System | Relevant DTC | |
|---|---|---|---|
| Microcomputer malfunction | Motor generator control system | P0A1B1F | Generator Control Module Circuit Intermittent |
| P1C2B1C | Drive Motor "A" Control Module A/D Converter Circuit Voltage Out of Range | ||
| P1C2B49 | Drive Motor "A" Control Module A/D Converter Circuit Internal Electronic Failure | ||
| P1CB746 | Generator Control Module (EEPRM Backup Power) Calibration / Parameter Memory Failure | ||
| Hybrid control system | P0A1B49 | Drive Motor "A" Control Module Internal Electronic Failure | |
| Power source circuit malfunction | Motor generator control system | P06B01C | Generator Control Module Position Sensor REF Power Source Circuit Voltage Out of Range |
| P06D61C | Generator Control Module Offset Power Circuit Voltage Out of Range | ||
| Communication malfunction | Motor generator control system | P312487 | Lost Communication between Drive Motor "A" and HV ECU Missing Message |
| Hybrid control system | P312387 | Lost Communication with Missing Message | |
| Sensor and actuator circuit malfunction | Hybrid control system | P0A3F16 | Drive Motor "A" Position Sensor Circuit Voltage Below Threshold |
- HINT:
- ·
P1CB7A2 may be output as a result of the malfunction indicated by the DTCs above.
1.The chart above is listed in inspection order of priority.
2.Check DTCs that are output at the same time by following the listed order. (The main cause of the malfunction can be determined without performing unnecessary inspections.)
Turn the power switch off.
A
B
Click hereEngine / Hybrid System>HYBRID / BATTERY CONTROL>HYBRID CONTROL SYSTEM>DIAGNOSTIC TROUBLE CODE CHART
C
Click hereEngine / Hybrid System>HYBRID / BATTERY CONTROL>MOTOR GENERATOR CONTROL SYSTEM>P033500
- Result:
Result Proceed to OK A NG (The connector is not connected securely.) B NG (The terminals are not making secure contact or are deformed, or water or foreign matter exists in the connector.) C
A
B
C
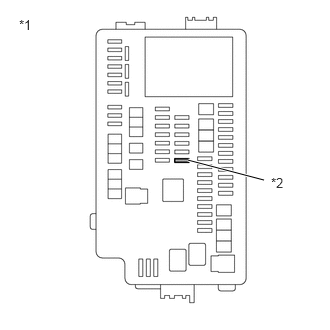
| *1 | No. 1 Engine Room Relay Block and No. 1 Junction Block Assembly |
| *2 | PCU BUB/PCU RR fuse |
Remove the PCU BUB/PCU RR fuse from the No. 1 engine room relay block and No. 1 junction block assembly.
Measure the resistance according to the value(s) in the table below.
- Standard Resistance:
Tester Connection Condition Specified Condition PCU BUB/PCU RR fuse terminal Always Below 1 Ω
Install the PCU BUB/PCU RR fuse.
- Result:
Proceed to OK NG
OK
NG
Connect the GTS to the DLC3.
Turn the power switch on (IG).
Enter the following menus: Powertrain / Motor Generator / Data List / Battery Voltage, IGCT Voltage.
- Powertrain > Motor Generator > Data List
-
Tester Display Battery Voltage IGCT Voltage - 50003 395 53,123
Read the Data List.
- Result:
Result Proceed to The values of Data List items Battery Voltage and IGCT Voltage are almost equal to the auxiliary battery voltage. A Other than above. B
Turn the power switch off.
A
B
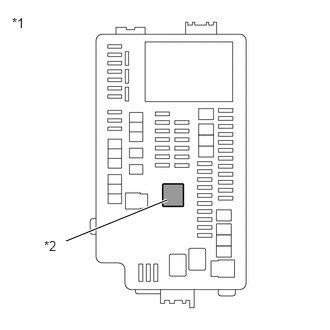
| *1 | No. 1 Engine Room Relay Block and No. 1 Junction Block Assembly |
| *2 | IGCT Relay |
Remove the IGCT relay from the No. 1 engine room relay block and No. 1 junction block assembly.
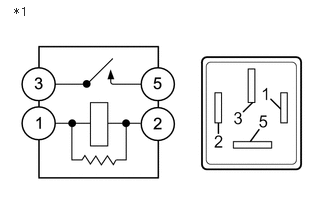
| *1 | IGCT Relay |
Measure the resistance according to the value(s) in the table below.
- Standard Resistance:
Tester Connection Condition Specified Condition 3 - 5 Auxiliary battery voltage is not applied between terminals 1 and 2 10 kΩ or higher Auxiliary battery voltage is applied between terminals 1 and 2 Below 1 Ω
Install the IGCT relay.
- Result:
Proceed to OK NG
OK
NG
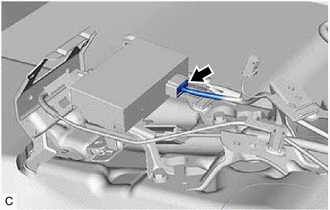
Check the connection condition of the inverter battery connector and the contact pressure of each terminal. Check the terminals for deformation, and check the connector for water ingress and foreign matter.
- OK:
- The connector is connected securely.
- The terminals are not deformed and are connected securely.
- No water or foreign matter in the connector.
- Result:
Result Proceed to OK A NG (The connector is not connected securely.) B NG (The terminals are not making secure contact or are deformed, or water or foreign matter exists in the connector.) C
A
B
C
- CAUTION:
-
Be sure to wear insulated gloves.
Check that the service plug grip is not installed.
- NOTICE:
-
After removing the service plug grip, do not turn the power switch on (READY), unless instructed by the repair manual because this may cause a malfunction.
Disconnect the C33 inverter with converter assembly connector.
Disconnect the M64 inverter battery connector.
Connect the cable to the negative (-) auxiliary battery terminal.
Turn the power switch on (IG).
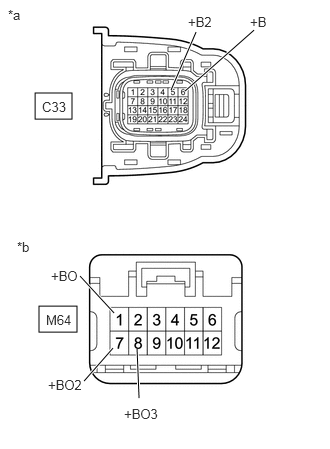
| *a | Front view of wire harness connector
(to Inverter with Converter Assembly) |
| *b | Front view of wire harness connector
(to Inverter Battery) |
Measure the voltage according to the value(s) in the table below.
- Standard Voltage:
Tester Connection Condition Specified Condition M64-1 (+BO) - C33-6 (+B) Power switch on (IG) Below 1 V M64-1 (+BO) - C33-5 (+B2) Power switch on (IG) Below 1 V M64-7 (+BO2) - C33-6 (+B) Power switch on (IG) Below 1 V M64-7 (+BO2) - C33-5 (+B2) Power switch on (IG) Below 1 V M64-8 (+BO3) - C33-6 (+B) Power switch on (IG) Below 1 V M64-8 (+BO3) - C33-5 (+B2) Power switch on (IG) Below 1 V
- NOTICE:
-
Turning the power switch on (IG) with the inverter with converter assembly connector and ECM connectors disconnected causes other DTCs to be stored. Clear the DTCs after performing this inspection.
Turn the power switch off.
Measure the resistance according to the value(s) in the table below.
- Standard Resistance (Check of short):
Tester Connection Condition Specified Condition M64-1 (+BO) - C33-6 (+B) Power switch off Below 1 Ω M64-1 (+BO) - C33-5 (+B2) Power switch off Below 1 Ω M64-7 (+BO2) - C33-6 (+B) Power switch off Below 1 Ω M64-7 (+BO2) - C33-5 (+B2) Power switch off Below 1 Ω M64-8 (+BO3) - C33-6 (+B) Power switch off Below 1 Ω M64-8 (+BO3) - C33-5 (+B2) Power switch off Below 1 Ω
- Standard Resistance (Check for Short):
Tester Connection Condition Specified Condition M64-1 (+BO) or C33-6 (+B) - Body ground and other terminals Power switch off 10 kΩ or higher M64-1 (+BO) or C33-5 (+B2) - Body ground and other terminals Power switch off 10 kΩ or higher M64-7 (+BO2) or C33-6 (+B) - Body ground and other terminals Power switch off 10 kΩ or higher M64-7 (+BO2) or C33-5 (+B2) - Body ground and other terminals Power switch off 10 kΩ or higher M64-8 (+BO3) or C33-6 (+B) - Body ground and other terminals Power switch off 10 kΩ or higher M64-8 (+BO3) or C33-5 (+B2) - Body ground and other terminals Power switch off 10 kΩ or higher
Disconnect the cable from the negative (-) auxiliary battery terminal.
Reconnect the M64 inverter battery connector.
Reconnect the C33 inverter with converter assembly connector.
- Result:
Proceed to OK NG
OK
NG
Check the connection condition of the inverter battery connector and the contact pressure of each terminal. Check the terminals for deformation, and check the connector for water ingress and foreign matter.
- OK:
- The connector is connected securely.
- The terminals are not deformed and are connected securely.
- No water or foreign matter in the connector.
- Result:
Result Proceed to OK A NG (The connector is not connected securely.) B NG (The terminals are not making secure contact or are deformed, or water or foreign matter exists in the connector.) C
A
B
C
Remove the PCU BUB/ PCU RR fuse from the No. 1 engine room relay block and engine room junction block.
Disconnect the M64 inverter battery connector.
Connect the cable to the negative (-) auxiliary battery terminal.
Turn the power switch on (IG).
Measure the voltage according to the value(s) in the table below.
- Standard Voltage:
Tester Connection Condition Specified Condition M64-10 (BUBI) - Body ground Power switch on (IG) Below 1 V
- NOTICE:
-
Turning the power switch on (IG) with the inverter with converter assembly connector and ECM connectors disconnected causes other DTCs to be stored. Clear the DTCs after performing this inspection.
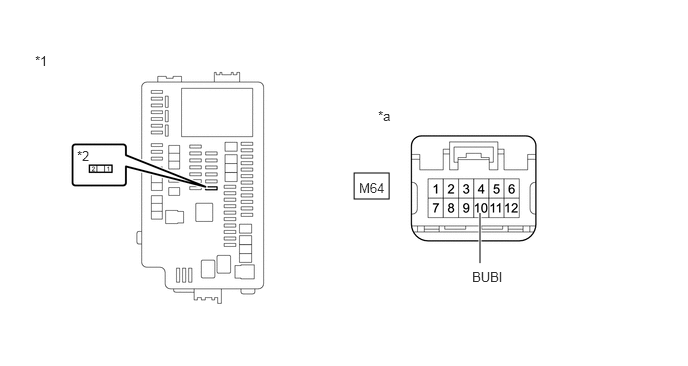
| *1 | No. 1 Engine Room Relay Block and No. 1 Engine room Junction Block Assembly | *2 | PCU BUB/PCU RR Fuse |
| *a | Front view of wire harness connector
(to Inverter Battery) |
- | - |
Turn the power switch off.
Measure the resistance according to the value(s) in the table below.
- Standard Resistance (Check of short):
Tester Connection Condition Specified Condition M64-10 (BUBI) - PCU BUB/PCU RR fuse Power switch off Below 1 Ω
- Standard Resistance (Check for Short):
Tester Connection Condition Specified Condition M64-10 (BUBI) or PCU BUB/PCU RR fuse - Body ground and other terminals Power switch off 10 kΩ or higher
Disconnect the cable from the negative (-) auxiliary battery terminal.
Reconnect the M64 inverter battery connector.
Reinstall the PCU BUB/PCU RR fuse.
- Result:
Proceed to OK NG
OK
NG
Click hereEngine / Hybrid System>HYBRID / BATTERY CONTROL>INVERTER BATTERY>REMOVAL
- Result:
Proceed to NEXT
NEXT
- Result:
Proceed to NEXT
NEXT
- Result:
Proceed to NEXT
NEXT
- Result:
Proceed to NEXT
NEXT