EXTERIOR PANELS / TRIM BACK DOOR OUTSIDE GARNISH REASSEMBLY
CAUTION / NOTICE / HINT
- HINT:
-
When installing the name plates, heat the back door outside garnish and name plates using a heat light.
| Item | Temperature |
|---|---|
·
Back Door Outside Garnish ·
Name Plate |
20 to 30°C (68 to 86°F) |
- CAUTION:
-
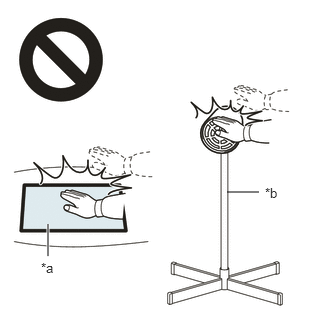 2.365,2 2.698,2 false 0.5,2.333 0.5,2.667 true 0.427,2.708 0.74,2.865 0.313,0.156 10 false *a 2.76,1.927 3.073,2.083 0.313,0.156 10 false *b
*a Heated Part *b Heat Light
- ·
Do not touch the heat light and heated parts, touching the heat light may result in burns.
·Touching heated parts for a long time may result in burns.
- NOTICE:
-
Do not heat the back door outside garnish or name plate excessively.
PROCEDURE

 75403
1.INSTALL BACK DOOR ORNAMENT SUB-ASSEMBLY
75443A
2.INSTALL NO. 3 LUGGAGE COMPARTMENT DOOR PLATE
75441E
3.INSTALL NO. 1 BACK DOOR NAME PLATE
75442
4.INSTALL NO. 2 LUGGAGE COMPARTMENT DOOR NAME PLATE
for HYBRID Plate: Click hereVehicle Exterior>EXTERIOR PANELS / TRIM>NAME PLATE>INSTALLATION
for PRIUS Plate: Click hereVehicle Exterior>EXTERIOR PANELS / TRIM>NAME PLATE>INSTALLATION
76825
5.INSTALL BACK DOOR OUTSIDE GARNISH PROTECTOR
- HINT:
-
When installing the back door outside garnish protector, heat the back door outside garnish using a heat light.
| Item | Temperature |
|---|---|
| Back Door Outside Garnish | 20 to 30°C (68 to 86°F) |
- CAUTION:
-
2.365,2 2.698,2 false 0.5,2.333 0.5,2.667 true 0.427,2.708 0.74,2.865 0.313,0.156 10 false *a 2.76,1.927 3.073,2.083 0.313,0.156 10 false *b
*a Heated Part *b Heat Light
- ·
Do not touch the heat light and heated parts, touching the heat light may result in burns.
·Touching heated parts for a long time may result in burns.
- NOTICE:
-
Do not heat the back door outside garnish excessively.
Clean the back door outside garnish surface.
Using a heat light, heat the back door outside garnish surface.
Remove the double-sided tape from the back door outside garnish.
Wipe off any tape adhesive residue with cleaner.
Using a heat light, heat the back door outside garnish.
Remove the release paper from a new back door outside garnish protector.
- HINT:
-
After removing the release paper, keep the exposed adhesive free from foreign matter.
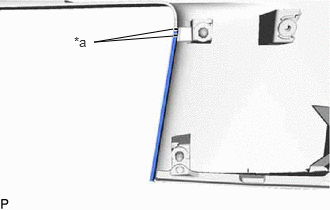
| *a | Line |
Install the back door outside garnish protector as shown in the illustration.
- HINT:
- ·
Make sure to install the back door outside garnish protector so that the ends of the back door outside garnish protector are within the area shown in the illustration.
·Use the same procedure for the RH side and LH side.
76825E
6.INSTALL NO. 2 BACK DOOR OUTSIDE GARNISH PROTECTOR
- HINT:
-
When installing the No. 2 back door outside garnish protector, heat the back door outside garnish using a heat light.
| Item | Temperature |
|---|---|
| Back Door Outside Garnish | 20 to 30°C (68 to 86°F) |
- CAUTION:
-
2.365,2 2.698,2 false 0.5,2.333 0.5,2.667 true 0.427,2.708 0.74,2.865 0.313,0.156 10 false *a 2.76,1.927 3.073,2.083 0.313,0.156 10 false *b
*a Heated Part *b Heat Light
- ·
Do not touch the heat light and heated parts, touching the heat light may result in burns.
·Touching heated parts for a long time may result in burns.
- NOTICE:
-
Do not heat the back door outside garnish excessively.
Clean the back door outside garnish surface.
Using a heat light, heat the back door outside garnish surface.
Remove the double-sided tape from the back door outside garnish.
Wipe off any tape adhesive residue with cleaner.
Using a heat light, heat the back door outside garnish.
Remove the release paper from a new No. 2 back door outside garnish protector.
- HINT:
-
After removing the release paper, keep the exposed adhesive free from foreign matter.
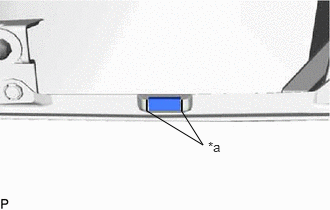
| *a | Line |
Install the No. 2 back door outside garnish protector as shown in the illustration.
- HINT:
- ·
Make sure to install the No. 2 back door outside garnish protector so that the ends of the No. 2 back door outside garnish protector are within the area shown in the illustration.
·Use the same procedure for the RH side and LH side.