Rear Power Window LH does not Operate with Rear Power Window Switch LH
Circuit diagnosis · Vehicles built from Nov 2005
DESCRIPTION
If the rear LH side manual UP / DOWN function does not operate, a malfunction may exist in the power window regulator motor, power window regulator switch, power window regulator master switch or wire harness.WIRING DIAGRAM
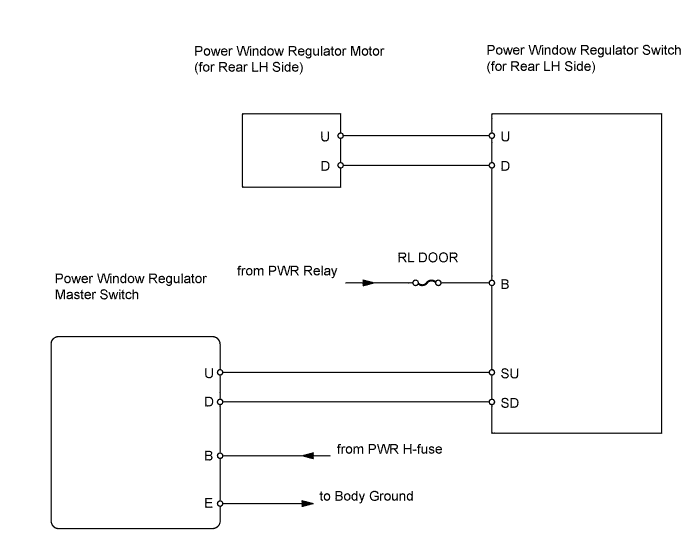

INSPECTION PROCEDURE
| 1. INSPECT FUSE (RL DOOR) |

Remove the RL DOOR fuse from the instrument panel junction block.
Measure the resistance of the fuse.
- Standard resistance:
- Below 1 Ω
|
|
||||

| OK | |
 |
| 2. CHECK POWER WINDOW REGULATOR SWITCH ASSEMBLY (for Rear LH) (POWER SOURCE) |
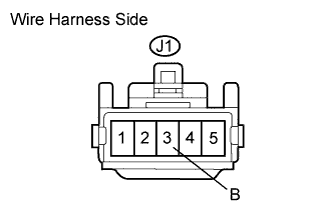 |
Disconnect the J1 switch connector.
Measure the voltage of the wire harness side connector.
- Standard voltage:
Tester Connection
Condition
Specified Condition
J1-3 (B) - Body ground
Ignition switch on (IG)
10 to 14 V
|
|
||||
| OK | |
|
| 3. INSPECT POWER WINDOW REGULATOR SWITCH ASSEMBLY (for Rear LH) |
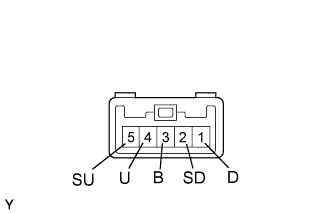 |
Remove the power window regulator switch.
Measure the resistance of the switch when the switch is operated.
- Standard resistance:
Tester Connection
Switch Condition
Specified Condition
1 (D) - 2 (SD)
3 (B) - 4 (U)
UP
Below 1 Ω
4 (U) - 5 (SU)
1 (D) - 2 (SD)
OFF
Below 1 Ω
1 (D) - 3 (B)
4 (U) - 5 (SU)
DOWN
Below 1 Ω
|
|
||||
| OK | |
|
| 4. CHECK WIRE HARNESS (REGULATOR SWITCH - REGULATOR MOTOR) |
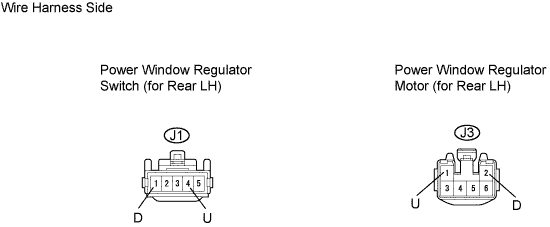
Disconnect the J1 switch connector.
Disconnect the J3 motor connector.
Measure the resistance of the wire harness side connectors.
- Standard resistance:
Tester Connection
Specified Condition
J1-4 (U) - J3-1 (U)
Below 1 Ω
J1-1 (D) - J3-2 (D)
Below 1 Ω
J1-4 (U) or J3-1 (U) - Body ground
10 kΩ or higher
J1-1 (D) or J3-2 (D) - Body ground
10 kΩ or higher
|
|
||||
| OK | |
|
| 5. INSPECT POWER WINDOW REGULATOR MOTOR ASSEMBLY (for Rear LH) |
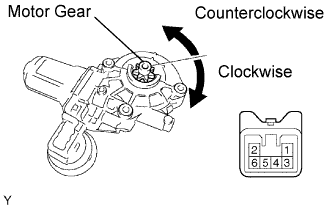 |
Remove the power window regulator motor.
Apply the battery voltage to connector terminals 1 and 2.
Check that the motor gear rotates smoothly as follows.
- OK:
Measurement Condition
Specified Condition
Battery positive (+) → 1
Battery negative (-) → 2
Motor gear rotates clockwise
Battery positive (+) → 2
Battery negative (-) → 1
Motor gear rotates counterclockwise
|
|
||||
| OK | |
|
| 6. CHECK WIRE HARNESS (MASTER SWITCH - REGULATOR SWITCH) |
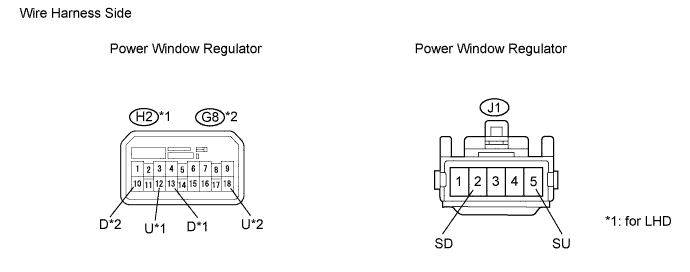
Disconnect the H2*1 or G8*2 switch connector.
Disconnect the J1 switch connector.
Measure the resistance of the wire harness side connectors.
- Standard resistance:
- for LHD:
Tester Connection
Specified Condition
H2-12 (U) - J1-5 (SU)
Below 1 Ω
H2-13 (D) - J1-2 (SD)
Below 1 Ω
H2-12 (U) or J1-5 (SU) - Body ground
10 kΩ or higher
H2-13 (D) or J1-2 (SD) - Body ground
10 kΩ or higher
- for RHD:
Tester Connection
Specified Condition
G8-18 (U) - J1-5 (SU)
Below 1 Ω
G8-10 (D) - J1-2 (SD)
Below 1 Ω
G8-18 (U) or J1-5 (SU) - Body ground
10 kΩ or higher
G8-10 (D) or J1-2 (SD) - Body ground
10 kΩ or higher
|
|
||||
| OK | ||
 |
||
| ||